Call +(254) 703 030 000 / 751 483 999 / 721 704 777
.....Read More
Frequently Asked Questions
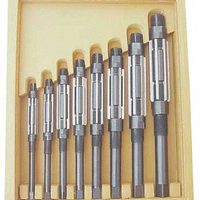
What is a reamer set used for?
A reamer set is used for precision machining to enlarge or finish holes to an exact diameter with a smooth finish. Reamers are cutting tools that refine the size and improve the surface finish of a pre-drilled hole. They are typically used in metalworking, woodworking, and plastic fabrication.
The set usually includes various sizes of reamers, allowing for versatility in different applications. Each reamer in the set is designed to remove a small amount of material, ensuring that the hole is brought to the precise size required. This is crucial in applications where tight tolerances are necessary, such as in the manufacturing of mechanical components, where parts must fit together with high precision.
Reamers can be hand-operated or machine-driven. Hand reamers are used with a wrench or tap handle, while machine reamers are used with drill presses, lathes, or milling machines. The choice between hand and machine reamers depends on the specific requirements of the task, such as the material being worked on and the precision needed.
Reamer sets are essential in industries like automotive, aerospace, and manufacturing, where precision and accuracy are critical. They are also used in maintenance and repair operations to ensure that components fit together correctly after wear or damage. By providing a smooth and accurate finish, reamer sets help in achieving the desired fit and function of mechanical parts, contributing to the overall reliability and performance of the machinery or product.
How do you choose the right size reamer?
To choose the right size reamer, follow these steps:
1. **Determine Hole Size**: Identify the final hole size required for your application. This is the diameter you want after reaming.
2. **Material Consideration**: Consider the material of the workpiece. Different materials may require different reamer types and tolerances.
3. **Pre-Drilled Hole Size**: Ensure the pre-drilled hole is slightly smaller than the final desired size. Typically, the pre-drilled hole should be 0.010 to 0.015 inches smaller than the reamer size for most materials.
4. **Reamer Type**: Choose the appropriate reamer type based on the application:
- **Hand Reamers**: For manual operations, with a slight taper for easy entry.
- **Machine Reamers**: For use with machines, providing precision and efficiency.
- **Chucking Reamers**: For general-purpose machine reaming.
- **Tapered Reamers**: For creating tapered holes.
5. **Tolerance and Finish**: Consider the tolerance and surface finish required. Precision reamers offer tighter tolerances and better finishes.
6. **Reamer Material**: Select the reamer material based on the workpiece material:
- **High-Speed Steel (HSS)**: Suitable for general-purpose reaming.
- **Carbide**: For harder materials and longer tool life.
- **Cobalt**: For tough materials and high-temperature applications.
7. **Reamer Coating**: Choose coatings like TiN or TiCN for enhanced performance and tool life, especially in abrasive materials.
8. **Check Manufacturer Specifications**: Refer to the manufacturer's specifications for the reamer to ensure compatibility with your equipment and application.
9. **Trial and Adjustment**: Conduct a trial run if possible, and adjust based on the results to achieve the desired fit and finish.
By considering these factors, you can select the right size reamer for your specific needs.
What is the difference between a hand reamer and a machine reamer?
A hand reamer and a machine reamer are both tools used to finish or slightly enlarge holes to precise dimensions, but they differ in design, application, and operation.
1. **Design and Construction**:
- **Hand Reamer**: Typically features a longer, tapered lead-in section to facilitate manual alignment and gradual cutting. It often has a square shank to accommodate a wrench for manual turning.
- **Machine Reamer**: Generally has a shorter lead-in and a straight or spiral flute design optimized for use with powered machinery. The shank is usually round or has a Morse taper for secure machine attachment.
2. **Operation**:
- **Hand Reamer**: Operated manually, requiring the user to apply consistent pressure and rotation. It is suitable for small-scale or delicate work where precision and control are paramount.
- **Machine Reamer**: Used with drill presses, lathes, or CNC machines, allowing for faster, more consistent, and efficient reaming. It is ideal for high-volume or industrial applications.
3. **Application**:
- **Hand Reamer**: Best for low-volume tasks, adjustments, or when working with softer materials. It is often used in maintenance, repair, or when precision hand-finishing is required.
- **Machine Reamer**: Suited for high-volume production, harder materials, or when speed and uniformity are critical. It is commonly used in manufacturing and industrial settings.
4. **Precision and Finish**:
- **Hand Reamer**: Offers high precision and control, allowing for fine adjustments and a smooth finish, but is slower and more labor-intensive.
- **Machine Reamer**: Provides consistent results with high precision and a good surface finish, especially in repetitive tasks, but requires proper machine setup and operation.
In summary, the choice between a hand reamer and a machine reamer depends on the specific requirements of the task, including volume, material, precision, and available equipment.
How do you maintain and care for reamer sets?
To maintain and care for reamer sets, follow these steps:
1. **Cleaning**: After each use, clean the reamers thoroughly to remove metal shavings and debris. Use a soft brush or compressed air to clean the flutes and cutting edges.
2. **Lubrication**: Apply a light coat of oil to prevent rust and corrosion. Use a suitable cutting oil or a rust-preventive oil for this purpose.
3. **Storage**: Store reamers in a dry, clean environment. Use protective cases or sleeves to prevent damage to the cutting edges. Ensure they are stored in a way that prevents them from knocking against each other.
4. **Inspection**: Regularly inspect reamers for wear, damage, or dullness. Check for chips or nicks on the cutting edges and flutes. Replace or sharpen reamers as needed.
5. **Sharpening**: If reamers become dull, have them professionally sharpened. Avoid sharpening them yourself unless you have the proper equipment and expertise, as improper sharpening can damage the tool.
6. **Handling**: Handle reamers with care to avoid dropping or striking them against hard surfaces, which can cause damage.
7. **Usage**: Use the correct reamer for the material and application. Ensure the reamer is properly aligned with the hole to prevent uneven wear or breakage.
8. **Coolant**: Use appropriate coolant during reaming operations to reduce heat and friction, which can extend the life of the reamer.
9. **Documentation**: Keep a log of usage and maintenance activities to track the condition and performance of each reamer.
By following these steps, you can extend the life of your reamer sets and ensure they perform effectively.
What materials can reamers be used on?
Reamers are versatile cutting tools used to refine and enlarge holes to precise dimensions and smooth finishes. They can be used on a variety of materials, including:
1. **Metals**:
- **Steel**: Reamers are commonly used on various types of steel, including carbon steel, alloy steel, and stainless steel.
- **Aluminum**: Due to its softness, aluminum is easily reamed to achieve smooth finishes.
- **Brass and Bronze**: These non-ferrous metals are often reamed for applications requiring precise hole dimensions.
- **Cast Iron**: Reamers can be used on cast iron, though care must be taken due to its brittle nature.
- **Copper**: Reaming is effective on copper, especially in plumbing and electrical applications.
- **Titanium**: Specialized reamers are used for this tough, lightweight metal.
2. **Plastics**:
- Reamers can be used on various plastics, including acrylic, polycarbonate, and PVC, to achieve smooth and accurate holes.
3. **Wood**:
- In woodworking, reamers are used to enlarge and smooth holes in different types of wood, including hardwoods and softwoods.
4. **Composites**:
- Reamers can be used on composite materials, such as fiberglass and carbon fiber, though specialized tools may be required to prevent delamination.
5. **Ceramics and Glass**:
- With appropriate coatings and designs, reamers can be used on ceramics and glass, though these materials require careful handling due to their brittleness.
Reamers are available in various designs and materials, such as high-speed steel (HSS), carbide, and cobalt, to suit different applications and material types. Proper selection of reamer type and material is crucial for achieving the desired results on specific workpieces.
How do you properly use a reamer?
To properly use a reamer, follow these steps:
1. **Select the Right Reamer**: Choose a reamer that matches the desired hole size and material. Ensure it is sharp and in good condition.
2. **Prepare the Workpiece**: Secure the workpiece firmly in a vise or fixture to prevent movement. Ensure the hole to be reamed is pre-drilled slightly smaller than the reamer's size.
3. **Align the Reamer**: Align the reamer with the hole to ensure it enters straight. Misalignment can cause uneven reaming and damage the tool or workpiece.
4. **Lubricate**: Apply appropriate cutting fluid or lubricant to the reamer and the hole to reduce friction and heat, improving the finish and extending tool life.
5. **Use the Right Speed**: Set the machine to the correct speed. Reaming requires slower speeds than drilling to achieve a smooth finish.
6. **Feed the Reamer**: Gently feed the reamer into the hole using steady, even pressure. Avoid forcing it, as this can cause chatter or breakage.
7. **Maintain Consistent Pressure**: Keep consistent pressure throughout the process. Do not stop midway, as this can leave marks or an uneven finish.
8. **Reverse and Remove**: Once the reamer has passed through the hole, reverse the machine to back the reamer out. Do not pull it out while rotating forward, as this can damage the hole.
9. **Clean and Inspect**: After reaming, clean the hole and inspect it for size and finish. Use a micrometer or gauge to ensure accuracy.
10. **Care for the Reamer**: Clean the reamer after use and store it properly to maintain its condition for future use.
What are the benefits of using a reamer set over individual reamers?
Using a reamer set over individual reamers offers several benefits:
1. **Versatility**: A reamer set provides a range of sizes, allowing for greater flexibility in handling various hole diameters without needing to purchase multiple individual reamers.
2. **Cost-Effectiveness**: Buying a set is often more economical than purchasing each reamer separately, especially when multiple sizes are needed for different projects.
3. **Convenience**: Having a complete set ensures that the right size is always available, reducing downtime and the need to source additional tools mid-project.
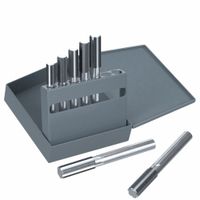
4. **Storage and Organization**: Reamer sets typically come in a case or holder, keeping tools organized and protected, which prolongs their lifespan and makes them easier to transport.
5. **Consistency**: Using a set ensures uniformity in tool quality and performance, as all reamers are from the same manufacturer and batch, reducing variability in results.
6. **Efficiency**: With a set, users can quickly switch between sizes as needed, improving workflow and productivity.
7. **Preparedness**: A set prepares users for unexpected requirements, such as needing to adjust hole sizes on the fly, without the need for additional purchases.
8. **Professionalism**: Having a complete set reflects a professional approach, ensuring readiness for any task and enhancing credibility with clients or employers.
9. **Space-Saving**: A set takes up less space than storing multiple individual reamers, which is beneficial in workshops with limited storage.
10. **Skill Development**: For beginners, a set provides an opportunity to learn and practice with different sizes, enhancing skill and confidence in using reamers effectively.