Call +(254) 703 030 000 / 751 483 999 / 721 704 777
.....Read More
Frequently Asked Questions
What is the best desoldering tool for beginners?
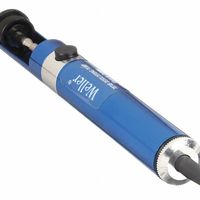
The best desoldering tool for beginners is typically a desoldering pump, also known as a solder sucker. It is affordable, easy to use, and effective for most basic desoldering tasks. A desoldering pump is a manual tool that creates a vacuum to suck up molten solder from a joint, making it ideal for beginners who are learning to remove components from a circuit board.
For those who prefer a more integrated solution, a desoldering iron with a built-in vacuum pump can be a good choice. These tools combine a heated tip to melt the solder and a vacuum mechanism to remove it, offering more precision and efficiency. However, they are generally more expensive than a simple solder sucker.
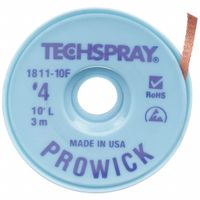
Another option is desoldering braid or wick, which is a copper braid that absorbs molten solder when heated with a soldering iron. It is particularly useful for cleaning up solder residue and is a good complement to a solder sucker.
For beginners, a combination of a desoldering pump and desoldering braid is often recommended. This combination provides versatility and allows for effective removal of solder in various situations. Additionally, these tools are widely available and come with a low learning curve, making them suitable for those new to electronics work.
Ultimately, the best desoldering tool for a beginner depends on their specific needs, budget, and the types of projects they plan to undertake. Starting with a basic desoldering pump and braid is a practical approach, allowing beginners to gain experience and decide if they need more advanced tools in the future.
How do you use a desoldering pump effectively?
To use a desoldering pump effectively, follow these steps:
1. **Preparation**: Ensure the device is unplugged and cooled down. Gather necessary tools: a soldering iron, desoldering pump, and possibly a soldering stand.
2. **Heating the Solder**: Turn on the soldering iron and allow it to reach the appropriate temperature. Place the tip of the soldering iron on the solder joint you wish to remove. Heat the solder until it becomes molten. This usually takes a few seconds, depending on the soldering iron's power and the size of the joint.
3. **Positioning the Pump**: Hold the desoldering pump in your dominant hand. Once the solder is molten, quickly position the nozzle of the pump directly over the liquid solder. Ensure the pump is close enough to create a good seal but not touching the soldering iron.
4. **Activating the Pump**: With the pump in position, press the release button or trigger to activate the suction. This will draw the molten solder into the pump. It’s crucial to perform this step swiftly to prevent the solder from solidifying.
5. **Cleaning the Pump**: After use, clean the pump by ejecting the collected solder. This is typically done by pressing the plunger and allowing the solder to fall out. Regular cleaning ensures the pump remains effective.
6. **Repeat if Necessary**: If all the solder wasn’t removed in one attempt, reheat the joint and repeat the process. Multiple attempts may be needed for larger joints.
7. **Final Inspection**: Once the solder is removed, inspect the joint to ensure all solder is cleared. This is crucial for successful component removal or replacement.
By following these steps, you can effectively use a desoldering pump to remove solder from electronic components.
What is the difference between desoldering braid and desoldering pump?
Desoldering braid and desoldering pump are both tools used to remove solder from electronic components, but they operate differently and are suited for different tasks.
Desoldering Braid:
- Also known as solder wick, it is a fine copper wire mesh coated with flux.
- It works by capillary action, where the braid is placed over the solder joint and heated with a soldering iron. The solder melts and is absorbed into the braid.
- It is ideal for removing small amounts of solder or cleaning up excess solder from a joint.
- It provides precision and is effective for delicate work, such as on small components or densely packed circuit boards.
- It is disposable; once saturated with solder, it must be cut off and discarded.
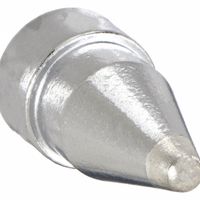
Desoldering Pump:
- Also known as a solder sucker, it is a mechanical device with a spring-loaded plunger.
- It works by heating the solder joint with a soldering iron, then quickly placing the pump's nozzle over the molten solder and releasing the plunger to create a vacuum that sucks up the solder.
- It is suitable for removing larger amounts of solder, such as when desoldering through-hole components.
- It is reusable and requires occasional cleaning to maintain effectiveness.
- It is less precise than braid and may not be suitable for very small or delicate components.
In summary, desoldering braid is best for precision work and small-scale solder removal, while a desoldering pump is more efficient for larger solder joints and bulk removal.
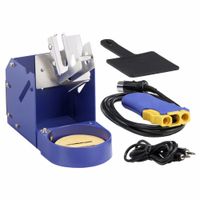
How do you maintain and clean desoldering equipment?
To maintain and clean desoldering equipment, follow these steps:
1. **Regular Inspection**: Frequently check the equipment for wear and tear. Look for damaged parts, especially the nozzle and heating elements.
2. **Cleaning the Nozzle**: After each use, clean the nozzle to prevent clogging. Use a cleaning pin or brush to remove solder residues. For stubborn clogs, heat the nozzle and use a brass wire brush.
3. **Filter Replacement**: Replace filters regularly to ensure efficient suction. Check the manufacturer’s guidelines for the recommended replacement schedule.
4. **Suction Maintenance**: Ensure the vacuum pump is functioning properly. Clean or replace the pump’s filter and check for leaks in the tubing.
5. **Heating Element Care**: Avoid overheating the element. Turn off the equipment when not in use to prolong its life. If the element is damaged, replace it according to the manufacturer’s instructions.
6. **Cleaning the Chamber**: Disassemble the collection chamber and clean it with isopropyl alcohol to remove solder and flux residues. Ensure it is completely dry before reassembly.
7. **Calibration**: Periodically calibrate the temperature settings to ensure accurate operation. Use a thermocouple to verify the temperature.
8. **Storage**: Store the equipment in a clean, dry place. Use protective covers to prevent dust accumulation.
9. **Lubrication**: If applicable, lubricate moving parts as per the manufacturer’s recommendations to ensure smooth operation.
10. **User Manual**: Always refer to the user manual for specific maintenance instructions and safety precautions.
By following these steps, you can ensure the longevity and efficiency of your desoldering equipment.
What are the safety precautions when using desoldering tools?
When using desoldering tools, several safety precautions should be observed to ensure both personal safety and the integrity of the electronic components:
1. **Personal Protective Equipment (PPE):** Wear safety goggles to protect your eyes from molten solder splashes. Use heat-resistant gloves to prevent burns from hot tools and components.
2. **Ventilation:** Ensure adequate ventilation in the workspace to avoid inhaling fumes from solder and flux. Use a fume extractor or work in a well-ventilated area.
3. **Tool Inspection:** Regularly inspect desoldering tools for damage or wear. Ensure that the tips are clean and in good condition to prevent accidents and ensure effective desoldering.
4. **Temperature Control:** Use tools with adjustable temperature settings to prevent overheating, which can damage components and create safety hazards. Set the temperature to the minimum required for effective desoldering.
5. **Proper Handling:** Handle tools with care, keeping fingers away from hot surfaces. Always place hot tools on a heat-resistant mat or stand when not in use.
6. **Electrical Safety:** Ensure that all electrical equipment is properly grounded. Disconnect tools from power sources when not in use or when changing tips.
7. **Component Safety:** Be cautious not to apply excessive force or heat to components, which can cause damage. Use appropriate tools and techniques for the specific components being desoldered.
8. **Fire Safety:** Keep flammable materials away from the work area. Have a fire extinguisher nearby in case of emergencies.
9. **Training:** Ensure that you are adequately trained in using desoldering tools and understand the specific requirements and risks associated with the equipment.
10. **Clean Workspace:** Maintain a tidy workspace to prevent accidents. Keep tools organized and ensure that the work area is free from clutter.
By adhering to these precautions, you can safely and effectively use desoldering tools while minimizing risks to yourself and the components you are working with.
How do you choose the right desoldering tool for your needs?
Choosing the right desoldering tool depends on several factors, including the type of work you are doing, the components involved, and your budget. Here’s a concise guide:
1. **Type of Work**:
- For occasional repairs or hobby projects, a simple desoldering pump (solder sucker) or desoldering braid (wick) may suffice. These are cost-effective and easy to use for small jobs.
- For professional or frequent use, consider an electric desoldering gun or station, which offers precision and efficiency for larger or more complex tasks.
2. **Component Size and Density**:
- For small, delicate components or densely packed circuit boards, a desoldering station with adjustable temperature control is ideal. It allows for precise heat application, reducing the risk of damage.
- For larger components or through-hole solder joints, a manual pump or braid can be effective, but ensure the tool can handle the solder volume.
3. **Budget**:
- Manual tools like pumps and braids are inexpensive and suitable for light, infrequent use.
- Electric desoldering guns and stations are more expensive but offer better performance and are worth the investment for regular use.
4. **Skill Level**:
- Beginners may prefer simpler tools like pumps or braids, which require less technical skill.
- Experienced users might benefit from the advanced features of electric desoldering stations, such as vacuum pumps and temperature control.
5. **Portability**:
- If you need to work in different locations, consider portable options like battery-operated desoldering guns.
6. **Maintenance and Durability**:
- Consider tools with replaceable tips and easy maintenance for long-term use.
By evaluating these factors, you can select a desoldering tool that matches your specific needs and ensures efficient and safe desoldering.
What are common problems and solutions when using desoldering equipment?
Common problems when using desoldering equipment include:
1. **Clogged Nozzle**: The nozzle can become clogged with solder, reducing efficiency.
- **Solution**: Regularly clean the nozzle with a cleaning pin or use a nozzle cleaner to prevent blockages.
2. **Insufficient Heat**: The equipment may not reach the necessary temperature to melt solder effectively.
- **Solution**: Ensure the equipment is set to the correct temperature and allow adequate time for preheating. Check for any calibration issues.
3. **Damaged Pads/Traces**: Excessive heat or force can damage PCB pads or traces.
- **Solution**: Use the correct temperature settings and apply minimal force. Practice proper technique to avoid prolonged heat exposure.
4. **Poor Suction**: Weak suction can leave solder behind, making desoldering ineffective.
- **Solution**: Check for leaks in the vacuum system, ensure the pump is functioning properly, and replace any worn-out parts.
5. **Tip Wear**: Desoldering tips can wear out, leading to poor heat transfer.
- **Solution**: Regularly inspect and replace tips as needed. Use high-quality tips to ensure longevity.
6. **Solder Splash**: Solder can splash onto other components, causing shorts.
- **Solution**: Use a solder wick or desoldering braid to control solder removal and protect surrounding areas with heat-resistant tape.
7. **Equipment Malfunction**: Desoldering tools can malfunction due to wear and tear.
- **Solution**: Perform regular maintenance checks, replace faulty components, and follow the manufacturer's guidelines for use and care.
8. **Operator Fatigue**: Long sessions can lead to fatigue, affecting precision.
- **Solution**: Take regular breaks and ensure a comfortable working environment to maintain focus and accuracy.