Call +(254) 703 030 000 / 751 483 999 / 721 704 777
.....Read More
Frequently Asked Questions
What is the difference between a vise and an anvil?
A vise and an anvil are both tools used in metalworking and woodworking, but they serve different purposes and have distinct characteristics.
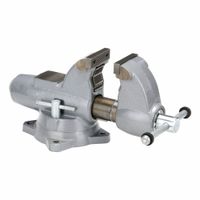
A vise is a mechanical device used to hold an object securely in place while work is being performed on it. It typically consists of two parallel jaws, one fixed and the other movable, which are brought together by a screw mechanism. Vises are commonly mounted on workbenches and are used for tasks that require precision and stability, such as sawing, drilling, filing, or sanding. They come in various types, including bench vises, pipe vises, and machine vises, each designed for specific applications. The primary function of a vise is to provide a stable grip on the workpiece, allowing the user to work with both hands free.
An anvil, on the other hand, is a heavy, solid block of metal with a flat top surface and often a horn or rounded projection. It is primarily used in blacksmithing and metalworking to shape and forge metal. The flat surface is used for hammering and shaping metal, while the horn is used for bending and forming curves. Anvils are typically made of cast iron or steel and are designed to withstand heavy impacts. They provide a hard surface against which metal can be worked, allowing for the shaping, flattening, and cutting of metal pieces. Unlike a vise, an anvil does not hold the workpiece in place; instead, it provides a surface to work against.
In summary, a vise is used to hold objects securely for precision work, while an anvil provides a robust surface for shaping and forging metal.
How do you properly mount a vise to a workbench?
1. **Select Location**: Choose a corner of the workbench for the vise, ensuring it doesn't interfere with other tools or workspace. The vise should be positioned so that the fixed jaw is flush with the edge of the bench.
2. **Mark Holes**: Place the vise on the workbench in the desired position. Use a pencil to mark the locations of the mounting holes on the bench through the base of the vise.
3. **Drill Holes**: Use a drill with a bit slightly larger than the diameter of the mounting bolts to drill holes through the workbench at the marked locations.
4. **Select Bolts**: Choose bolts that are long enough to pass through the vise base and the workbench, with enough length to accommodate washers and nuts. Typically, 3/8-inch or 1/2-inch diameter bolts are used.
5. **Install Bolts**: Insert the bolts through the holes in the vise base and the workbench. Place a washer on the underside of the workbench for each bolt to distribute the load.
6. **Secure with Nuts**: Thread a nut onto each bolt and tighten with a wrench. Ensure the vise is securely fastened and does not wobble.
7. **Check Alignment**: Ensure the vise jaws are parallel to the workbench edge and adjust if necessary before fully tightening the nuts.
8. **Test Stability**: Open and close the vise to ensure smooth operation and check for any movement. Tighten bolts further if needed.
9. **Optional Reinforcement**: For added stability, consider adding a wooden or metal plate between the vise and workbench, or use lag screws if the bench is made of wood.
10. **Final Inspection**: Ensure all components are secure and the vise operates correctly.
What are the best materials for vise jaw caps?
The best materials for vise jaw caps depend on the specific application and the type of work being performed. Here are some commonly used materials:
1. **Aluminum**: Lightweight and durable, aluminum jaw caps are ideal for general-purpose use. They provide a good balance between strength and softness, preventing damage to delicate workpieces while offering sufficient grip.
2. **Copper**: Known for its excellent thermal and electrical conductivity, copper jaw caps are suitable for applications involving electrical components or heat-sensitive materials. They are soft enough to prevent marring but durable enough for repeated use.
3. **Rubber**: Rubber jaw caps are perfect for holding delicate or finished surfaces without causing scratches or dents. They provide excellent grip and cushioning, making them ideal for woodworking or holding fragile items.
4. **Leather**: Leather jaw caps offer a soft, non-abrasive surface that is gentle on delicate materials. They are often used in applications where surface finish is critical, such as in jewelry making or when working with polished metals.
5. **Nylon**: Nylon jaw caps are durable and resistant to chemicals and abrasion. They are suitable for holding softer materials and provide a non-marring surface, making them ideal for use in automotive or aerospace applications.
6. **Polyurethane**: Known for its flexibility and resilience, polyurethane jaw caps offer excellent grip and cushioning. They are suitable for holding irregularly shaped objects and are often used in applications requiring a high degree of surface protection.
7. **Wood**: Wooden jaw caps are traditional and provide a soft, non-marring surface. They are often used in woodworking and other applications where preserving the workpiece's surface is essential.
Selecting the right material for vise jaw caps depends on the specific requirements of the task, including the material of the workpiece, the need for surface protection, and the type of grip required.
How do you maintain and care for an anvil?
To maintain and care for an anvil, follow these steps:
1. **Location and Setup**: Place the anvil on a sturdy, level surface, ideally on a wooden block or stand to absorb shock and reduce noise. Ensure it's securely fastened to prevent movement during use.
2. **Cleaning**: Regularly clean the anvil to remove debris, rust, and scale. Use a wire brush or a scraper for surface cleaning. For stubborn rust, apply a rust remover or use a vinegar soak, followed by scrubbing.
3. **Surface Maintenance**: Keep the face of the anvil smooth. If it develops nicks or dents, use a file or a grinder to smooth them out. Avoid grinding too much to preserve the anvil's hardness and flatness.
4. **Rust Prevention**: After cleaning, apply a thin coat of oil (such as linseed or machine oil) to the anvil to prevent rust. Reapply regularly, especially in humid environments.
5. **Avoid Damage**: Use the anvil properly to avoid damage. Do not strike the anvil directly with a hammer; always have workpieces between the hammer and the anvil. Avoid using the edges for heavy work to prevent chipping.
6. **Inspect Regularly**: Check for cracks or significant wear. If you find any, consult a professional for repair or replacement advice.
7. **Storage**: If not in use for extended periods, cover the anvil with a tarp or cloth to protect it from dust and moisture. Store in a dry place to minimize rust risk.
8. **Use Proper Tools**: Use appropriate hammers and tools to prevent unnecessary wear. Avoid using hardened steel tools directly on the anvil's face.
By following these steps, you can ensure your anvil remains in good condition, providing reliable service for years.
What are the different types of vises available?
There are several types of vises, each designed for specific tasks and materials:
1. **Bench Vise**: Commonly used in workshops, it is mounted on workbenches and holds workpieces securely for sawing, drilling, or filing. It typically has a swivel base for versatility.
2. **Pipe Vise**: Specifically designed to hold pipes and tubes, it features a V-shaped jaw to grip round objects securely. It is essential in plumbing and metalworking.
3. **Woodworking Vise**: Attached to woodworking benches, it has large wooden jaws to prevent damage to wood surfaces. It is used for planing, sawing, and sanding.
4. **Machine Vise**: Used on milling machines and drill presses, it holds metal workpieces in place. It is precise and often features a quick-release mechanism.
5. **Vacuum Vise**: Portable and versatile, it uses a suction base to attach to smooth surfaces. It is ideal for light-duty tasks and small workpieces.
6. **Clamp-On Vise**: Easily attached to any table or bench edge, it is portable and suitable for light to medium tasks.
7. **Cross-Slide Vise**: Allows movement along the X and Y axes, making it ideal for precise positioning in milling and drilling operations.
8. **Leg Vise**: Traditional in blacksmithing, it has a long leg that reaches the floor for added stability. It is robust and suitable for heavy-duty tasks.
9. **Handheld Vise**: Small and portable, it is used for delicate tasks like jewelry making or electronics.
10. **Pin Vise**: A small tool used to hold tiny drill bits or wires, often used in model making and precision work.
11. **Angle Vise**: Allows the workpiece to be held at an angle, useful for complex machining tasks.
Each type of vise is designed to provide stability and precision for specific applications, enhancing efficiency and safety in various tasks.
How do you choose the right size anvil for blacksmithing?
To choose the right size anvil for blacksmithing, consider the following factors:
1. **Purpose and Type of Work**: Determine the type of projects you will be working on. For small, detailed work, a lighter anvil (50-100 lbs) is sufficient. For larger projects, such as forging tools or large sculptures, a heavier anvil (100-200 lbs or more) is preferable.
2. **Portability**: If you need to move your anvil frequently, a lighter anvil is more practical. However, if it will remain stationary, a heavier anvil is more stable and effective.
3. **Space and Setup**: Consider the space available in your workshop. Ensure the anvil size fits comfortably within your workspace and is compatible with your forge setup.
4. **Budget**: Larger anvils are generally more expensive. Balance your budget with your needs, keeping in mind that a good quality anvil is a long-term investment.
5. **Anvil to Hammer Ratio**: A common guideline is that the anvil should be at least 50 times the weight of the hammer you use. This ensures efficient energy transfer and reduces rebound.
6. **Material and Quality**: Choose an anvil made from high-quality steel for durability and performance. Avoid cast iron anvils as they are less durable and absorb more energy.
7. **Personal Preference**: Some blacksmiths prefer a specific anvil size based on personal comfort and experience. Test different sizes if possible to find what feels right for you.
8. **Availability**: Sometimes, the size of the anvil you choose may be influenced by what is available in your area or from suppliers.
By considering these factors, you can select an anvil size that best suits your blacksmithing needs and preferences.
What safety precautions should be taken when using a vise or anvil?
When using a vise or anvil, several safety precautions should be observed to ensure a safe working environment:
1. **Proper Installation**: Ensure the vise or anvil is securely mounted to a stable workbench or stand. The mounting surface should be strong enough to withstand the forces applied during use.
2. **Inspection**: Regularly inspect the vise or anvil for any signs of damage, such as cracks or wear. Replace or repair any damaged equipment before use.
3. **Personal Protective Equipment (PPE)**: Wear appropriate PPE, including safety goggles to protect your eyes from flying debris, gloves to protect your hands from sharp edges, and steel-toed boots to protect your feet from heavy objects.
4. **Work Area**: Keep the work area clean and free of clutter. Ensure there is adequate lighting to clearly see the workpiece and tools.
5. **Correct Usage**: Use the vise or anvil for its intended purpose. Do not use a vise as a press or an anvil as a hammering surface for inappropriate materials.
6. **Securing Workpieces**: Ensure workpieces are securely clamped in the vise or properly positioned on the anvil to prevent movement during work. Do not over-tighten the vise, as this can damage both the vise and the workpiece.
7. **Tool Handling**: Use the correct tools for the job and ensure they are in good condition. Avoid using damaged or makeshift tools.
8. **Body Positioning**: Maintain a balanced stance and keep your body clear of the path of tools and materials. Avoid leaning over the workpiece.
9. **Awareness**: Be aware of your surroundings and ensure others are at a safe distance from your work area.
10. **Training**: Ensure you are trained in the proper use of a vise or anvil and understand the potential hazards associated with their use.