Call +(254) 703 030 000 / 751 483 999 / 721 704 777
.....Read More


Frequently Asked Questions
What are the essential hand tools for electricians?
Essential hand tools for electricians include:
1. **Screwdrivers**: A set of insulated screwdrivers with various head types (flathead, Phillips) is crucial for working on electrical panels and outlets.
2. **Pliers**: Needle-nose pliers for precision work, lineman's pliers for cutting and twisting wires, and diagonal cutting pliers for cutting wire.
3. **Wire Strippers**: Used to strip the insulation from electrical wires without damaging the conductor.
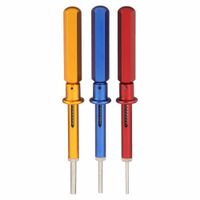
4. **Voltage Tester**: A non-contact voltage tester to safely check for the presence of voltage in wires and outlets.
5. **Multimeter**: A digital multimeter for measuring voltage, current, and resistance, essential for troubleshooting electrical issues.
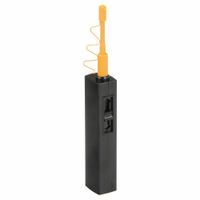
6. **Fish Tape**: Used to pull wire through walls, conduits, and other hard-to-reach spaces.
7. **Tape Measure**: For measuring distances and ensuring proper placement of electrical components.
8. **Level**: Ensures that installations like outlets and switches are straight and level.
9. **Utility Knife**: For cutting insulation, electrical tape, and other materials.
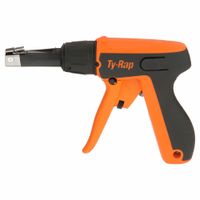
10. **Cable Ties**: Used to organize and secure wires and cables.
11. **Hammer**: For driving nails and securing electrical boxes.
12. **Flashlight or Headlamp**: Provides illumination in dark or dimly lit work areas.
13. **Tool Belt or Pouch**: Keeps tools organized and easily accessible while working.
14. **Conduit Bender**: For bending conduit to fit around obstacles and ensure proper alignment.
15. **Crimping Tool**: Used for attaching connectors to wires.
These tools are fundamental for performing electrical work safely and efficiently, allowing electricians to install, maintain, and repair electrical systems.
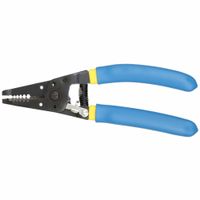
How do you use a wire stripper correctly?
To use a wire stripper correctly, follow these steps:
1. **Select the Right Tool**: Choose a wire stripper that matches the gauge of the wire you are working with. Most wire strippers have multiple notches for different wire sizes.
2. **Prepare the Wire**: Ensure the wire is clean and straight. If it’s part of a cable, separate the wire you need to strip.
3. **Measure the Strip Length**: Determine how much insulation you need to remove. This is usually about 1/2 to 3/4 inch, but it depends on your specific application.
4. **Position the Wire**: Insert the wire into the correct notch on the wire stripper. The notch should match the wire gauge to avoid cutting the wire strands.
5. **Grip the Wire**: Squeeze the handles of the wire stripper gently to close the jaws around the wire. Ensure the cutting edge is only on the insulation, not the wire itself.
6. **Strip the Insulation**: With the jaws closed, rotate the stripper slightly to break the insulation. Then, pull the stripper towards the end of the wire to remove the insulation cleanly.
7. **Inspect the Wire**: Check the exposed wire for any nicks or damage. If the wire strands are cut or damaged, trim the wire and strip it again.
8. **Repeat if Necessary**: If you need to strip multiple wires, repeat the process for each one.
9. **Safety Precautions**: Always ensure the wire is not live before stripping. Wear safety glasses to protect your eyes from flying debris.
By following these steps, you can strip wires efficiently and safely, ensuring a clean and undamaged wire for your electrical projects.
What is the difference between a cable slitter and a wire stripper?
A cable slitter and a wire stripper are both tools used in electrical work, but they serve different purposes and are designed for different tasks.
A cable slitter is specifically designed to cut through the outer insulation or jacket of a cable without damaging the internal wires. It is typically used for larger cables, such as coaxial cables, network cables, or multi-conductor cables. The tool often features an adjustable blade that can be set to the thickness of the cable's outer jacket, allowing for precise cuts. Cable slitters are essential for preparing cables for termination or splicing, ensuring that the internal conductors remain intact and undamaged.
On the other hand, a wire stripper is used to remove the insulation from individual wires, exposing the metal conductor underneath. Wire strippers are generally used for smaller, single-conductor wires. They come in various designs, including manual and automatic versions, and often have multiple notches or holes to accommodate different wire gauges. The tool grips the wire, cuts through the insulation, and pulls it away, leaving the conductor exposed for connections or soldering.
In summary, the primary difference lies in their applications: a cable slitter is used for cutting the outer jacket of larger cables, while a wire stripper is used for removing insulation from individual wires. Both tools are essential for electrical work, but they are not interchangeable due to their specific functions and design features.
How do you choose the right crimping tool for connectors?
To choose the right crimping tool for connectors, consider the following factors:
1. **Connector Type**: Identify the specific type of connector you are working with, such as RJ45, coaxial, or insulated terminals. Each connector type requires a compatible crimping tool designed to handle its unique shape and size.
2. **Wire Gauge**: Determine the wire gauge or size that the connectors will be used with. Crimping tools are often rated for specific wire gauges, so ensure the tool can accommodate the wire size you are working with.
3. **Crimp Profile**: Different connectors require different crimp profiles (e.g., hex, indent, or oval). Choose a tool that provides the correct crimp profile for the connector to ensure a secure and reliable connection.
4. **Tool Quality**: Opt for a high-quality tool from a reputable manufacturer. Quality tools provide consistent crimps, are durable, and often come with warranties. They may be more expensive but offer better long-term value.
5. **Adjustability**: Some crimping tools offer adjustable settings for different connector sizes and wire gauges. This versatility can be beneficial if you work with various connectors and wires.
6. **Ergonomics**: Consider the tool's ergonomics, especially if you will be using it frequently. Look for features like comfortable grips, lightweight design, and ease of use to reduce hand fatigue.
7. **Ratchet Mechanism**: A ratchet mechanism ensures that the crimp is completed fully before the tool releases, providing consistent and reliable crimps.
8. **Budget**: While it's important to invest in a quality tool, consider your budget. Balance cost with the features and quality you need for your specific applications.
By evaluating these factors, you can select a crimping tool that meets your needs and ensures reliable and efficient connections.
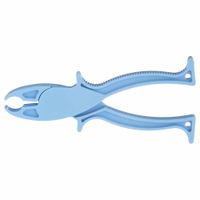
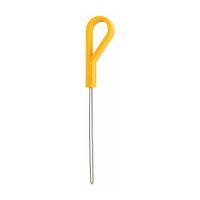
What are the best practices for using cable pullers?
1. **Inspection and Maintenance**: Regularly inspect cable pullers for wear, damage, or defects. Ensure all components, including hooks, cables, and gears, are in good condition. Lubricate moving parts as needed to ensure smooth operation.
2. **Proper Training**: Ensure all operators are adequately trained in the use of cable pullers. They should understand the equipment's capabilities, limitations, and safety features.
3. **Load Capacity**: Always adhere to the manufacturer's specified load capacity. Overloading can lead to equipment failure and potential injury.
4. **Secure Setup**: Anchor the cable puller securely to a stable point. Ensure the cable is properly aligned and tensioned to prevent slippage or snapping.
5. **Use Appropriate Accessories**: Utilize the correct slings, shackles, and hooks that are rated for the load being pulled. Ensure all accessories are compatible with the cable puller.
6. **Clear Work Area**: Keep the work area clear of obstructions and ensure all personnel are at a safe distance from the cable and load path.
7. **Controlled Operation**: Operate the puller smoothly and steadily. Avoid sudden jerks or rapid movements that can cause the cable to snap or the load to shift unexpectedly.
8. **Communication**: Maintain clear communication with all team members involved in the operation. Use hand signals or radios if necessary to ensure everyone is aware of the operation's status.
9. **Emergency Preparedness**: Be prepared for emergencies. Know how to quickly release tension if needed and have a plan in place for dealing with equipment failure or accidents.
10. **Storage**: Store cable pullers in a dry, clean environment to prevent rust and corrosion. Keep them organized and easily accessible for future use.
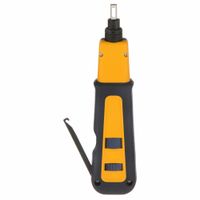
How do punchdown tools work for network installations?
A punchdown tool is a hand-held device used in network installations to connect wires to a patch panel, keystone module, or surface mount box. It is essential for terminating twisted pair cables, such as Cat5e, Cat6, or Cat6a, into insulation-displacement connectors (IDCs).
The tool consists of a handle and a blade. The blade has two sides: one for cutting excess wire and the other for seating the wire into the IDC. The process begins by stripping the outer jacket of the cable to expose the twisted pairs. Each pair is untwisted and aligned with the corresponding color-coded slots on the IDC.
To use the punchdown tool, the installer places the wire into the IDC slot. The tool is then positioned over the wire with the cutting side of the blade facing outward, away from the IDC. Applying firm pressure, the installer pushes the tool down until it clicks, indicating the wire is seated and the excess is cut. This action forces the wire into the IDC's metal contacts, which pierce the wire's insulation to establish a secure electrical connection.
Punchdown tools often have adjustable impact settings to accommodate different types of connectors and ensure a reliable connection without damaging the wire or IDC. Some tools also feature interchangeable blades for compatibility with various connector types, such as 66, 110, or Krone.
Overall, punchdown tools are crucial for creating stable and efficient network connections, ensuring that data transmission is reliable and minimizing the risk of connection failures.
What safety precautions should be taken when using electrical hand tools?
When using electrical hand tools, several safety precautions are essential to prevent accidents and injuries:
1. **Read the Manual**: Always read the manufacturer's instructions and safety guidelines before using any tool.
2. **Inspect Tools**: Check for any damage, such as frayed cords, cracked casings, or loose parts. Do not use damaged tools.
3. **Use Appropriate PPE**: Wear personal protective equipment like safety goggles, gloves, and ear protection to protect against debris, noise, and electrical hazards.
4. **Ensure Proper Grounding**: Use tools with a three-prong plug or double insulation to prevent electric shock. Avoid using tools in wet or damp conditions unless they are specifically designed for such environments.
5. **Secure Work Area**: Keep the work area clean and well-lit. Remove any tripping hazards and ensure that cords are not in the way.
6. **Use the Right Tool**: Select the correct tool for the job. Using the wrong tool can lead to accidents and damage.
7. **Avoid Loose Clothing**: Wear fitted clothing and tie back long hair to prevent entanglement with moving parts.
8. **Disconnect Power**: Unplug tools when not in use, before servicing, or when changing accessories like blades or bits.
9. **Use Proper Technique**: Maintain a firm grip and stable footing. Follow the correct operating procedures to avoid loss of control.
10. **Stay Alert**: Avoid using tools when tired or under the influence of drugs or alcohol.
11. **Keep Others Safe**: Ensure that bystanders are at a safe distance and aware of the work being done.
12. **Regular Maintenance**: Keep tools clean and well-maintained. Regularly check for wear and tear and replace parts as needed.
By adhering to these precautions, the risk of accidents and injuries can be significantly reduced.