Call +(254) 703 030 000 / 751 483 999 / 721 704 777
.....Read More


Frequently Asked Questions
What are the different types of pipe fittings and their uses?
Pipe fittings are essential components in plumbing and piping systems, used to connect, control, and direct the flow of fluids. Here are the different types and their uses:
1. **Elbows**: Used to change the direction of flow, typically available in 45-degree and 90-degree angles. They are essential in navigating around obstacles or changing the pipeline's direction.
2. **Tees**: Shaped like the letter 'T', these fittings are used to split or combine flow. They allow for branch connections in a pipeline, facilitating the distribution of fluids to different locations.
3. **Couplings**: Used to connect two pipes of the same diameter, couplings are essential for extending the length of a pipeline or repairing a broken pipe.
4. **Reducers**: These fittings are used to connect pipes of different diameters, allowing for a change in flow size. They are crucial in systems where the flow rate needs to be adjusted.
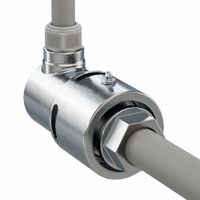
5. **Unions**: Similar to couplings, but designed for easy disconnection and reconnection of pipes. They are used in systems that require frequent maintenance or disassembly.
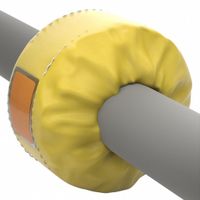
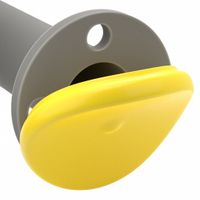
6. **Caps and Plugs**: Used to close the end of a pipe, caps are fitted over the pipe end, while plugs are inserted into the pipe. They are essential for sealing off unused pipe sections.
7. **Bushings**: Used to connect pipes of different sizes, bushings are inserted into a larger fitting to reduce its size, allowing for a smaller pipe connection.
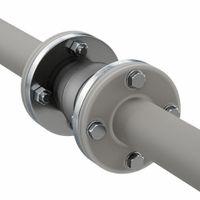
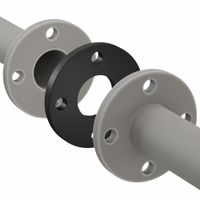
8. **Flanges**: Used to connect pipes, valves, pumps, and other equipment, flanges provide easy access for cleaning, inspection, or modification. They are bolted together and sealed with gaskets.
9. **Valves**: Control the flow and pressure within a system. Various types include gate, ball, and check valves, each serving specific functions like stopping flow, regulating pressure, or preventing backflow.
10. **Crosses**: Similar to tees but with four openings, crosses are used in systems where multiple branches are needed.
These fittings are made from various materials, including metal, plastic, and composite, chosen based on the application and fluid type.
How do you choose the right pipe fitting for a specific application?
To choose the right pipe fitting for a specific application, consider the following factors:
1. **Material Compatibility**: Ensure the fitting material is compatible with the pipe material and the fluid being transported. Common materials include PVC, CPVC, copper, steel, and brass.
2. **Size and Dimensions**: Match the fitting size to the pipe size, considering both the inner diameter (ID) and outer diameter (OD). Use appropriate standards like NPT, BSP, or metric for threading.
3. **Pressure and Temperature Ratings**: Check the fitting's pressure and temperature ratings to ensure they meet or exceed the application's requirements.
4. **Type of Connection**: Choose the connection type based on ease of installation and maintenance. Options include threaded, welded, flanged, and push-fit connections.
5. **Flow Requirements**: Consider the flow characteristics needed, such as minimizing pressure drop or turbulence. Use fittings like elbows, tees, and reducers accordingly.
6. **Corrosion Resistance**: Select fittings with appropriate corrosion resistance for the environment, especially in chemical or marine applications.
7. **Regulatory Compliance**: Ensure fittings comply with relevant industry standards and regulations, such as ASTM, ANSI, or ISO.
8. **Cost and Availability**: Balance cost considerations with quality and availability. Opt for readily available fittings to avoid delays.
9. **Installation Environment**: Consider the installation environment, such as indoor, outdoor, underground, or exposed to UV light, and choose fittings accordingly.
10. **Future Maintenance**: Plan for ease of maintenance and potential future modifications, selecting fittings that allow for easy disassembly and reassembly.
By evaluating these factors, you can select the most suitable pipe fitting for your specific application, ensuring safety, efficiency, and longevity.
What materials are commonly used for pipe fittings and why?
Pipe fittings are essential components in plumbing and piping systems, used to connect straight pipe or tubing sections, adapt to different sizes or shapes, and regulate fluid flow. Common materials for pipe fittings include:
1. **Steel (Carbon and Stainless):**
- **Carbon Steel:** Known for its strength and durability, carbon steel is used in high-pressure applications. It is cost-effective and suitable for transporting water, oil, and gas.
- **Stainless Steel:** Offers excellent corrosion resistance, making it ideal for chemical, food, and pharmaceutical industries. It withstands high temperatures and pressures.
2. **Copper:**
- Copper fittings are widely used in plumbing due to their excellent thermal conductivity and corrosion resistance. They are suitable for hot and cold water supply lines and are easy to install.
3. **Brass:**
- Brass fittings are durable and resistant to corrosion. They are commonly used in applications involving water, air, and non-corrosive fluids. Brass is also easy to machine and join.
4. **PVC (Polyvinyl Chloride):**
- PVC is lightweight, easy to install, and resistant to corrosion and chemical damage. It is commonly used in residential and commercial plumbing for cold water applications and drainage systems.
5. **CPVC (Chlorinated Polyvinyl Chloride):**
- Similar to PVC but with added chlorine, CPVC can withstand higher temperatures, making it suitable for hot water lines.
6. **PEX (Cross-linked Polyethylene):**
- PEX is flexible, resistant to scale and chlorine, and easy to install. It is used in residential plumbing for both hot and cold water supply.
7. **Cast Iron:**
- Known for its durability and strength, cast iron is used in drainage systems and sewer lines. It is resistant to abrasion and can handle high-pressure applications.
These materials are chosen based on factors like pressure and temperature requirements, corrosion resistance, cost, and ease of installation.
How do you properly install a pipe fitting to prevent leaks?
To properly install a pipe fitting and prevent leaks, follow these steps:
1. **Select the Right Fitting**: Ensure the fitting is compatible with the pipe material and size. Use appropriate fittings for the specific application, such as PVC, copper, or steel.
2. **Prepare the Pipe Ends**: Cut the pipe ends cleanly and squarely using a pipe cutter. Remove any burrs or debris with a deburring tool or sandpaper to ensure a smooth surface.
3. **Clean the Surfaces**: Wipe the pipe ends and the inside of the fitting with a clean cloth to remove dust, grease, or moisture. For metal pipes, use a wire brush if necessary.
4. **Apply Sealant**: For threaded fittings, apply a suitable pipe thread sealant or Teflon tape. Wrap the tape clockwise around the male threads 2-3 times, ensuring it covers the threads evenly without overlapping the pipe end.
5. **Assemble the Fitting**: Hand-tighten the fitting onto the pipe. Use a wrench to tighten further, but avoid over-tightening, which can damage threads or crack fittings. For compression fittings, ensure the ferrule is properly seated and tighten the nut securely.
6. **Check Alignment**: Ensure the pipes and fittings are aligned correctly to avoid stress on the joints, which can lead to leaks.
7. **Test for Leaks**: Once assembled, test the system for leaks. Turn on the water supply and inspect all joints. For gas lines, use a soapy water solution to check for bubbles indicating leaks.
8. **Make Adjustments**: If leaks are detected, tighten the fittings slightly or reapply sealant as needed. Re-test until no leaks are present.
By following these steps, you can ensure a secure and leak-free pipe fitting installation.
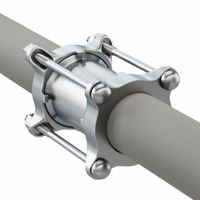
What are the advantages of using pipe expansion joints?
Pipe expansion joints offer several advantages:
1. **Thermal Expansion Compensation**: They accommodate thermal expansion and contraction in piping systems, preventing damage due to temperature fluctuations.
2. **Vibration Isolation**: These joints absorb and reduce vibrations from pumps, compressors, and other equipment, protecting the system from mechanical stress and noise.
3. **Misalignment Correction**: They can compensate for minor misalignments in piping systems, reducing installation time and costs.
4. **Pressure Absorption**: Expansion joints can absorb pressure surges and pulsations, enhancing the system's durability and reliability.
5. **Space Efficiency**: They allow for more compact system designs by reducing the need for additional loops or bends to manage thermal expansion.
6. **Reduced Maintenance**: By minimizing stress and movement in the piping system, expansion joints can decrease wear and tear, leading to lower maintenance requirements.
7. **Flexibility in Design**: They provide flexibility in system design, allowing for complex routing and easier accommodation of structural movements.
8. **Cost-Effectiveness**: By preventing damage and reducing the need for additional components, expansion joints can lead to cost savings in both installation and long-term maintenance.
9. **Safety Enhancement**: By managing thermal and mechanical stresses, they contribute to the overall safety of the piping system, reducing the risk of leaks or failures.
10. **Material Versatility**: Available in various materials, they can be tailored to specific applications, including high-temperature or corrosive environments.
Overall, pipe expansion joints are crucial for maintaining the integrity and efficiency of piping systems across various industries.
How do you maintain and inspect pipe fittings for safety and efficiency?
To maintain and inspect pipe fittings for safety and efficiency, follow these steps:
1. **Regular Inspection**: Conduct routine visual inspections to identify signs of wear, corrosion, or damage. Look for leaks, rust, or any physical deformities in the fittings.
2. **Pressure Testing**: Perform hydrostatic or pneumatic pressure tests to ensure the fittings can withstand operational pressures. This helps identify leaks or weaknesses in the system.
3. **Cleaning**: Regularly clean the fittings to prevent buildup of debris or corrosive materials. Use appropriate cleaning agents that do not damage the material of the fittings.
4. **Lubrication**: Apply suitable lubricants to threaded fittings to prevent seizing and ensure easy disassembly. Ensure the lubricant is compatible with the pipe material and the fluid being transported.
5. **Tightening**: Check and tighten connections as needed. Use the correct torque specifications to avoid over-tightening, which can cause damage, or under-tightening, which can lead to leaks.
6. **Material Compatibility**: Ensure that the fittings are compatible with the materials of the pipes and the fluids being transported to prevent chemical reactions or degradation.
7. **Replacement**: Replace any fittings that show signs of significant wear, corrosion, or damage. Use high-quality, certified fittings to ensure longevity and safety.
8. **Documentation**: Keep detailed records of inspections, maintenance activities, and replacements. This helps in tracking the condition of the fittings and planning future maintenance.
9. **Training**: Ensure that personnel involved in maintenance and inspection are properly trained and aware of safety protocols and procedures.
10. **Compliance**: Adhere to industry standards and regulations to ensure that all fittings meet safety and efficiency requirements.
By following these steps, you can maintain the integrity and performance of pipe fittings, ensuring safe and efficient operation.
What are the common causes of pipe fitting failures and how can they be prevented?
Common causes of pipe fitting failures include:
1. **Corrosion**: Occurs due to chemical reactions between the pipe material and its environment. Prevention includes using corrosion-resistant materials, applying protective coatings, and implementing cathodic protection.
2. **Improper Installation**: Incorrect assembly or use of incompatible materials can lead to leaks or bursts. Prevention involves following manufacturer guidelines, using skilled labor, and ensuring proper alignment and support.
3. **Material Defects**: Flaws in the pipe or fitting material can cause weaknesses. Prevention includes quality control during manufacturing and using certified materials.
4. **Mechanical Stress**: Excessive pressure, vibration, or thermal expansion can cause fittings to fail. Prevention involves proper design to accommodate stress, using flexible joints, and regular maintenance checks.
5. **Fatigue**: Repeated stress cycles can weaken fittings over time. Prevention includes designing for expected load cycles and using materials with high fatigue resistance.
6. **Chemical Exposure**: Certain chemicals can degrade pipe materials. Prevention involves selecting materials compatible with the chemicals being transported and using protective barriers.
7. **Temperature Extremes**: High or low temperatures can cause material expansion or brittleness. Prevention includes using materials suitable for the temperature range and insulating pipes.
8. **Erosion**: High-velocity fluids can wear down pipe surfaces. Prevention involves reducing flow velocity, using erosion-resistant materials, and regular inspections.
9. **Improper Maintenance**: Lack of regular inspection and maintenance can lead to undetected issues. Prevention includes implementing a routine maintenance schedule and using monitoring systems.
10. **Design Flaws**: Poor design can lead to stress concentrations and failures. Prevention involves thorough design reviews and simulations to identify potential issues.
By addressing these causes through careful material selection, proper installation, regular maintenance, and appropriate design, pipe fitting failures can be significantly reduced.
How do you determine the correct size of a pipe fitting for a given pipe?
To determine the correct size of a pipe fitting for a given pipe, follow these steps:
1. **Identify Pipe Type**: Determine the material and type of pipe (e.g., PVC, copper, steel) as different materials have different sizing standards.
2. **Measure Pipe Diameter**: Use a caliper or a pipe tape measure to find the outside diameter (OD) of the pipe. For threaded pipes, measure the inside diameter (ID) as well.
3. **Check Pipe Schedule**: Identify the pipe schedule, which indicates wall thickness. This affects the ID and is crucial for matching fittings.
4. **Consult Standards**: Refer to relevant standards (e.g., ANSI, ASME, ASTM) for the specific pipe type to find the nominal pipe size (NPS) based on your measurements.
5. **Determine Fitting Type**: Identify the type of fitting needed (e.g., elbow, tee, coupling) and ensure it matches the pipe's material and application.
6. **Match Nominal Size**: Use the nominal pipe size to select the fitting. Fittings are typically labeled with the NPS, which corresponds to the pipe's nominal diameter.
7. **Consider Connection Type**: Ensure the fitting's connection type (e.g., threaded, welded, flanged) is compatible with the pipe's end type.
8. **Verify Pressure Rating**: Check that the fitting's pressure rating matches or exceeds the system's requirements.
9. **Account for Expansion**: In systems subject to temperature changes, consider expansion allowances in fitting selection.
10. **Consult Manufacturer Specifications**: Review the manufacturer's specifications for compatibility and installation guidelines.
By following these steps, you can accurately determine the correct size of a pipe fitting for your specific application.
What are the benefits of using bolted pipe couplings over welded connections?
Bolted pipe couplings offer several advantages over welded connections:
1. **Ease of Installation and Maintenance**: Bolted couplings are easier and faster to install compared to welding, which requires skilled labor and more time. They allow for quick assembly and disassembly, facilitating maintenance and repairs without the need for specialized welding equipment.
2. **Flexibility and Adjustability**: Bolted connections provide flexibility in alignment and can accommodate slight misalignments, which is not possible with welded joints. This adjustability is beneficial in systems where precise alignment is challenging.
3. **Reduced Downtime**: Since bolted couplings can be installed and removed quickly, they minimize system downtime during maintenance or modifications, enhancing operational efficiency.
4. **No Heat-Affected Zone**: Welding can alter the material properties in the heat-affected zone, potentially leading to weaknesses or failures. Bolted connections avoid this issue, maintaining the integrity of the pipe material.
5. **Reusability**: Bolted couplings can be reused, unlike welded joints, which are permanent. This reusability is cost-effective for temporary installations or systems that require frequent reconfiguration.
6. **Safety**: The installation of bolted couplings does not involve the risks associated with welding, such as exposure to fumes, high temperatures, and potential fire hazards, making it safer for workers.
7. **Cost-Effectiveness**: The overall cost of bolted couplings can be lower due to reduced labor costs, faster installation, and the elimination of the need for post-weld inspections and treatments.
8. **Versatility**: Bolted couplings can be used in a variety of environments and applications, including those where welding is impractical, such as in explosive atmospheres or underwater.
9. **Ease of Inspection**: Bolted connections are easier to inspect for integrity and leaks compared to welded joints, which may require non-destructive testing methods.
These benefits make bolted pipe couplings a preferred choice in many industrial applications where flexibility, speed, and safety are priorities.
How do you safely handle and store pipe fittings to prevent damage?
To safely handle and store pipe fittings and prevent damage, follow these guidelines:
1. **Proper Handling:**
- Use appropriate lifting equipment like slings, hoists, or forklifts to move heavy fittings, ensuring they are balanced and secure.
- Wear personal protective equipment (PPE) such as gloves, safety shoes, and helmets to prevent injuries.
- Avoid dropping or dragging fittings to prevent physical damage and deformation.
2. **Inspection:**
- Inspect fittings upon receipt for any visible damage or defects.
- Check for correct specifications, including size, material, and pressure rating.
3. **Storage Environment:**
- Store fittings in a clean, dry, and well-ventilated area to prevent corrosion and contamination.
- Keep fittings away from direct sunlight and extreme temperatures to avoid material degradation.
4. **Organization:**
- Arrange fittings by type, size, and material for easy identification and access.
- Use racks, shelves, or bins to keep fittings off the ground and organized.
- Label storage areas clearly to minimize handling errors.
5. **Protection:**
- Use protective covers or caps on fittings to prevent dirt, moisture, and physical damage.
- Wrap or box fittings in protective materials like bubble wrap or foam for added cushioning.
6. **Inventory Management:**
- Implement a first-in, first-out (FIFO) system to ensure older stock is used before new stock, reducing the risk of material degradation.
- Regularly audit inventory to maintain accurate stock levels and identify any issues early.
7. **Training:**
- Train staff on proper handling techniques and safety protocols to minimize accidents and damage.
- Encourage reporting of any damage or safety concerns immediately.
By adhering to these practices, you can ensure the longevity and integrity of pipe fittings, reducing the risk of damage and associated costs.