Call +(254) 703 030 000 / 751 483 999 / 721 704 777
.....Read More
Frequently Asked Questions
What is a thread mill and how does it work?
A thread mill is a specialized tool used in machining to create threads in a workpiece. Unlike traditional taps, which cut threads by being driven into a pre-drilled hole, thread mills are used in CNC (Computer Numerical Control) machines to mill threads. This process involves the tool moving in a helical path to cut the threads, allowing for greater flexibility and precision.
Thread mills are typically made of high-speed steel or carbide and come in various sizes and configurations to accommodate different thread types and sizes. They can be used to create both internal and external threads and are suitable for a wide range of materials, including metals, plastics, and composites.
The operation of a thread mill involves several steps:
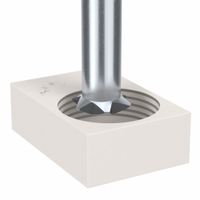
1. **Pre-drilling**: A hole is drilled into the workpiece to the desired depth and diameter, slightly larger than the minor diameter of the thread to be cut.
2. **Tool Path Programming**: The CNC machine is programmed with the specific parameters for the thread, including pitch, diameter, and depth. The tool path is designed to follow a helical trajectory.
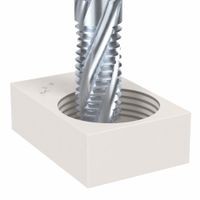
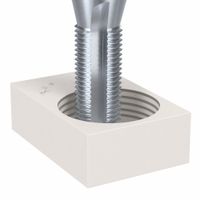
3. **Thread Milling**: The thread mill enters the pre-drilled hole and begins cutting the thread by moving in a circular and axial motion simultaneously. The tool rotates around its axis while following the programmed helical path, gradually cutting the thread profile into the workpiece.
4. **Completion**: Once the thread is fully formed, the tool retracts, and the process is complete.
Thread milling offers several advantages, such as the ability to produce threads with high precision and surface finish, reduced risk of tool breakage, and the capability to create threads in hard-to-machine materials. Additionally, a single thread mill can be used to cut different thread sizes and types, making it a versatile tool in manufacturing.
What are the advantages of using thread mills over taps?
Thread mills offer several advantages over taps:
1. **Versatility**: Thread mills can create a variety of thread sizes and types with a single tool, whereas taps are specific to a single thread size and type.
2. **Material Flexibility**: Thread mills are suitable for a wide range of materials, including hard-to-machine materials like hardened steels, titanium, and composites. Taps may struggle or wear out quickly in such materials.
3. **Reduced Tool Pressure**: Thread milling generates less tool pressure compared to tapping, reducing the risk of part deformation, especially in thin-walled or delicate components.
4. **Chip Control**: Thread milling produces smaller, manageable chips, reducing the risk of chip clogging and tool breakage, a common issue with taps.
5. **Tool Life**: Thread mills generally have a longer tool life due to their ability to cut with multiple flutes and the reduced cutting forces involved.
6. **Adjustable Thread Depth**: Thread mills allow for precise control over thread depth, enabling adjustments without changing tools, unlike taps which are fixed.
7. **Broken Tool Removal**: If a thread mill breaks, it is easier to remove from the workpiece compared to a broken tap, which can be difficult and costly to extract.
8. **Multi-Directional Cutting**: Thread mills can cut threads in both right-hand and left-hand directions, offering greater flexibility in machining operations.
9. **CNC Compatibility**: Thread milling is well-suited for CNC machines, allowing for complex thread patterns and high precision, which is more challenging with traditional tapping.
10. **Cost Efficiency**: Although the initial cost of thread mills may be higher, their versatility and longer lifespan can lead to cost savings in the long run, especially in high-mix, low-volume production environments.
Can thread mills be used for both internal and external threading?
Yes, thread mills can be used for both internal and external threading. Thread milling is a versatile machining process that involves using a rotating tool to cut threads into a workpiece. The tool, known as a thread mill, is capable of creating threads on the inside (internal) or outside (external) of a component.
For internal threading, the thread mill enters a pre-drilled hole and moves in a helical path to cut the internal threads. This process is advantageous for creating threads in hard materials or when high precision is required. It also allows for the creation of threads with varying diameters using the same tool, simply by adjusting the tool path.
For external threading, the thread mill operates similarly but cuts threads on the outer surface of a cylindrical workpiece. The tool moves around the outside of the workpiece in a helical motion to form the threads. This method is particularly useful for large diameter threads or when working with materials that are difficult to machine using traditional threading methods.
Thread milling offers several benefits over traditional tapping or die threading. It reduces the risk of tool breakage, especially in hard or brittle materials, and provides greater control over thread dimensions and quality. Additionally, thread mills can be used to create both right-hand and left-hand threads, as well as threads of different pitches and profiles, by simply changing the tool path.
Overall, the flexibility and precision of thread milling make it an excellent choice for both internal and external threading applications across a wide range of materials and thread specifications.
What materials are suitable for thread milling?
Thread milling is a versatile process suitable for a wide range of materials, each requiring specific considerations to ensure optimal results. Suitable materials include:
1. **Aluminum**: Its softness and low melting point make it easy to machine, allowing for high-speed thread milling with minimal tool wear.
2. **Steel**: Both carbon and alloy steels are commonly thread milled. High-speed steel (HSS) or carbide tools are recommended to handle the material's hardness and strength.
3. **Stainless Steel**: Known for its toughness and work-hardening properties, stainless steel requires sharp, wear-resistant tools, often made from carbide, to achieve precise threads.
4. **Titanium**: This material's strength-to-weight ratio and corrosion resistance make it popular in aerospace and medical applications. Thread milling titanium requires sharp, high-quality carbide tools to manage its toughness and tendency to gall.
5. **Inconel and Superalloys**: These high-temperature alloys are challenging to machine due to their hardness and heat resistance. Carbide tools with advanced coatings are essential for thread milling these materials.
6. **Plastics**: Thread milling is effective for thermoplastics and thermosetting plastics, which require sharp tools to prevent melting or deformation during machining.
7. **Copper and Brass**: These softer metals are easily thread milled, but care must be taken to avoid tool wear and ensure clean threads.
8. **Cast Iron**: Its brittleness and abrasive nature require robust tools, often carbide, to withstand the wear and achieve accurate threads.
9. **Composites**: Thread milling can be used on composite materials, but specialized tools are necessary to prevent delamination and achieve clean cuts.
In all cases, selecting the appropriate tool material, coating, and geometry is crucial to accommodate the specific properties of the workpiece material, ensuring efficient and precise thread milling.
How do I choose the right thread mill for my application?
1. **Material Compatibility**: Choose a thread mill made from materials suitable for the workpiece material. For example, use carbide thread mills for hard materials like stainless steel and high-speed steel for softer materials.
2. **Thread Type and Size**: Determine the thread type (e.g., UNC, UNF, metric) and size you need. Ensure the thread mill can produce the desired thread profile and pitch.
3. **Machine Capability**: Assess your CNC machine's capabilities, including spindle speed, power, and rigidity. Ensure the thread mill is compatible with your machine's specifications.
4. **Coating**: Select a thread mill with the appropriate coating for your application. Coatings like TiN, TiAlN, or AlTiN can enhance tool life and performance, especially in high-speed or abrasive applications.
5. **Tool Geometry**: Consider the tool's geometry, such as the number of flutes and helix angle. More flutes can provide a smoother finish, while the helix angle affects chip evacuation and cutting forces.
6. **Thread Depth and Length**: Ensure the thread mill can accommodate the required thread depth and length. Check the tool's reach and cutting length to match your application.
7. **Coolant and Lubrication**: Determine if your application requires coolant or lubrication. Some thread mills are designed for dry cutting, while others perform better with coolant.
8. **Cost and Tool Life**: Balance cost with tool life. Higher-quality thread mills may have a higher upfront cost but offer longer tool life and better performance, reducing overall costs.
9. **Supplier Support**: Choose a reputable supplier that offers technical support and guidance. They can assist with tool selection and provide troubleshooting advice.
10. **Trial and Testing**: If possible, conduct trials to test the thread mill's performance in your specific application, allowing for adjustments and optimization.
What are the limitations of using thread mills?
Thread mills, while versatile and capable of producing high-quality threads, have several limitations:
1. **Initial Cost**: Thread mills are generally more expensive than traditional taps, which can be a significant investment for small shops or those with limited budgets.
2. **Complexity**: The programming and setup for thread milling can be more complex than tapping, requiring skilled operators and advanced CNC machines.
3. **Cycle Time**: Thread milling can be slower than tapping, especially for small threads, as it involves multiple passes to achieve the desired thread depth.
4. **Tool Wear**: Thread mills are subject to wear, especially when used on hard materials, which can affect the precision and quality of the threads over time.
5. **Machine Requirements**: Thread milling requires a CNC machine with helical interpolation capabilities, which may not be available in all workshops.
6. **Size Limitations**: Thread mills may not be suitable for very small or very large threads due to tool size constraints and the need for precise control.
7. **Material Limitations**: While thread mills can handle a variety of materials, extremely hard or abrasive materials can reduce tool life and increase costs.
8. **Vibration and Stability**: Thread milling can induce vibrations, especially in long overhangs or when machining deep threads, potentially affecting thread quality.
9. **Tool Breakage**: There is a risk of tool breakage, particularly if the tool is not properly aligned or if there is excessive tool deflection.
10. **Limited Thread Depth**: The depth of threads that can be milled is limited by the length of the tool, which can be a constraint for deep threading applications.
11. **Surface Finish**: Achieving a high-quality surface finish can be challenging, especially in materials that are prone to work hardening.
These limitations must be considered when deciding whether thread milling is the appropriate method for a given application.
How do I program a CNC machine for thread milling?
To program a CNC machine for thread milling, follow these steps:
1. **Select the Thread Mill**: Choose the appropriate thread mill based on the thread size, pitch, and material. Ensure it matches the thread specifications.
2. **Define the Thread Parameters**: Determine the thread's major diameter, minor diameter, pitch, and depth. These parameters are crucial for accurate programming.
3. **Set Up the CNC Machine**: Secure the workpiece and ensure the machine is calibrated. Load the thread mill tool into the spindle.
4. **Program the Tool Path**:
- **Start Point**: Position the tool at the starting point above the hole or external thread location.
- **Helical Interpolation**: Use G-code to create a helical path. The tool should move in a circular path while simultaneously moving vertically to create the thread.
- **G02/G03 Commands**: Use G02 for clockwise and G03 for counterclockwise helical interpolation.
- **Z-Axis Movement**: Program the Z-axis to move the tool down by the thread pitch per revolution.
5. **Compensate for Tool Diameter**: Adjust the tool path to account for the tool's diameter, ensuring the correct thread profile.
6. **Program Entry and Exit**: Ensure smooth entry and exit of the tool to prevent tool breakage or workpiece damage.
7. **Simulate the Program**: Use CNC simulation software to verify the tool path and ensure there are no collisions or errors.
8. **Run a Test Cut**: Perform a test cut on a scrap piece to verify the thread dimensions and quality.
9. **Adjust as Necessary**: Make any necessary adjustments to the program based on the test cut results.
10. **Finalize and Execute**: Once satisfied, run the program on the actual workpiece.
Ensure safety protocols are followed throughout the process.