Call +(254) 703 030 000 / 751 483 999 / 721 704 777
.....Read More
Frequently Asked Questions
What is the difference between Vernier, dial, and digital height gauges?
Vernier, dial, and digital height gauges are precision instruments used to measure the height of objects or to mark items for machining. They differ primarily in their measurement readout mechanisms and ease of use.
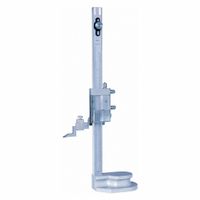
1. **Vernier Height Gauge**: This traditional tool uses a vernier scale for measurement. It consists of a main scale and a sliding vernier scale, which allows for precise readings. The user must manually interpret the measurement by aligning the scales, which can be time-consuming and requires skill. Vernier height gauges are durable and do not require batteries, making them reliable in various conditions. However, they are less user-friendly compared to digital models.
2. **Dial Height Gauge**: This type features a dial indicator for measurement readout. The dial gauge provides a more intuitive and quicker reading than the vernier scale, as the measurement is displayed on a circular dial. The dial height gauge is easier to use than the vernier type but still requires some skill to ensure accuracy. It is suitable for applications where quick readings are necessary, but it can be less precise than digital gauges due to potential parallax errors.
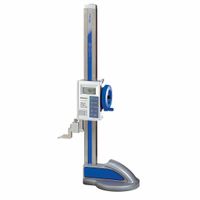
3. **Digital Height Gauge**: This modern tool uses an electronic display to show measurements, offering the highest ease of use and precision. Digital height gauges provide instant readings, often with additional features like data output for recording measurements. They eliminate human error associated with reading scales and are ideal for high-precision tasks. However, they require batteries and can be more expensive and less durable in harsh environments compared to vernier and dial gauges.
In summary, vernier gauges are durable and battery-free, dial gauges offer quicker readings, and digital gauges provide the highest precision and ease of use.
How do you calibrate a height gauge?
To calibrate a height gauge, follow these steps:
1. **Clean the Gauge**: Ensure the height gauge is clean and free from dust or debris. Use a soft cloth to wipe the surfaces.
2. **Check the Surface Plate**: Place the height gauge on a clean, flat, and stable surface plate. The surface plate should be calibrated and free from any imperfections.
3. **Zero the Gauge**: Lower the scriber or measuring jaw to touch the surface plate gently. Set the gauge to zero using the zero adjustment knob or button.
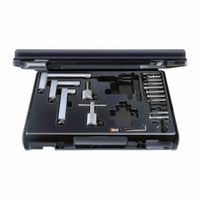
4. **Use Gauge Blocks**: Obtain a set of calibrated gauge blocks. These blocks are precision tools used to verify the accuracy of measuring instruments.
5. **Measure with Gauge Blocks**: Place a gauge block of known height on the surface plate. Adjust the height gauge to measure the block. The reading should match the block's height. Repeat this with different blocks to cover the gauge's range.
6. **Check for Consistency**: Measure each block multiple times to ensure consistent readings. If the readings vary, inspect the gauge for mechanical issues or recalibrate.
7. **Adjust if Necessary**: If discrepancies are found, adjust the height gauge according to the manufacturer's instructions. This may involve adjusting the scale or recalibrating the digital readout.
8. **Document the Calibration**: Record the calibration results, including the date, gauge ID, gauge block sizes used, and any adjustments made. This documentation is essential for quality control and future reference.
9. **Regular Calibration**: Establish a regular calibration schedule based on usage frequency and environmental conditions to maintain accuracy.
10. **Professional Calibration**: For critical applications, consider professional calibration services to ensure compliance with industry standards.
What are the main applications of height gauges in metalworking?
Height gauges are essential tools in metalworking, primarily used for precision measurement and layout tasks. Their main applications include:
1. **Dimensional Measurement**: Height gauges are used to measure the height of objects or features on a workpiece with high accuracy. This is crucial for ensuring that parts meet specified dimensions and tolerances.
2. **Scribing Lines**: They are employed to scribe lines parallel to a reference surface, aiding in the layout and marking of workpieces for further machining processes.
3. **Comparative Measurement**: Height gauges can compare the height of different parts or features, ensuring uniformity and consistency across multiple components.
4. **Depth Measurement**: By using attachments, height gauges can measure the depth of holes, slots, or recesses, which is vital for quality control and ensuring proper fit and function.
5. **Alignment and Setup**: In machine setup, height gauges help align and position workpieces accurately on machine tables, ensuring precise machining operations.
6. **Inspection and Quality Control**: They are integral in inspection processes, verifying that finished parts conform to design specifications and quality standards.
7. **Tool Setting**: Height gauges assist in setting the height of cutting tools on machines, ensuring correct cutting depth and preventing tool or workpiece damage.
8. **Surface Flatness and Parallelism**: By measuring various points on a surface, height gauges help assess flatness and parallelism, critical for parts that must mate or seal properly.
9. **Calibration**: They are used to calibrate other measuring instruments, ensuring accuracy across different tools and processes.
Overall, height gauges are versatile instruments that enhance precision, efficiency, and quality in metalworking operations.
How do you read a Vernier height gauge?
To read a Vernier height gauge, follow these steps:
1. **Position the Gauge**: Place the base of the height gauge on a flat, stable surface. Ensure the object to be measured is also on the same surface.
2. **Zero the Gauge**: Before taking a measurement, ensure the gauge is zeroed. Adjust the Vernier scale to align with the zero mark on the main scale. If necessary, use the fine adjustment screw for precision.
3. **Align the Scriber**: Move the slider up or down to position the scriber or measuring jaw at the desired height on the object. Lock the slider in place using the locking screw.
4. **Read the Main Scale**: Look at the main scale (usually in millimeters or inches) and note the last whole number visible just before the zero mark of the Vernier scale. This is your main scale reading.
5. **Read the Vernier Scale**: Examine the Vernier scale, which is a smaller, secondary scale. Identify the line on the Vernier scale that aligns exactly with any line on the main scale. The number on the Vernier scale that aligns is your Vernier reading.
6. **Calculate the Total Measurement**: Add the main scale reading to the Vernier reading. The Vernier reading is typically a fraction of the smallest division on the main scale (e.g., 0.02 mm or 0.001 inches). This sum gives the total height measurement.
7. **Record the Measurement**: Note down the measurement, ensuring to include the correct units.
By following these steps, you can accurately read a Vernier height gauge and obtain precise measurements.
What are the advantages of using a digital height gauge over a Vernier or dial gauge?
1. **Accuracy and Precision**: Digital height gauges offer higher accuracy and precision compared to Vernier or dial gauges. They provide digital readouts that minimize human error in reading measurements.
2. **Ease of Use**: Digital displays are easier to read than the scales on Vernier or dial gauges. This reduces the likelihood of misinterpretation and speeds up the measurement process.
3. **Data Output**: Many digital height gauges come with data output capabilities, allowing for easy transfer of measurements to computers or other devices for further analysis or record-keeping.
4. **Zero Setting**: Digital height gauges often feature a simple zero-setting function, enabling quick calibration and adjustment without the need for manual calculations.
5. **Multiple Units**: They can easily switch between different units of measurement (e.g., inches to millimeters), providing versatility for various applications.
6. **Advanced Features**: Some digital models include advanced features such as preset functions, incremental measurement, and tolerance setting, which are not available in traditional Vernier or dial gauges.
7. **Durability and Maintenance**: Digital height gauges often require less maintenance as they have fewer moving parts compared to dial gauges, which can wear out over time.
8. **User-Friendly Interface**: The digital interface is generally more intuitive, making it accessible for users with varying levels of experience.
9. **Error Reduction**: The elimination of parallax error, which can occur with analog scales, enhances measurement reliability.
10. **Battery-Powered**: While this can be a disadvantage if batteries run out, it allows for portable use without the need for manual operation.
11. **Enhanced Visibility**: The digital display is often backlit, improving visibility in low-light conditions, which is not possible with Vernier or dial gauges.
How do you maintain and care for a height gauge?
To maintain and care for a height gauge, follow these steps:
1. **Regular Cleaning**: After each use, clean the height gauge with a soft, lint-free cloth to remove dust, dirt, and any residues. Avoid using abrasive materials that could scratch the surfaces.
2. **Lubrication**: Periodically apply a light machine oil to the moving parts, such as the slider and the measuring surfaces, to ensure smooth operation and prevent rust. Wipe off any excess oil to avoid attracting dust.
3. **Calibration**: Regularly check the calibration of the height gauge using a certified gauge block or a calibration standard. If discrepancies are found, recalibrate according to the manufacturer's instructions or have it professionally serviced.
4. **Storage**: Store the height gauge in a protective case or cover when not in use to shield it from dust and environmental factors. Keep it in a dry, stable environment to prevent corrosion and damage.
5. **Handling**: Handle the height gauge with care. Avoid dropping or subjecting it to shocks, as this can affect its accuracy. Use both hands when moving or adjusting the gauge to maintain stability.
6. **Inspection**: Regularly inspect the gauge for signs of wear, damage, or misalignment. Pay attention to the scriber, base, and measuring surfaces. Replace or repair any damaged parts promptly.
7. **Avoid Contamination**: Keep the gauge away from chemicals, moisture, and extreme temperatures, which can cause corrosion or damage to the components.
8. **Training**: Ensure that all users are properly trained in the correct use and maintenance of the height gauge to prevent misuse and prolong its lifespan.
By following these steps, you can ensure the longevity and accuracy of your height gauge.
What are the common errors to avoid when using a height gauge?
1. **Improper Zero Setting**: Failing to zero the height gauge before measurement can lead to inaccurate readings. Always ensure the gauge is calibrated to zero on a reference surface.
2. **Surface Irregularities**: Using a height gauge on a non-flat or dirty surface can cause errors. Ensure the surface plate is clean and flat.
3. **Incorrect Probe Contact**: Not ensuring proper contact between the probe and the workpiece can result in measurement errors. The probe should touch the workpiece gently without excessive force.
4. **Parallax Error**: When reading the scale, ensure your line of sight is perpendicular to the scale to avoid parallax errors.
5. **Temperature Variations**: Temperature changes can affect the material of the gauge and the workpiece, leading to expansion or contraction. Use the gauge in a temperature-controlled environment.
6. **Improper Handling**: Dropping or mishandling the height gauge can cause misalignment or damage. Handle the instrument with care.
7. **Ignoring Tool Wear**: Over time, the probe and other parts may wear out. Regularly inspect and replace worn components to maintain accuracy.
8. **Inconsistent Pressure**: Applying inconsistent pressure when moving the gauge can lead to variable readings. Use a consistent, gentle pressure.
9. **Not Using the Right Accessories**: Using incorrect or worn scribers and attachments can affect measurement accuracy. Ensure all accessories are appropriate and in good condition.
10. **Neglecting Regular Calibration**: Regular calibration against a known standard is essential to maintain accuracy. Follow a routine calibration schedule.
11. **Environmental Factors**: Dust, humidity, and vibrations can affect measurements. Ensure the working environment is clean and stable.
12. **Improper Storage**: Store the height gauge in a protective case to prevent damage and exposure to environmental factors.