Call +(254) 703 030 000 / 751 483 999 / 721 704 777
.....Read More

Frequently Asked Questions
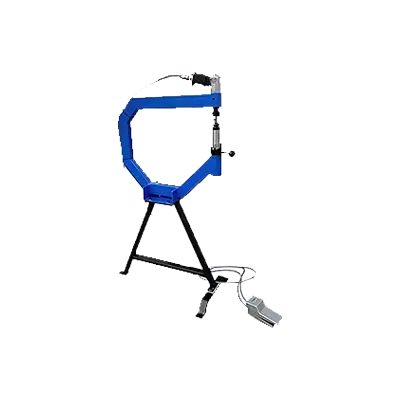
What is a power planishing hammer used for?
A power planishing hammer is a specialized tool used in metalworking to smooth and shape metal surfaces, particularly in the creation of curved or contoured metal pieces. It is commonly employed in industries such as automotive restoration, metal art, and custom fabrication. The tool operates by delivering rapid, repeated hammering actions to the metal, which helps to refine the surface finish and achieve the desired shape with precision.
The power planishing hammer consists of a frame that holds a reciprocating hammer and an anvil. The metal workpiece is placed between the hammer and the anvil. As the hammer strikes the metal, it compresses and stretches the material, effectively smoothing out any irregularities, dents, or weld seams. This process is essential for achieving a uniform surface and is particularly useful for thin metal sheets that require gentle shaping without causing damage or distortion.
One of the key advantages of using a power planishing hammer is its ability to produce consistent and high-quality results with minimal manual effort. The tool allows for greater control over the shaping process compared to manual hammering, reducing the risk of overworking or damaging the metal. Additionally, it significantly speeds up the planishing process, making it more efficient for large-scale or complex projects.
Overall, a power planishing hammer is an invaluable tool for metalworkers seeking to achieve smooth, aesthetically pleasing surfaces and precise shapes in their metal projects.
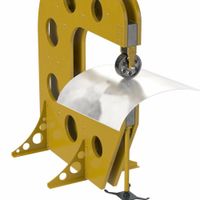
How does an English wheel work?
An English wheel is a metalworking tool used to form compound curves in sheet metal. It consists of a large, sturdy frame with two wheels: a large, flat upper wheel and a smaller, interchangeable lower wheel, known as an anvil wheel. The sheet metal is placed between these wheels.
The process begins by selecting the appropriate anvil wheel, which has a specific radius to achieve the desired curvature. The sheet metal is then fed between the upper and lower wheels. The operator applies pressure by adjusting the tension, which is typically controlled by a screw mechanism. This pressure causes the metal to stretch and thin out as it is rolled back and forth between the wheels.
The key to the English wheel's operation is the combination of pressure and movement. As the metal is passed through the wheels, the pressure from the wheels stretches the metal, while the movement allows for even distribution of this stretching. This results in a smooth, continuous curve. The operator can control the degree of curvature by adjusting the pressure and selecting different anvil wheels.
The English wheel is particularly valued for its ability to create smooth, flowing curves without leaving marks or creases on the metal surface. It is commonly used in automotive restoration, aircraft manufacturing, and sculpture. Mastery of the English wheel requires skill and experience, as the operator must carefully control the pressure and movement to achieve the desired shape without over-stretching or distorting the metal.
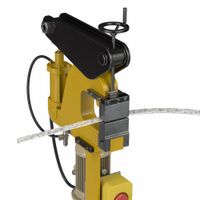
What is the difference between a shrinker and a stretcher?
A shrinker and a stretcher are tools used in metalworking to shape and form sheet metal, but they serve opposite functions.
A shrinker is designed to compress the metal, effectively reducing its surface area. It works by gripping the metal and pulling it together, creating a tighter curve or bend. This tool is particularly useful for creating concave shapes or reducing the diameter of a metal piece. The shrinker has jaws that move inwards when the tool is activated, allowing the metal to be gathered and compressed.
On the other hand, a stretcher is used to expand the metal, increasing its surface area. It operates by gripping the metal and pulling it apart, which is ideal for creating convex shapes or enlarging the diameter of a metal piece. The stretcher's jaws move outwards, stretching the metal and allowing it to spread.
Both tools are often used in tandem to achieve precise shaping of metal, especially in automotive restoration, aircraft construction, and custom metal fabrication. They allow for smooth, controlled manipulation of metal without the need for cutting or welding, preserving the integrity of the material.
How do you choose the right forming dies for a planishing hammer?
To choose the right forming dies for a planishing hammer, consider the following factors:
1. **Material Compatibility**: Ensure the die material is compatible with the metal you are working on. Common die materials include hardened steel for durability and nylon or urethane for softer metals to prevent marring.
2. **Shape and Size**: Select dies that match the desired shape and size of your workpiece. Dies come in various profiles such as flat, domed, or radius. Choose based on the curvature and detail required in your project.
3. **Surface Finish**: Opt for dies with a smooth surface finish to achieve a polished look on the metal. Any imperfections on the die will transfer to the workpiece.
4. **Die Hardness**: Consider the hardness of the die. Harder dies are suitable for heavy-duty applications and harder metals, while softer dies are better for delicate work.
5. **Interchangeability**: If your planishing hammer supports interchangeable dies, select a set that offers versatility for different projects. This allows for quick changes and adaptability.
6. **Project Requirements**: Assess the specific requirements of your project, such as the level of detail, finish, and production volume. This will guide you in choosing the appropriate die profile and material.
7. **Manufacturer Recommendations**: Follow the manufacturer's guidelines for die selection to ensure compatibility with your planishing hammer model.
8. **Budget**: Consider your budget, balancing cost with quality and durability. Investing in high-quality dies can save money in the long run by reducing wear and tear.
9. **Trial and Error**: Sometimes, selecting the right die involves experimentation. Test different dies to see which produces the best results for your specific application.
By evaluating these factors, you can select the most suitable forming dies for your planishing hammer, ensuring efficient and high-quality metalworking.
What materials can be shaped using an English wheel?
An English wheel is a versatile tool used primarily in metalworking to shape and form sheet materials into smooth, curved surfaces. The materials that can be shaped using an English wheel include:
1. **Aluminum**: Due to its malleability and lightweight nature, aluminum is commonly used with an English wheel. It is ideal for creating complex curves and shapes, often used in automotive and aircraft body panels.
2. **Steel**: Both mild and stainless steel can be shaped using an English wheel. Mild steel is more common due to its ease of shaping, while stainless steel requires more effort due to its hardness.
3. **Copper**: Known for its ductility, copper can be easily shaped and is often used in artistic applications and custom metalwork.
4. **Brass**: Similar to copper, brass is malleable and can be shaped into intricate designs, making it suitable for decorative items and musical instruments.
5. **Titanium**: Although more challenging to work with due to its strength and springiness, titanium can be shaped using an English wheel, often in aerospace applications.
6. **Bronze**: This alloy can be shaped with an English wheel, typically used in artistic and architectural applications.
7. **Other Alloys**: Various other metal alloys can be shaped, depending on their composition and properties, as long as they are within the workable thickness range for the English wheel.
The English wheel is primarily used for thin sheets of these materials, typically ranging from 18 to 22 gauge, though thicker materials can be worked with more effort. The tool is favored for its ability to produce smooth, compound curves without the need for welding or additional finishing processes.
How do you maintain and care for sheet metal shaping machines?
To maintain and care for sheet metal shaping machines, follow these steps:
1. **Regular Cleaning**: Keep the machine free from dust, metal shavings, and debris. Use a soft brush or compressed air to clean hard-to-reach areas.
2. **Lubrication**: Regularly lubricate moving parts such as bearings, gears, and slides with appropriate lubricants to reduce friction and prevent wear.
3. **Inspection**: Conduct routine inspections for signs of wear, damage, or misalignment. Check for loose bolts, worn belts, and damaged electrical components.
4. **Calibration**: Ensure the machine is properly calibrated to maintain precision. Regularly check and adjust settings as needed.
5. **Tool Maintenance**: Keep shaping tools sharp and in good condition. Replace or repair any damaged tools to ensure quality output.
6. **Alignment**: Regularly check and adjust the alignment of the machine components to ensure accurate shaping and prevent undue stress on parts.
7. **Coolant System**: Maintain the coolant system by checking fluid levels and replacing coolant as necessary. Clean the system to prevent clogs and contamination.
8. **Safety Checks**: Regularly test safety features such as emergency stops and guards to ensure they are functioning correctly.
9. **Electrical System**: Inspect electrical connections and components for signs of wear or damage. Ensure all wiring is secure and intact.
10. **Documentation**: Keep detailed records of maintenance activities, inspections, and repairs to track the machine’s condition and schedule future maintenance.
11. **Training**: Ensure operators are well-trained in machine operation and maintenance procedures to prevent misuse and extend the machine’s lifespan.
12. **Environment**: Maintain a clean and controlled environment to prevent dust and moisture from affecting machine performance.
By following these steps, you can ensure the longevity and optimal performance of sheet metal shaping machines.
What safety precautions should be taken when using sheet metal shaping machines?
1. **Personal Protective Equipment (PPE):** Wear safety goggles, gloves, and steel-toed boots to protect against flying debris and sharp edges. Use ear protection if the machine is loud.
2. **Training and Certification:** Ensure operators are properly trained and certified to use the specific machine. Understanding the machine's operation and safety features is crucial.
3. **Machine Inspection:** Regularly inspect the machine for any signs of wear, damage, or malfunction. Ensure all safety guards and emergency stop buttons are functional.
4. **Work Area Safety:** Keep the work area clean and free of clutter. Ensure adequate lighting and ventilation. Mark safe zones and keep unauthorized personnel away.
5. **Proper Setup:** Securely fasten the sheet metal and ensure it is properly aligned before starting the machine. Use clamps or fixtures to hold the material in place.
6. **Use of Guards and Shields:** Always use machine guards and shields to protect against accidental contact with moving parts.
7. **Emergency Procedures:** Be familiar with emergency shutdown procedures and ensure that emergency stop buttons are easily accessible.
8. **Avoid Loose Clothing and Jewelry:** Wear fitted clothing and remove any jewelry to prevent entanglement with moving parts.
9. **Focus and Awareness:** Stay alert and focused while operating the machine. Avoid distractions and never leave the machine running unattended.
10. **Regular Maintenance:** Follow a regular maintenance schedule to ensure the machine operates safely and efficiently. Replace worn or damaged parts promptly.
11. **Safe Handling of Materials:** Use proper lifting techniques or mechanical aids to handle heavy or large sheets of metal to prevent injury.
12. **Lockout/Tagout Procedures:** Follow lockout/tagout procedures during maintenance or when the machine is not in use to prevent accidental startup.