Call +(254) 703 030 000 / 751 483 999 / 721 704 777
.....Read More

Frequently Asked Questions
What is a broach used for in metalworking?
A broach is a precision tool used in metalworking to remove material and create precise shapes, holes, or profiles in a workpiece. It is typically employed in a process known as broaching, which involves a linear motion where the broach is pushed or pulled through the material. The broach itself is a long tool with a series of progressively larger cutting teeth, each designed to remove a small amount of material, resulting in a smooth and accurate finish.
Broaching is commonly used for creating keyways, splines, and other complex internal and external profiles that would be difficult to achieve with other machining processes. The process is highly efficient for producing high-volume, consistent parts with tight tolerances. Broaches can be designed for specific applications, such as internal broaches for holes and external broaches for surfaces.
There are two main types of broaching: linear and rotary. Linear broaching is the most common and involves a straight path, while rotary broaching involves a rotating motion, often used for creating polygonal shapes in holes.
Broaching is favored for its ability to produce precise and repeatable results quickly, making it ideal for mass production. However, it requires specialized equipment and tooling, which can be costly. The choice of broach material, typically high-speed steel or carbide, depends on the workpiece material and the desired finish.
Overall, broaching is a critical process in industries such as automotive, aerospace, and manufacturing, where precision and efficiency are paramount.
How does a keyway broach work?
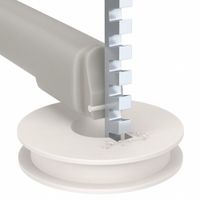
A keyway broach is a cutting tool used to create keyways in a workpiece, typically a gear or pulley. The process involves using a broaching machine and a broach, which is a long, multi-toothed tool. The broach is pushed or pulled through the workpiece to cut the keyway.
The broach has a series of progressively larger teeth that remove material in a single pass. The first few teeth are smaller and act as roughing teeth, gradually increasing in size to the finishing teeth, which define the final dimensions of the keyway. The broach is guided through the workpiece by a bushing that fits into the bore of the workpiece, ensuring alignment and stability.
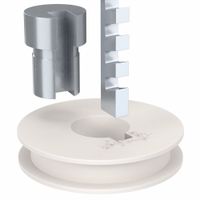
The broaching process begins by securing the workpiece in a fixture on the broaching machine. The broach is then inserted into the starting hole of the workpiece. As the broach is pushed or pulled through, each tooth removes a small amount of material, cutting the keyway to the desired depth and width. The process is efficient and produces a precise, smooth finish.
Keyway broaching is commonly used in manufacturing for its ability to produce accurate and consistent keyways quickly. It is suitable for both high-volume production and custom applications. The process is versatile, capable of creating keyways in various materials, including metals and plastics.
What are the differences between keyway broaches and rotary broaches?
Keyway broaches and rotary broaches are both tools used in machining to create specific shapes in workpieces, but they differ in their operation and applications.
Keyway Broaches:
1. **Operation**: Keyway broaches are used in a linear motion. They are pushed or pulled through a pre-drilled hole in the workpiece to cut a keyway slot.
2. **Design**: These broaches have a series of progressively larger teeth that gradually remove material to form the desired slot.
3. **Application**: Primarily used for cutting keyways in gears, pulleys, and other components that require a key for torque transmission.
4. **Setup**: Requires a broaching machine or an arbor press. The setup can be more time-consuming due to the need for alignment and support.
5. **Material Removal**: Removes material in a single pass, making it efficient for producing straight slots.
Rotary Broaches:
1. **Operation**: Rotary broaches operate in a rotational motion. The broach is held at a slight angle and rotates with the workpiece to cut the desired shape.
2. **Design**: Typically shorter and more compact, with a cutting edge that forms the shape in a single pass.
3. **Application**: Used for creating polygonal shapes like hexagons, squares, or splines in blind or through holes.
4. **Setup**: Can be used on lathes, mills, or CNC machines, offering more flexibility and quicker setup.
5. **Material Removal**: Cuts the shape in a single pass, but the process is generally slower than keyway broaching due to the rotational cutting action.
In summary, keyway broaches are ideal for linear slot cutting, while rotary broaches are suited for creating complex shapes in a rotational manner.
How do you use a broach to create a keyway?
To create a keyway using a broach, follow these steps:
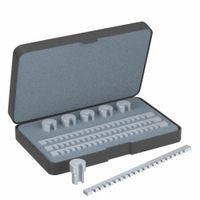
1. **Select the Broach**: Choose a broach that matches the desired keyway size and shape. Broaches are available in various sizes and are designed for specific keyway dimensions.
2. **Prepare the Workpiece**: Ensure the workpiece is properly secured in a vise or fixture. The hole where the keyway will be cut should be pre-drilled to the appropriate diameter.
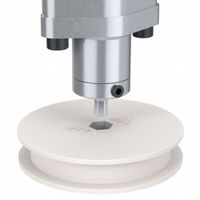
3. **Set Up the Arbor Press**: Position the arbor press over the workpiece. The press should be capable of exerting sufficient force to push the broach through the material.
4. **Insert the Broach**: Place the broach into the starting hole of the workpiece. The broach should be aligned straight to ensure an even cut.
5. **Use Shims**: If necessary, use shims to adjust the depth of the cut. Shims are placed behind the broach to control the depth of the keyway.
6. **Apply Lubrication**: Apply cutting oil or lubricant to the broach and workpiece to reduce friction and prevent overheating.
7. **Perform the Broaching Operation**: Slowly and steadily apply pressure using the arbor press to push the broach through the workpiece. Ensure the broach remains aligned and does not tilt.
8. **Remove the Broach**: Once the broach has passed through the workpiece, remove it carefully. Inspect the keyway for accuracy and finish.
9. **Clean and Deburr**: Clean the workpiece to remove any metal shavings. Deburr the edges of the keyway to ensure a smooth finish.
10. **Inspect the Keyway**: Verify the dimensions and fit of the keyway using appropriate measuring tools to ensure it meets the required specifications.
What materials can be machined with broaches?
Broaching is a versatile machining process that can be used on a wide range of materials. The materials that can be effectively machined with broaches include:
1. **Metals:**
- **Steel:** Both carbon and alloy steels, including stainless steel, are commonly broached. The process is suitable for hardened and unhardened steels.
- **Aluminum:** Due to its softness and machinability, aluminum is frequently broached for various applications.
- **Brass and Bronze:** These materials are easily broached and are often used in applications requiring good corrosion resistance.
- **Copper:** Broaching is effective for copper, which is used in electrical components due to its excellent conductivity.
- **Titanium:** Although more challenging due to its strength and toughness, titanium can be broached with appropriate tooling and techniques.
- **Nickel Alloys:** These are broached for high-performance applications, especially in aerospace and power generation.
2. **Non-Metals:**
- **Plastics:** Certain thermoplastics and thermosetting plastics can be broached, provided the material is stable and not prone to melting or deformation under the process conditions.
- **Composites:** Some composite materials can be broached, though care must be taken to avoid delamination or damage to the material structure.
3. **Other Materials:**
- **Cast Iron:** Both gray and ductile cast irons are suitable for broaching, often used in automotive and heavy machinery components.
- **Powdered Metals:** Sintered materials can be broached, though they may require specific considerations due to their porosity and potential brittleness.
The choice of material for broaching depends on the specific application requirements, including the desired surface finish, dimensional accuracy, and production volume. Proper tool selection and process parameters are crucial to successfully broaching different materials.
What are the components of a broaching setup?
A broaching setup consists of several key components that work together to perform the broaching process effectively:
1. **Broach Tool**: The broach is a multi-tooth cutting tool with a series of progressively larger teeth. It is the primary component that performs the cutting operation. Broaches can be designed for internal or external broaching and come in various shapes, such as round, square, or custom profiles.
2. **Broaching Machine**: This is the machine that holds and moves the broach through the workpiece. Broaching machines can be horizontal or vertical and are designed to provide the necessary force and speed for the broaching operation. They include hydraulic, mechanical, or electro-mechanical drives.
3. **Workpiece Holder**: This component securely holds the workpiece in place during the broaching process. It ensures that the workpiece does not move or shift, which is crucial for maintaining precision and accuracy.
4. **Fixture**: Fixtures are used to position and support the workpiece accurately. They are custom-designed for specific workpieces to ensure repeatability and precision in the broaching operation.
5. **Guide Rails**: These are used to guide the broach tool along the desired path. They ensure that the broach moves in a straight line and maintains the correct alignment with the workpiece.
6. **Coolant System**: A coolant system is used to reduce heat and friction during the broaching process. It helps in prolonging the life of the broach tool and improving the surface finish of the workpiece.
7. **Chip Disposal System**: This system removes chips and debris generated during the broaching process, preventing them from interfering with the operation or damaging the tool and workpiece.
8. **Control System**: Modern broaching machines are equipped with control systems that allow operators to set and monitor parameters such as speed, feed rate, and cutting depth, ensuring optimal performance and safety.
How do you maintain and sharpen broaches?
To maintain and sharpen broaches, follow these steps:
1. **Inspection**: Regularly inspect broaches for wear, damage, or dullness. Look for signs of chipping, uneven wear, or burrs on the cutting edges.
2. **Cleaning**: Clean the broach thoroughly to remove any debris, chips, or coolant residues. Use a soft brush and appropriate cleaning solution to ensure all particles are removed.
3. **Sharpening**: Use a specialized broach sharpening machine or a precision grinding machine. Ensure the machine is set to the correct angles and specifications for the broach type. Align the broach properly to maintain the original geometry.
4. **Grinding**: Carefully grind the cutting edges. Use a fine-grit grinding wheel to avoid removing too much material. Maintain the original rake and clearance angles to ensure efficient cutting performance.
5. **Honing**: After grinding, hone the cutting edges to remove burrs and achieve a smooth finish. This step enhances the sharpness and prolongs the tool's life.
6. **Balancing**: Check the broach for balance after sharpening. An imbalanced broach can cause uneven cutting and damage to the workpiece or machine.
7. **Lubrication**: Apply a light coat of rust-preventive oil to protect the broach from corrosion during storage.
8. **Storage**: Store broaches in a dry, clean environment. Use protective covers or cases to prevent damage from accidental contact.
9. **Record Keeping**: Maintain a log of sharpening and maintenance activities. This helps track the broach's condition and schedule future maintenance.
10. **Professional Services**: For complex or high-precision broaches, consider using professional sharpening services to ensure optimal results.
Regular maintenance and proper sharpening techniques extend the life of broaches and ensure consistent performance.