Call +(254) 703 030 000 / 751 483 999 / 721 704 777
.....Read More


Frequently Asked Questions
How do I install a backing pad on an angle grinder?
1. **Safety First**: Ensure the angle grinder is unplugged or the battery is removed to prevent accidental start-up.
2. **Remove Existing Accessories**: If there is a disc or any other accessory attached, use the provided wrench or spanner to loosen the locking nut. Hold the spindle lock button to keep the spindle from rotating while you unscrew the nut.
3. **Inspect the Backing Pad**: Check the backing pad for any damage or defects. Ensure it is compatible with your angle grinder's size and specifications.
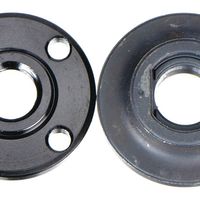
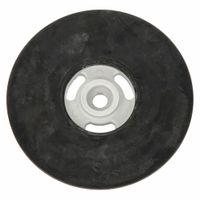
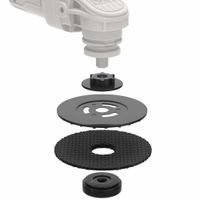
4. **Attach the Backing Pad**: Place the backing pad onto the spindle. Ensure it sits flat against the grinder's flange. The backing pad usually has a hole in the center that fits over the spindle.
5. **Secure with Locking Nut**: Place the locking nut over the backing pad. Some angle grinders have a specific side of the nut that should face the pad, often indicated by a label or manual.
6. **Tighten the Nut**: Use the wrench or spanner to tighten the nut. Hold the spindle lock button to prevent the spindle from turning. Ensure the nut is snug but avoid overtightening, which can damage the pad or grinder.
7. **Check Alignment**: Ensure the backing pad is centered and aligned properly. It should not wobble or be off-balance.
8. **Test the Setup**: Plug in the angle grinder or reattach the battery. Turn it on briefly to ensure the backing pad is securely attached and spins without wobbling.
9. **Attach Sanding Disc**: If using for sanding, attach the appropriate sanding disc to the backing pad, ensuring it is centered and secure.
10. **Final Safety Check**: Wear appropriate safety gear, including goggles and gloves, before using the angle grinder.
What is the difference between hook-and-loop and adhesive-backed backing pads?
Hook-and-loop and adhesive-backed backing pads are both used to attach sanding discs or polishing pads to power tools, but they differ in their attachment methods and applications.
Hook-and-loop backing pads use a system similar to Velcro, where one side of the pad has tiny hooks, and the corresponding sanding or polishing disc has loops. This allows for quick and easy attachment and removal of the discs. The hook-and-loop system is ideal for applications requiring frequent changes of discs, as it provides a secure hold while allowing for easy swapping. It is commonly used in orbital sanders and polishers, offering flexibility and convenience in various sanding and polishing tasks.
Adhesive-backed backing pads, on the other hand, use a pressure-sensitive adhesive to attach the sanding or polishing disc to the pad. The discs have a sticky backing that adheres directly to the pad. This method provides a strong bond, making it suitable for heavy-duty applications where the disc needs to stay firmly in place. However, changing discs can be more time-consuming, as the adhesive can leave residue on the pad, requiring cleaning before applying a new disc. Adhesive-backed systems are often used in applications where disc changes are infrequent or where maximum adhesion is necessary.
In summary, hook-and-loop backing pads offer ease of use and quick disc changes, making them suitable for tasks requiring frequent disc swaps. Adhesive-backed backing pads provide a stronger bond for heavy-duty applications but can be less convenient for changing discs.
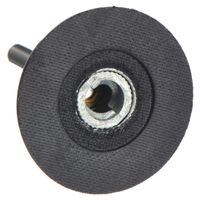
How do I change a quick-change backing pad?
To change a quick-change backing pad, follow these steps:
1. **Safety First**: Ensure the tool is unplugged or the battery is removed to prevent accidental activation. Wear safety gloves and goggles to protect against sharp edges and debris.
2. **Access the Backing Pad**: Depending on the tool, you may need to remove a guard or cover to access the backing pad. Refer to the tool's manual for specific instructions.
3. **Lock the Spindle**: Most tools have a spindle lock button. Press and hold this button to prevent the spindle from rotating while you change the backing pad.
4. **Remove the Old Backing Pad**: Use the appropriate wrench or tool provided with your equipment to unscrew the backing pad. Turn it counterclockwise to loosen and remove it from the spindle.
5. **Inspect the Spindle and New Pad**: Check the spindle for any damage or debris. Ensure the new backing pad is compatible with your tool and is free from defects.
6. **Attach the New Backing Pad**: Align the new backing pad with the spindle. Screw it on by turning it clockwise. Hand-tighten initially, then use the wrench to secure it firmly, but avoid over-tightening to prevent damage.
7. **Reassemble the Tool**: If you removed any guards or covers, reattach them securely.
8. **Test the Installation**: Plug in the tool or reinsert the battery. Turn it on briefly to ensure the backing pad is installed correctly and spins without wobbling.
9. **Final Check**: Ensure all components are secure and the tool is functioning properly before use.
By following these steps, you can safely and efficiently change a quick-change backing pad. Always refer to the specific tool's manual for any additional instructions or safety precautions.
Can I use a backing pad with any type of abrasive disc?
No, you cannot use a backing pad with any type of abrasive disc indiscriminately. The compatibility between backing pads and abrasive discs depends on several factors:
1. **Disc Type**: Different abrasive discs, such as fiber discs, flap discs, and sanding discs, have specific requirements for backing pads. For instance, fiber discs typically require a hard backing pad to provide the necessary support, while flap discs often have built-in support and may not need an additional pad.
2. **Size and Shape**: The backing pad must match the size and shape of the abrasive disc. Using a mismatched size can lead to uneven wear, reduced performance, and potential safety hazards.
3. **Attachment Method**: Ensure the attachment method of the backing pad is compatible with the disc. Common methods include hook-and-loop, adhesive, or screw-on systems. Mismatched systems can result in poor adhesion and disc slippage.
4. **Material Compatibility**: The material of the backing pad should be suitable for the type of work and the material being worked on. For example, a soft backing pad may be used for contour sanding, while a hard pad is better for flat surfaces.
5. **Tool Compatibility**: The backing pad and abrasive disc must be compatible with the tool being used, such as an angle grinder or sander. Check the manufacturer's specifications for maximum RPM ratings to ensure safe operation.
6. **Application**: Consider the specific application, such as grinding, sanding, or polishing, as this will influence the choice of backing pad and disc combination.
Always refer to the manufacturer's guidelines for both the backing pad and the abrasive disc to ensure compatibility and safe usage.
How do I secure a fiber disc to a backing pad?
To secure a fiber disc to a backing pad, follow these steps:
1. **Select the Right Backing Pad**: Ensure the backing pad matches the size and type of the fiber disc. The pad should be compatible with the tool you are using, such as an angle grinder or sander.
2. **Inspect the Backing Pad**: Check the backing pad for any damage or wear. A damaged pad can lead to improper disc attachment and potential safety hazards.
3. **Align the Disc**: Place the fiber disc on the backing pad, ensuring the center hole of the disc aligns perfectly with the center of the pad. This alignment is crucial for balanced operation.
4. **Secure with a Locking Nut or Flange**: Most backing pads come with a locking nut or flange system. Place the locking nut or flange over the center of the disc and tighten it securely. Use the appropriate tool, such as a wrench, to ensure it is firmly attached.
5. **Check for Stability**: Once secured, manually rotate the disc to ensure it is stable and does not wobble. A stable disc ensures smooth operation and reduces the risk of accidents.
6. **Test the Setup**: Before starting your work, briefly run the tool at a low speed to ensure the disc is securely attached and operates smoothly without any vibrations.
7. **Safety Precautions**: Always wear appropriate personal protective equipment (PPE) such as safety goggles, gloves, and hearing protection when operating power tools.
By following these steps, you can securely attach a fiber disc to a backing pad, ensuring safe and efficient operation.
What size backing pad do I need for my tool?
To determine the appropriate size backing pad for your tool, consider the following factors:
1. **Tool Type and Model**: Check the manufacturer's specifications for your tool. Different tools, such as angle grinders, orbital sanders, or polishers, have specific backing pad size recommendations. This ensures optimal performance and safety.
2. **Disc Size Compatibility**: The backing pad should match the size of the abrasive disc or polishing pad you intend to use. Common sizes include 4.5 inches, 5 inches, 6 inches, and 7 inches. Using a backing pad that matches the disc size ensures even pressure distribution and effective material removal or polishing.
3. **Application**: Consider the task at hand. Larger backing pads cover more surface area, making them suitable for large, flat surfaces. Smaller pads offer better control and precision for detailed work or curved surfaces.
4. **Tool Power and Speed**: Ensure the backing pad is rated for the tool's speed (RPM). Using a pad not designed for high speeds can lead to failure or unsafe conditions. Check the pad's maximum RPM rating and compare it with your tool's specifications.
5. **Attachment Method**: Verify the attachment method (e.g., hook and loop, adhesive, or screw-on) is compatible with your tool and the discs you plan to use. This ensures secure attachment and easy disc changes.
6. **Material and Durability**: Choose a backing pad made from durable materials like rubber or polyurethane, which can withstand the tool's power and the demands of the task.
By considering these factors, you can select the right size backing pad that ensures efficiency, safety, and the desired finish for your project.
How do I maintain and clean a backing pad?
To maintain and clean a backing pad, follow these steps:
1. **Regular Inspection**: Frequently check the backing pad for wear and tear. Look for cracks, tears, or any signs of damage that could affect performance.
2. **Cleaning**: After each use, remove dust and debris. Use a soft brush or compressed air to clean the surface. Avoid using water or solvents that could degrade the material.
3. **Adhesive Residue Removal**: If adhesive residue from sanding discs is present, gently rub the surface with a cloth dampened with a mild solvent like isopropyl alcohol. Ensure the pad is completely dry before reuse.
4. **Storage**: Store the backing pad in a cool, dry place away from direct sunlight and extreme temperatures. This prevents warping and material degradation.
5. **Avoid Overheating**: During use, ensure the pad does not overheat. Overheating can cause the pad to warp or degrade. Use appropriate speed settings and apply minimal pressure.
6. **Proper Attachment**: Ensure the backing pad is securely attached to the tool. Loose attachments can cause uneven wear and potential damage.
7. **Replacement**: Replace the backing pad if it shows significant wear, damage, or if it no longer holds sanding discs securely. Regular replacement ensures optimal performance and safety.
8. **Compatibility Check**: Use only compatible sanding discs and tools to prevent undue stress on the backing pad.
By following these maintenance and cleaning steps, you can extend the life of your backing pad and ensure efficient and safe operation.