Call +(254) 703 030 000 / 751 483 999 / 721 704 777
.....Read More

Frequently Asked Questions
What are abrasive accessories used for?
Abrasive accessories are tools or attachments designed to modify, clean, or finish surfaces by rubbing, grinding, or sanding. They are commonly used with power tools like drills, grinders, sanders, and rotary tools to perform various tasks across many industries and DIY projects.
Their primary uses include: * Material removal: For example, grinding down welds, shaping metal, or removing excess material from wood.
* Surface preparation: Such as cleaning rust, paint, or old coatings, or preparing a surface for painting or bonding.
* Finishing: Achieving a smooth surface, polishing, or deburring edges.
* Sharpening: Sharpening tools like knives, drill bits, or chisels.
* Cutting: Certain abrasive accessories, like cut-off wheels, are used for cutting through various materials.Common types of abrasive accessories include grinding wheels, sanding discs, abrasive belts, wire brushes, flap discs, polishing pads, and various specialized bits for rotary tools. They come in different grits (coarseness), materials (e.g., aluminum oxide, silicon carbide, ceramic), and bonding types, each suited for specific applications and materials like metal, wood, plastic, ceramics, and stone.
How do I choose the right sandpaper grit for my project?
Choosing the right sandpaper grit is crucial for a successful project, as it dictates the aggressiveness of the sanding and the final finish. Sandpaper grits are typically categorized by numbers: lower numbers (e.g., 40-80 grit) are coarse and remove material quickly, ideal for initial shaping, stripping old finishes, or tackling rough surfaces. Medium grits (e.g., 100-150 grit) are good for general sanding, smoothing out minor imperfections, and preparing surfaces for painting or staining. Fine grits (e.g., 180-220 grit) are used for final sanding before finishing, creating a smooth surface that will readily accept paint or stain. Very fine grits (e.g., 320-600 grit) are excellent for sanding between coats of finish, wet sanding, or achieving a silky-smooth polish. For certain applications, such as automotive or delicate polishing, even higher grits (e.g., 1000-2000+) are available.
To determine the best grit for your project, consider the following:1. **Starting condition of the material:** If the surface is very rough or has significant imperfections, begin with a coarser grit.
2. **Desired outcome:** For rough removal, use coarse; for smooth preparation, use fine; for polishing, use very fine.
3. **Material type:** Different materials respond to sanding differently. Hardwoods might require slightly coarser grits initially than softwoods, while metals or plastics might need specific types of abrasive.
4. **Progression:** Always work your way up through grits. Starting with a very fine grit on a rough surface will be inefficient and might not achieve the desired smoothness. A common practice is to jump no more than one or two grit sizes at a time (e.g., 80, then 120, then 180).By carefully selecting and progressing through grits, you can achieve optimal results, from efficient material removal to a flawlessly smooth finish.
What is the difference between flap wheels and surface-conditioning pads?
Flap wheels and surface-conditioning pads are both abrasive tools used for finishing and polishing surfaces, but they differ significantly in their construction, application, and the results they produce.
Flap wheels consist of multiple layers (flaps) of abrasive material, typically sandpaper, arranged radially around a central hub. As the wheel rotates, the flaps conform to the contours of the workpiece, making them ideal for finishing irregular shapes, deburring, and blending welds. The flexible nature of flap wheels allows them to provide a consistent finish over a large area, and new abrasive material is continuously exposed as the outer layers wear away, ensuring a fresh cutting surface. They come in various grits and sizes, suitable for applications ranging from aggressive stock removal to fine finishing.
Surface-conditioning pads, on the other hand, are made from non-woven nylon or synthetic fibers impregnated with abrasive grains. This open, porous structure allows for cool grinding, prevents loading, and provides a uniform, consistent finish. They are excellent for cleaning, deburring, blending, and satin finishing on a variety of materials, including metals, plastics, and composites. Unlike flap wheels, surface-conditioning pads create a more refined, matte finish and are less aggressive in material removal. They are often used for preparing surfaces for coating, removing light rust or oxidation, and achieving a decorative finish.
In summary, flap wheels are more aggressive and better suited for deburring, blending, and working on contoured surfaces, while surface-conditioning pads offer a finer, more consistent finish for cleaning, blending, and surface preparation. The choice between them depends on the desired finish and the specific application.
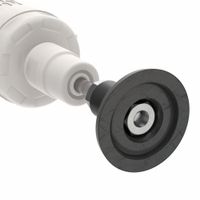
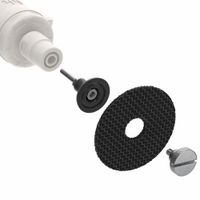
How do I install a backing pad on a rotary tool?
To install a backing pad on a rotary tool, first ensure your tool is unplugged for safety. Most rotary tools have a collet or a threaded shaft. If it's a collet system, loosen the collet nut and insert the backing pad's shaft into the collet, then tighten the nut firmly. If it's a threaded shaft, simply screw the backing pad onto the shaft until it is snug. Some backing pads may require a wrench or a specialized tool for tightening, which often comes with the rotary tool kit. Always refer to your rotary tool's instruction manual for specific guidance on accessory installation, as models can vary. Ensure the backing pad is securely attached before operating the tool to prevent it from coming loose during use.
What are mandrels and arbors used for in sanding?
Mandrels and arbors are essential accessories in sanding applications, primarily serving as holders or mounting devices for various abrasive tools. They allow rotary sanding tools to be securely attached to power drills, rotary tools, or other machinery.
A mandrel typically consists of a shaft with a threaded or clamping mechanism at one end, designed to hold sanding discs, flap wheels, or abrasive drums. The other end of the shaft is usually cylindrical and fits into the chuck of a power tool. This allows the abrasive to rotate at high speeds, making it effective for shaping, smoothing, and finishing surfaces.
Arbors, while similar, are often more robust and are commonly used for mounting larger or heavier sanding attachments like grinding wheels, wire brushes, or large drum sanders. They provide a stable and secure connection, ensuring concentric rotation and preventing wobbling during operation.
In essence, both mandrels and arbors act as an interface between the power source and the abrasive material, enabling precise and efficient material removal in a wide range of sanding tasks, from fine detail work to heavy-duty surface preparation. Their proper use is crucial for safety and achieving optimal sanding results.
How do expanding drums work with abrasive spiral bands?
Expanding drums are a key component in abrasive finishing, particularly when used with abrasive spiral bands. These drums are typically made of rubber or other elastic materials and are designed to securely hold abrasive bands during sanding, grinding, or polishing operations.
Here's how they work: The expanding drum has a mechanism that allows its diameter to increase. When an abrasive spiral band is slid over the drum, the drum is then expanded. This expansion creates a tight, secure fit between the drum and the inner surface of the abrasive band. This tension prevents the band from slipping or moving during operation, ensuring consistent and efficient material removal.
The "spiral" in "abrasive spiral bands" refers to how the abrasive material is wound around the band, allowing for continuous contact with the workpiece and efficient debris removal. The combination of the expanding drum and the spiral band provides a stable and effective system for various abrasive applications, from coarse material removal to fine finishing. They are commonly used in woodworking, metalworking, and other industries where controlled and precise abrasive action is required.
What is the best way to use sanding blocks for hand sanding?
When hand sanding, a sanding block is essential for achieving a smooth and even finish, especially on flat surfaces. The best way to use a sanding block involves several key steps.
First, choose the right sanding block. They come in various materials like rubber, cork, or foam, each offering different levels of flexibility. For flat surfaces, a rigid block is ideal to prevent dips and valleys. For contoured surfaces, a more flexible block or sponge can adapt to the curves.
Next, select the appropriate grit sandpaper. Start with a coarser grit (e.g., 80-120) to remove material quickly and address imperfections, then progressively move to finer grits (e.g., 180-220, then 320+) for a smoother finish. Ensure the sandpaper fits snugly around the block, with no creases or overlaps, to prevent uneven pressure.
When sanding, apply even and consistent pressure across the entire surface of the block. Avoid pressing down too hard, which can create gouges or uneven spots. Use long, consistent strokes, moving with the grain of the wood when possible. Overlap each stroke slightly to ensure full coverage and prevent missing spots.
Periodically check your progress by wiping away dust and inspecting the surface. Change sandpaper sheets as they become clogged with dust or lose their abrasive effectiveness. For critical applications, consider drawing pencil lines across the surface before sanding; when all the lines disappear, you've achieved a consistent level of sanding across that area. Remember that sanding is a progressive process, and patience is key to achieving a professional-looking finish.
How do I maintain and clean abrasive accessories?
To maintain and clean abrasive accessories, regularly remove debris and dust using a stiff brush or compressed air. For accessories like sanding belts or discs, use a sanding belt cleaner stick to remove clogged material and extend their lifespan. For wire brushes or abrasive wheels, inspect for bent or broken bristles/wires and replace if necessary. Store all abrasive accessories in a dry environment to prevent rust and degradation. Always follow the manufacturer's specific guidelines for cleaning and maintenance to ensure optimal performance and safety.
Can abrasive accessories be used on all types of materials?
No, abrasive accessories cannot be used on all types of materials. The effectiveness and safety of using abrasive accessories depend heavily on the specific type of abrasive, the material being worked on, and the desired outcome. Different abrasives are designed with varying hardness, grit sizes, and bonding agents to suit different materials. For example, some abrasives are ideal for grinding metal, while others are formulated for polishing wood, sanding plastics, or shaping stone. Using the wrong abrasive on a material can lead to poor results, damage the material, or even be dangerous due to excessive heat generation, material splintering, or premature wear of the accessory itself. Always consult the manufacturer's recommendations for both the abrasive accessory and the material you intend to work on to ensure compatibility and safe operation.
What safety precautions should I take when using abrasive accessories?
When using abrasive accessories, always wear appropriate personal protective equipment (PPE), including safety glasses or a face shield, gloves, and hearing protection. Ensure the accessory is compatible with your tool and operating within its maximum RPM rating. Inspect the accessory for damage before use and discard any that are cracked, chipped, or otherwise compromised. Secure your workpiece properly to prevent movement during operation. Avoid applying excessive pressure, which can lead to kickback or breakage. Use the correct accessory for the task at hand and follow the manufacturer's guidelines for safe operation and maintenance.