Call +(254) 703 030 000 / 751 483 999 / 721 704 777
.....Read More
Frequently Asked Questions
What are the best weld cleaning tools for stainless steel?
The best weld cleaning tools for stainless steel include:
1. **Electrochemical Weld Cleaners**: These are highly effective for removing discoloration and oxide layers from stainless steel welds. They use an electrolyte solution and an electric current to clean and passivate the surface, restoring the metal's corrosion resistance and appearance.
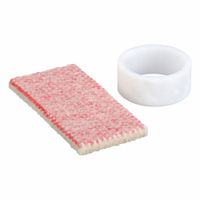
2. **Stainless Steel Wire Brushes**: These are essential for manual cleaning. They help remove surface contaminants and are specifically designed to avoid cross-contamination that can occur with carbon steel brushes.
3. **Flap Discs and Grinding Wheels**: Used for grinding and finishing welds, these tools help smooth out the weld bead and remove any surface imperfections. It's crucial to use discs specifically designed for stainless steel to prevent contamination.
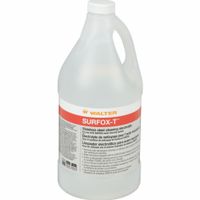
4. **Pickling Paste and Gels**: These chemical solutions are applied to the weld area to remove oxides and scale. They are effective for cleaning but require careful handling due to their corrosive nature.
5. **Scotch-Brite Pads**: These abrasive pads are used for light cleaning and finishing. They help in achieving a uniform surface finish without removing too much material.
6. **Tig Brushes**: These are specialized brushes used with electrochemical weld cleaners. They are designed to withstand the electric current and help in the effective cleaning of welds.
7. **Power Tools with Non-Woven Abrasives**: Tools like angle grinders equipped with non-woven abrasive wheels can be used for surface finishing and blending welds without damaging the stainless steel.
8. **Ultrasonic Cleaners**: For small parts, ultrasonic cleaners can effectively remove contaminants from welds using high-frequency sound waves in a cleaning solution.
Selecting the right tool depends on the specific requirements of the weld, including the size, location, and desired finish.
How do weld cleaning systems work?
Weld cleaning systems are designed to remove oxidation, discoloration, and contaminants from welded metal surfaces, particularly stainless steel, to restore their appearance and corrosion resistance. These systems typically use electrochemical processes, which involve the following steps:
1. **Electrolytic Cleaning**: The system uses an electrolytic cleaning solution, often an acidic or neutral electrolyte, which is applied to the weld area. This solution helps in breaking down the oxides and contaminants on the metal surface.
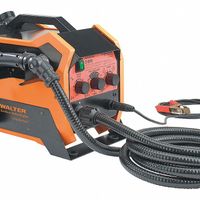
2. **Electrochemical Reaction**: A power supply unit generates a low-voltage electrical current that is passed through the cleaning tool, which is usually a brush or a pad. The tool is connected to the positive terminal (anode), while the workpiece is connected to the negative terminal (cathode). When the tool is applied to the weld, the electrical current facilitates an electrochemical reaction that dissolves the oxides and impurities.
3. **Passivation**: During the cleaning process, the electrochemical reaction not only removes contaminants but also helps in re-passivating the stainless steel surface. This is crucial for restoring the protective chromium oxide layer that prevents corrosion.
4. **Neutralization and Rinsing**: After cleaning, the surface is often neutralized with a neutralizing solution to stop the acidic reaction and then rinsed with water to remove any residual chemicals.
5. **Polishing (Optional)**: Some systems offer additional polishing capabilities to enhance the surface finish, providing a more aesthetically pleasing and uniform appearance.
Weld cleaning systems are preferred over traditional methods like pickling pastes due to their efficiency, safety, and environmental friendliness, as they reduce the need for hazardous chemicals and minimize waste.
What is the purpose of weld cleaning solutions?
Weld cleaning solutions are used to remove contaminants and imperfections from welded surfaces, ensuring the integrity and appearance of the weld. These solutions serve several key purposes:
1. **Oxide Layer Removal**: Welding often results in the formation of an oxide layer on the metal surface, which can affect the metal's appearance and corrosion resistance. Weld cleaning solutions help remove this layer, restoring the metal's natural finish.
2. **Corrosion Resistance**: By eliminating contaminants and oxide layers, these solutions enhance the corrosion resistance of the welded area, which is crucial for the longevity and durability of the metal structure.
3. **Aesthetic Improvement**: Weld cleaning solutions improve the visual appearance of the weld by removing discoloration and burn marks, resulting in a cleaner and more professional finish.
4. **Passivation**: Some weld cleaning solutions also passivate the metal surface, forming a protective oxide layer that prevents further oxidation and corrosion.
5. **Surface Preparation**: They prepare the surface for subsequent treatments, such as painting or coating, by ensuring it is clean and free of impurities that could affect adhesion.
6. **Safety and Compliance**: Using weld cleaning solutions can help meet industry standards and regulations regarding the cleanliness and safety of metal structures, particularly in sectors like food processing and pharmaceuticals.
7. **Efficiency**: These solutions can significantly reduce the time and effort required for manual cleaning methods, increasing productivity and reducing labor costs.
Overall, weld cleaning solutions are essential for maintaining the quality, appearance, and longevity of welded metal structures.
How do you remove heat tint from metal surfaces?
To remove heat tint from metal surfaces, especially stainless steel, follow these steps:
1. **Mechanical Cleaning**: Use abrasive methods like grinding, sanding, or brushing. Tools such as stainless steel wire brushes, non-woven abrasive pads, or flap discs can effectively remove the oxide layer. Ensure the tools are clean and dedicated to stainless steel to prevent contamination.
2. **Chemical Pickling**: Apply pickling paste or gel containing acids like nitric and hydrofluoric acid. This method dissolves the oxide layer and restores the metal's corrosion resistance. Follow the manufacturer's instructions for application time and safety precautions, including wearing protective gear.
3. **Electrochemical Cleaning**: Use an electrochemical cleaning system, which involves applying an electrolyte solution and using an electric current to remove the heat tint. This method is efficient and environmentally friendly, often used for weld cleaning.
4. **Passivation**: After removing the heat tint, passivate the surface to enhance corrosion resistance. This involves treating the metal with a nitric or citric acid solution to form a protective oxide layer.
5. **Rinsing and Drying**: Thoroughly rinse the metal surface with clean water to remove any chemical residues. Dry the surface completely to prevent water spots or further oxidation.
6. **Inspection**: Check the surface for any remaining discoloration or damage. Repeat the process if necessary to achieve the desired finish.
Always prioritize safety by using appropriate personal protective equipment (PPE) and working in a well-ventilated area.
What accessories are needed for weld cleaning systems?
Weld cleaning systems are essential for ensuring the quality and longevity of welded joints by removing oxidation, discoloration, and contaminants. The accessories needed for these systems can vary based on the specific type of weld cleaning system being used, but generally include the following:
1. **Electrolyte Solutions**: These are specially formulated liquids used in electrochemical weld cleaning systems to facilitate the cleaning process. They help in removing oxides and other impurities from the weld surface.
2. **Brushes and Pads**: These are used to apply the electrolyte solution to the weld area. They come in various sizes and materials, such as carbon fiber or stainless steel, to suit different types of welds and cleaning requirements.
3. **Power Supply Units**: These units provide the necessary electrical current for electrochemical cleaning systems. They are often adjustable to cater to different cleaning intensities and types of metals.
4. **Ground Clamps and Cables**: Essential for completing the electrical circuit in electrochemical systems, these ensure that the current flows correctly through the weld area.
5. **Protective Gear**: Safety equipment such as gloves, goggles, and aprons are necessary to protect the operator from potential hazards like chemical splashes and electrical shocks.
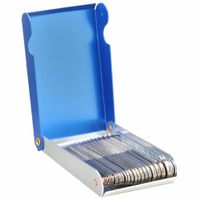
6. **Replacement Parts**: Over time, components like brushes and pads wear out and need replacement to maintain the efficiency of the cleaning system.
7. **Storage and Transport Cases**: These are used to safely store and transport the weld cleaning system and its accessories, protecting them from damage and contamination.
8. **Cleaning and Maintenance Tools**: These include items like cleaning cloths and maintenance kits to keep the system in optimal working condition.
These accessories ensure that weld cleaning systems operate effectively, providing clean, corrosion-resistant welds.
How do you use cleaning brushes and pads with weld cleaning systems?
To use cleaning brushes and pads with weld cleaning systems, follow these steps:
1. **Select the Appropriate Brush or Pad**: Choose a brush or pad compatible with your weld cleaning system and suitable for the type of metal and weld you are working on. Stainless steel brushes are commonly used for stainless steel welds.
2. **Prepare the Weld Area**: Ensure the weld area is free from loose debris, dust, and contaminants. This can be done by wiping the area with a clean cloth or using a mild solvent if necessary.
3. **Set Up the Weld Cleaning System**: Connect the cleaning brush or pad to the weld cleaning system. Ensure the system is set to the correct settings for the type of weld and material you are working with.
4. **Apply Cleaning Solution**: If your system requires a cleaning solution, apply it to the weld area or directly onto the brush or pad. This solution helps in breaking down oxides and contaminants on the weld surface.
5. **Operate the System**: Turn on the weld cleaning system and gently apply the brush or pad to the weld area. Move the brush or pad in a consistent, even motion along the weld seam. Ensure even coverage to avoid missing any spots.
6. **Monitor Progress**: Continuously check the weld area to ensure effective cleaning. Adjust the pressure and speed as necessary to achieve the desired finish without damaging the metal surface.
7. **Rinse and Inspect**: After cleaning, rinse the weld area with water to remove any residual cleaning solution. Inspect the weld to ensure it is clean and free from discoloration or oxides.
8. **Maintenance**: Clean the brushes and pads after use to prolong their lifespan. Store them properly to prevent damage and contamination.
By following these steps, you can effectively use cleaning brushes and pads with weld cleaning systems to achieve a clean, polished weld finish.
What are the benefits of using weld cleaning tools?
Weld cleaning tools offer several benefits that enhance the quality, safety, and efficiency of welding projects. Firstly, they improve the aesthetic appearance of welds by removing discoloration, oxidation, and heat tint, resulting in a clean and professional finish. This is particularly important in industries where visual appeal is crucial, such as in architectural and automotive applications.
Secondly, these tools enhance corrosion resistance. By effectively cleaning the weld area, they remove contaminants and residues that could lead to corrosion, thereby extending the lifespan of the welded structure. This is vital in industries like marine and construction, where materials are exposed to harsh environments.
Thirdly, weld cleaning tools contribute to improved safety. They eliminate the need for hazardous chemicals traditionally used in cleaning processes, reducing the risk of chemical burns and exposure to toxic substances. This creates a safer working environment for operators.
Additionally, these tools increase productivity. They are designed to be efficient and easy to use, allowing for faster cleaning times compared to manual methods. This efficiency reduces downtime and labor costs, making them a cost-effective solution for businesses.
Moreover, weld cleaning tools are versatile and can be used on various metals, including stainless steel, aluminum, and titanium. This versatility makes them suitable for a wide range of applications across different industries.
Finally, they ensure compliance with industry standards and regulations. Clean welds are often a requirement for meeting quality and safety standards, and using appropriate cleaning tools helps in achieving these benchmarks, ensuring that the final product is both safe and reliable.
How do you maintain weld cleaning equipment?
To maintain weld cleaning equipment, follow these steps:
1. **Regular Inspection**: Frequently check the equipment for any signs of wear, damage, or malfunction. Look for frayed cables, loose connections, and worn-out brushes or pads.
2. **Cleaning**: After each use, clean the equipment thoroughly. Remove any metal particles, dust, or debris that may have accumulated. Use a soft brush or compressed air to clean hard-to-reach areas.
3. **Check Electrical Components**: Ensure that all electrical components, such as cables and connectors, are in good condition. Replace any damaged parts immediately to prevent electrical hazards.
4. **Lubrication**: Regularly lubricate moving parts to ensure smooth operation. Use the manufacturer-recommended lubricant to avoid damaging the equipment.
5. **Replace Consumables**: Monitor the condition of consumable parts like brushes, pads, and electrodes. Replace them as needed to maintain optimal performance and prevent damage to the equipment or workpiece.
6. **Calibration**: Periodically calibrate the equipment to ensure it operates within the specified parameters. This helps maintain cleaning efficiency and prevents over-cleaning or under-cleaning.
7. **Storage**: Store the equipment in a clean, dry place when not in use. Protect it from moisture, dust, and extreme temperatures to prolong its lifespan.
8. **Follow Manufacturer Guidelines**: Adhere to the maintenance schedule and procedures outlined in the equipment’s manual. This includes any specific cleaning agents or techniques recommended by the manufacturer.
9. **Training**: Ensure that all operators are properly trained in the use and maintenance of the equipment. This reduces the risk of misuse and potential damage.
10. **Record Keeping**: Maintain a log of all maintenance activities, including inspections, repairs, and part replacements. This helps track the equipment’s condition and plan for future maintenance needs.
What is the difference between marking and etching metal surfaces?
Marking and etching are two distinct processes used to create designs or information on metal surfaces, but they differ in technique, depth, and application.
Marking involves creating visible designs or text on a metal surface without significantly altering its structure. This can be achieved through various methods such as laser marking, dot peen marking, or inkjet printing. Laser marking, for instance, uses a focused beam of light to discolor the surface, creating high-contrast marks. Marking is typically shallow, affecting only the surface layer, and is used for applications like serial numbers, logos, or barcodes. It is generally faster and less invasive than etching, making it suitable for applications where surface integrity must be maintained.
Etching, on the other hand, involves removing material from the metal surface to create a design. This is usually done through chemical, electrochemical, or laser etching processes. Chemical etching uses acids or other corrosive substances to dissolve parts of the metal, while electrochemical etching uses an electrical current to achieve the same effect. Laser etching, similar to laser marking, uses a laser but with higher power to vaporize the metal. Etching creates deeper, more permanent designs and is often used for decorative purposes, detailed artwork, or creating dies and molds. It can affect the metal's structural integrity due to the material removal.
In summary, marking is a surface-level process ideal for identification and traceability, while etching is a deeper, more permanent method used for detailed designs and functional modifications.
How do you clean a welding torch tip and nozzle?
To clean a welding torch tip and nozzle, follow these steps:
1. **Safety First**: Ensure the welding equipment is turned off and disconnected from the power source. Wear appropriate safety gear, including gloves and safety glasses.
2. **Disassemble the Torch**: Carefully remove the nozzle and tip from the welding torch. Refer to the manufacturer's instructions if needed.
3. **Inspect for Damage**: Check the nozzle and tip for any signs of wear or damage. Replace them if they are excessively worn or damaged.
4. **Remove Spatter**: Use a wire brush or a dedicated nozzle cleaning tool to remove welding spatter from the nozzle. For stubborn spatter, gently tap the nozzle on a hard surface to dislodge it.
5. **Clean the Tip**: Use a tip cleaner, which is a set of small files or reamers, to clean the inside of the tip. Insert the appropriate size cleaner into the tip's orifice and rotate it to remove any debris or buildup.
6. **Check Gas Ports**: Ensure the gas ports are clear. Use compressed air to blow out any obstructions from the nozzle and tip.
7. **Reassemble the Torch**: Once clean, reassemble the torch by carefully reattaching the nozzle and tip. Ensure they are securely fastened.
8. **Test the Torch**: Reconnect the torch to the power source and test it on a scrap piece of metal to ensure proper function and gas flow.
9. **Regular Maintenance**: Regularly clean the torch tip and nozzle to maintain optimal performance and extend their lifespan. Consider using anti-spatter spray to reduce future buildup.
By following these steps, you can effectively clean a welding torch tip and nozzle, ensuring efficient and safe welding operations.