Call +(254) 703 030 000 / 751 483 999 / 721 704 777
.....Read More
Frequently Asked Questions
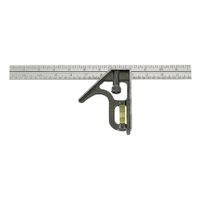
What is the difference between a T-square and a combination square?
A T-square and a combination square are both tools used in drafting and woodworking, but they serve different purposes and have distinct designs.
A T-square is primarily used in technical drawing and drafting. It consists of a long, straight edge attached to a shorter, perpendicular head, forming a "T" shape. The head of the T-square rests against the edge of the drawing board, allowing the long edge to provide a straight line across the paper. T-squares are essential for creating horizontal lines and ensuring that other lines are parallel or perpendicular. They are typically made of wood, plastic, or metal and come in various lengths to accommodate different sizes of drawing boards.
In contrast, a combination square is a versatile tool used in woodworking, metalworking, and general construction. It consists of a ruler with a sliding head that can be adjusted to different angles. The head usually includes a 90-degree and a 45-degree angle, allowing it to be used for measuring and marking right angles and miters. Combination squares often have additional features, such as a spirit level for checking level surfaces and a scribe for marking materials. They are typically made of metal for durability and precision.
In summary, the primary difference lies in their use and design: a T-square is mainly for drafting, providing straight edges for drawing, while a combination square is a multi-functional tool used for measuring, marking, and checking angles in various trades.
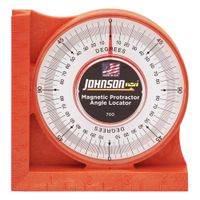
How do you use an angle finder to measure angles accurately?
To use an angle finder accurately, follow these steps:
1. **Select the Right Tool**: Choose an angle finder suitable for your task. Options include digital angle finders, protractors, or mechanical angle finders.
2. **Prepare the Surface**: Ensure the surfaces or objects you are measuring are clean and free from debris to avoid inaccurate readings.
3. **Position the Angle Finder**: Place the angle finder on the surface or between the two lines or edges forming the angle. For a digital angle finder, ensure it is turned on and calibrated to zero if necessary.
4. **Align the Tool**: For a mechanical angle finder, align the base or one arm with one side of the angle. Adjust the other arm to align with the other side of the angle. For a digital angle finder, ensure the tool is flat against the surface.
5. **Read the Measurement**: For a digital angle finder, read the angle displayed on the screen. For a mechanical angle finder, read the angle where the two arms intersect on the scale.
6. **Double-Check**: To ensure accuracy, measure the angle more than once. Reposition the angle finder and take another reading to confirm consistency.
7. **Record the Measurement**: Note down the angle measurement for future reference or use in your project.
8. **Store Properly**: After use, clean the angle finder and store it in a safe place to maintain its accuracy and longevity.
By following these steps, you can measure angles accurately using an angle finder.
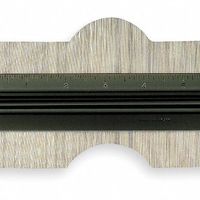
What are the best practices for using a contour gauge?
1. **Select the Right Gauge**: Choose a contour gauge with the appropriate pin depth and length for your project. Longer pins are better for deeper contours.
2. **Prepare the Surface**: Ensure the surface you are measuring is clean and free of debris to get an accurate reading.
3. **Align the Gauge**: Position the contour gauge perpendicular to the surface you are measuring. This ensures that the pins can move freely and capture the contour accurately.
4. **Press Gently**: Apply gentle, even pressure to the gauge to avoid bending the pins. This helps in capturing the exact shape without distortion.
5. **Secure the Shape**: Once the contour is captured, carefully remove the gauge from the surface. Some gauges have a locking mechanism to hold the pins in place; use it if available.
6. **Transfer the Shape**: Place the gauge on the material you need to cut or shape. Trace the outline with a pencil or marker for precise cutting.
7. **Double-Check Measurements**: Before cutting, double-check the transferred shape against the original surface to ensure accuracy.
8. **Use for Various Materials**: Contour gauges can be used on wood, tile, metal, and other materials. Ensure the gauge is suitable for the material you are working with.
9. **Maintain the Gauge**: Regularly clean the pins to prevent them from sticking. Lubricate if necessary to ensure smooth operation.
10. **Store Properly**: Keep the contour gauge in a safe place to avoid bending or damaging the pins.
11. **Practice**: Familiarize yourself with the tool by practicing on scrap materials to improve accuracy and confidence.
How do you transfer angles from an angle finder to a workpiece?
To transfer angles from an angle finder to a workpiece, follow these steps:
1. **Measure the Angle**: Place the angle finder on the surface where you need to measure the angle. Adjust the arms of the angle finder until they align perfectly with the sides of the angle. Lock the angle finder in place to preserve the measurement.
2. **Prepare the Workpiece**: Position the workpiece on a stable surface where you can easily mark and cut it. Ensure the workpiece is clean and free from debris to ensure accurate marking.
3. **Transfer the Angle**: Place the locked angle finder onto the workpiece. Align one arm of the angle finder with the edge of the workpiece. Ensure the pivot point of the angle finder is at the exact point where you want the angle to start.
4. **Mark the Angle**: Use a sharp pencil or a marking tool to trace along the other arm of the angle finder onto the workpiece. This will create a line that represents the angle you measured.
5. **Verify the Marking**: Double-check the marked angle by placing the angle finder back on the workpiece to ensure the lines match the original measurement. Adjust if necessary.
6. **Cut the Workpiece**: Use appropriate tools such as a saw or a miter saw to cut along the marked line. Ensure the cutting tool is set to the correct angle to maintain accuracy.
7. **Check the Cut**: After cutting, use the angle finder to verify that the angle on the workpiece matches the original measurement. Make any necessary adjustments or refinements.
By following these steps, you can accurately transfer angles from an angle finder to a workpiece, ensuring precision in your project.
What are the common uses of a double square in woodworking?
A double square is a versatile tool in woodworking, commonly used for various tasks due to its adjustable nature and precision. Here are some of its common uses:
1. **Measuring and Marking**: The double square is frequently used for measuring and marking precise lengths and angles. Its adjustable blade allows for accurate measurements, which is crucial for cutting and fitting pieces together.
2. **Checking Squareness**: Woodworkers use the double square to check the squareness of edges and corners. Ensuring that pieces are square is essential for the structural integrity and aesthetic quality of the finished product.
3. **Depth Gauging**: The adjustable blade can be set to measure the depth of grooves, mortises, and other recesses. This is particularly useful when creating joints or ensuring consistent depth across multiple pieces.
4. **Transferring Measurements**: The double square can transfer measurements from one piece to another, ensuring consistency and accuracy in repetitive tasks or when working on multiple components of a project.
5. **Setting Up Tools**: It is often used to set up and calibrate other tools, such as table saws, jointers, and planers. The precision of the double square helps ensure that these tools are aligned correctly for accurate cuts.
6. **Layout Work**: For layout work, the double square is used to draw lines parallel to an edge or to mark out angles. Its ability to adjust to various lengths makes it ideal for complex layouts.
7. **Checking Flatness**: The tool can also be used to check the flatness of surfaces, ensuring that boards are even and ready for assembly or finishing.
Overall, the double square is a fundamental tool in woodworking, valued for its precision, versatility, and ability to perform multiple functions efficiently.
How do you ensure accuracy when using a protractor for angle measurement?
To ensure accuracy when using a protractor for angle measurement, follow these steps:
1. **Positioning the Protractor**: Place the protractor's center hole or midpoint exactly over the vertex of the angle. Ensure the baseline of the protractor aligns perfectly with one side of the angle.
2. **Alignment**: Make sure the baseline of the protractor is aligned with the zero-degree line on the protractor. This ensures that the measurement starts from the correct point.
3. **Reading the Scale**: Identify the correct scale on the protractor. Protractors typically have two sets of numbers, one for measuring angles from the left and one from the right. Choose the scale that starts from the baseline side of the angle.
4. **Avoid Parallax Error**: Look directly over the protractor to read the measurement. Viewing from an angle can lead to parallax error, where the reading appears different from different viewpoints.
5. **Use a Fine Point**: When marking or reading the angle, use a sharp pencil or fine-tipped pen to ensure precision in marking and reading.
6. **Check for Zero Error**: Ensure the protractor is not damaged or warped, as this can lead to incorrect readings. The zero line should be straight and clear.
7. **Double-Check Measurements**: After taking the initial measurement, recheck by measuring again or using a different method, such as a digital protractor, to confirm accuracy.
8. **Stable Surface**: Ensure the surface on which you are measuring is stable and flat to prevent any movement that could affect the reading.
9. **Calibration**: Regularly check the protractor against a known standard or use a digital protractor to ensure it is calibrated correctly.
By following these steps, you can minimize errors and ensure accurate angle measurements with a protractor.
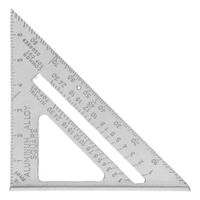
What are the key features to look for in a high-quality layout square?
When selecting a high-quality layout square, consider the following key features:
1. **Material**: Opt for durable materials like stainless steel or aluminum, which resist rust and wear, ensuring longevity and accuracy.
2. **Accuracy**: Ensure the square is precisely machined for accurate measurements. Look for certification or guarantees of accuracy.
3. **Size**: Choose a size that suits your projects. Common sizes include 6-inch, 12-inch, and larger framing squares. Larger squares are ideal for bigger projects, while smaller ones are more portable and versatile.
4. **Graduations**: Clear, easy-to-read markings are essential. Look for etched or engraved graduations that won’t fade over time. Metric and imperial measurements can be beneficial for versatility.
5. **Edge**: A straight, true edge is crucial for accurate marking and cutting. Check for any warping or imperfections.
6. **Weight**: A well-balanced square is easier to handle. It should be heavy enough to stay in place but light enough for comfortable use.
7. **Versatility**: Some squares offer additional features like protractor angles, level vials, or scribing notches, enhancing their functionality.
8. **Ergonomics**: Comfortable handling is important, especially for extended use. Look for smooth edges and a design that fits well in your hand.
9. **Brand Reputation**: Consider brands known for quality and reliability. Reviews and recommendations can provide insight into performance and durability.
10. **Price**: While not always indicative of quality, higher-priced squares often offer better materials and precision. Balance cost with the features you need.
11. **Warranty**: A good warranty can provide peace of mind, indicating the manufacturer’s confidence in their product.
By focusing on these features, you can select a layout square that meets your needs and ensures precision in your projects.