Call +(254) 703 030 000 / 751 483 999 / 721 704 777
.....Read More
Frequently Asked Questions
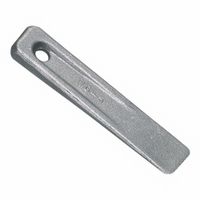
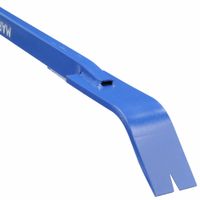
What is the difference between a pry bar and a crowbar?
A pry bar and a crowbar are both hand tools used for prying, lifting, and leveraging objects, but they have distinct differences in design and typical use.
1. **Design and Shape**:
- **Pry Bar**: Generally smaller and more slender, pry bars often have a flat, straight design with a chiseled end for precision work. They may have a slight curve or be completely straight, and some models include a nail puller notch.
- **Crowbar**: Typically larger and heavier, crowbars have a more robust, curved design. One end is usually a flattened, wedge-like shape, while the other end is often a hooked or claw-like shape for gripping.
2. **Material and Construction**:
- Both tools are usually made from forged steel for strength and durability, but crowbars are often thicker and more robust to handle heavier tasks.
3. **Function and Use**:
- **Pry Bar**: Ideal for lighter tasks requiring precision, such as removing molding, opening crates, or aligning materials. Its slender design allows it to fit into tighter spaces.
- **Crowbar**: Suited for heavy-duty tasks like demolition, removing large nails, or prying apart heavy objects. Its larger size and leverage make it effective for breaking apart materials.
4. **Weight and Portability**:
- Pry bars are lighter and more portable, making them easier to handle for extended periods.
- Crowbars, being heavier, provide more force but can be cumbersome for prolonged use.
In summary, while both tools serve similar purposes, pry bars are better for precision and lighter tasks, whereas crowbars are designed for heavy-duty applications.
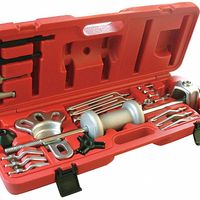
How do you use a jaw puller to remove a bearing?
To use a jaw puller to remove a bearing, follow these steps:
1. **Select the Right Puller**: Choose a jaw puller that fits the size of the bearing. Ensure the puller’s arms can securely grip the bearing.
2. **Prepare the Area**: Clean the area around the bearing to remove any dirt or debris. This ensures a better grip and prevents contamination.
3. **Position the Puller**: Open the jaws of the puller and position them around the outer edge of the bearing. Ensure the jaws are evenly spaced and securely grip the bearing.
4. **Align the Center Bolt**: Adjust the center bolt of the puller so that it aligns with the shaft or the center of the bearing. This ensures even pressure is applied during removal.
5. **Tighten the Jaws**: Gradually tighten the jaws by turning the handle or adjusting the mechanism, ensuring they maintain a firm grip on the bearing.
6. **Apply Pressure**: Slowly turn the center bolt clockwise using a wrench or socket. This action pulls the bearing off the shaft. Apply steady, even pressure to avoid damaging the bearing or shaft.
7. **Monitor Progress**: As you turn the bolt, monitor the bearing’s movement. If it becomes stuck, stop and check the alignment and grip of the puller.
8. **Remove the Bearing**: Continue applying pressure until the bearing is completely removed from the shaft.
9. **Inspect Components**: After removal, inspect the bearing and shaft for any damage. Clean the area if necessary.
10. **Store the Puller**: Once the bearing is removed, clean and store the puller properly for future use.
By following these steps, you can effectively use a jaw puller to remove a bearing without causing damage to the components involved.
What are the best techniques for using a slide hammer puller?
1. **Preparation**: Ensure the area around the part to be removed is clean. This prevents debris from interfering with the process. Wear safety goggles and gloves for protection.
2. **Select the Right Attachment**: Choose the appropriate attachment for the slide hammer puller based on the part you need to remove. Common attachments include hooks, jaws, and threaded adapters.
3. **Secure the Attachment**: Firmly attach the chosen accessory to the slide hammer. Ensure it is tightly secured to prevent slipping during use.
4. **Positioning**: Align the slide hammer puller with the part to be removed. Ensure it is centered to apply even force and prevent damage to surrounding components.
5. **Apply Force Gradually**: Start with gentle pulls to test the attachment and alignment. Gradually increase the force by sliding the hammer weight along the shaft towards the handle. This controlled force helps in loosening the part without causing damage.
6. **Consistent Motion**: Use a consistent, rhythmic motion when sliding the hammer. This helps in applying steady force, making the removal process more efficient.
7. **Check Progress**: Periodically check the progress to ensure the part is loosening. Adjust the attachment or technique if necessary.
8. **Use Penetrating Oil**: If the part is stubborn, apply penetrating oil to help loosen rust or corrosion. Allow it to soak for a few minutes before resuming.
9. **Safety First**: Always be aware of your surroundings and ensure no one is in the path of the slide hammer. The force can cause the part to release suddenly.
10. **Post-Removal Inspection**: Once the part is removed, inspect it and the surrounding area for any damage. Clean and prepare the area for the new part installation if necessary.
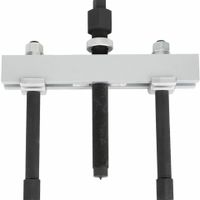
How do flange and set-up wedges work for leveling?
Flange and set-up wedges are tools used in industrial settings to achieve precise leveling and alignment of machinery and equipment. They work by providing a stable and adjustable base that can be fine-tuned to ensure that the equipment is perfectly level, which is crucial for optimal performance and longevity.
Flange wedges are typically used in conjunction with flanges, which are flat, circular plates that connect pipes, valves, pumps, and other equipment. The flange wedge is inserted between the flanges to create a gap that can be adjusted to achieve the desired level. By tightening or loosening the bolts on the flange, the wedge can be moved up or down, allowing for precise control over the alignment.
Set-up wedges, on the other hand, are used more broadly for leveling various types of machinery. These wedges are usually made of metal and have a tapered shape, allowing them to be inserted under the equipment. By driving the wedge further in or pulling it out slightly, the height of the equipment can be adjusted. This is particularly useful in situations where the floor is uneven or when the equipment needs to be aligned with other components.
Both flange and set-up wedges work on the principle of creating a controlled, adjustable gap that can be manipulated to achieve the desired level. They are essential tools in ensuring that machinery operates efficiently and safely, as improper leveling can lead to increased wear and tear, reduced performance, and even equipment failure. By using these wedges, technicians can ensure that equipment is properly aligned, reducing the risk of operational issues and extending the lifespan of the machinery.
What safety precautions should be taken when using pullers and pryers?
When using pullers and pryers, several safety precautions should be observed to prevent accidents and ensure efficient operation:
1. **Personal Protective Equipment (PPE):** Always wear appropriate PPE, including safety goggles to protect your eyes from flying debris, gloves to protect your hands from sharp edges, and steel-toed boots to safeguard your feet.
2. **Tool Inspection:** Before use, inspect the puller or pryer for any signs of damage, wear, or defects. Ensure that all parts are in good condition and functioning properly.
3. **Correct Tool Selection:** Use the right type and size of puller or pryer for the task. Using an incorrect tool can lead to slippage or breakage.
4. **Secure Work Area:** Ensure the work area is clean and free of obstructions. Secure the object being worked on to prevent movement during operation.
5. **Proper Setup:** Follow the manufacturer's instructions for setting up the tool. Ensure that the puller or pryer is properly aligned and securely attached to the object.
6. **Controlled Force Application:** Apply force gradually and evenly. Avoid sudden or excessive force that could cause the tool to slip or the object to break.
7. **Awareness of Surroundings:** Be aware of your surroundings and ensure that others are at a safe distance. Inform others of the potential hazards involved in the operation.
8. **Avoid Overloading:** Do not exceed the tool's rated capacity. Overloading can lead to tool failure and potential injury.
9. **Regular Maintenance:** Keep tools well-maintained and lubricated as per the manufacturer's guidelines to ensure optimal performance and safety.
10. **Training and Competence:** Ensure that only trained and competent individuals operate pullers and pryers. Proper training reduces the risk of accidents and enhances efficiency.
By adhering to these safety precautions, the risk of injury and equipment damage can be significantly minimized.
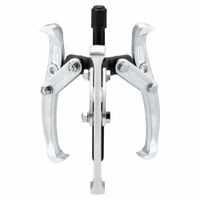
How do you choose the right puller for a specific task?
To choose the right puller for a specific task, consider the following factors:
1. **Type of Puller**: Identify the type of puller needed—gear pullers, bearing pullers, or specialized pullers. Gear pullers are versatile for removing gears, pulleys, and bearings. Bearing pullers are specifically designed for extracting bearings.
2. **Size and Capacity**: Match the puller size to the component being removed. Ensure the puller’s reach and spread are adequate for the task. Check the puller’s capacity to handle the force required without damage.
3. **Number of Jaws**: Decide between two-jaw or three-jaw pullers. Three-jaw pullers provide more stability and even force distribution, while two-jaw pullers are suitable for confined spaces.
4. **Manual vs. Hydraulic**: For light to moderate tasks, manual pullers are sufficient. For heavy-duty applications, hydraulic pullers offer more power and ease of use.
5. **Material and Build Quality**: Choose pullers made from durable materials like forged steel to withstand high stress and ensure longevity.
6. **Ease of Use**: Consider pullers with ergonomic designs and features like self-centering jaws for ease of operation.
7. **Safety Features**: Look for pullers with safety features such as safety cages or pressure relief valves to prevent accidents.
8. **Brand and Reviews**: Opt for reputable brands known for quality and reliability. Check user reviews for performance insights.
9. **Cost**: Balance cost with quality and functionality. Investing in a high-quality puller can save money in the long run by reducing the risk of damage to components.
10. **Specific Requirements**: Consider any specific requirements of the task, such as non-standard sizes or unique component shapes, which may necessitate custom or adjustable pullers.
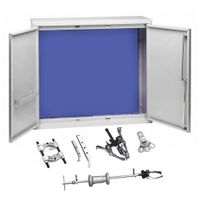
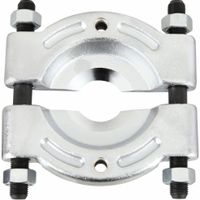
What are the common applications for bearing splitters?
Bearing splitters are specialized tools used in various mechanical and industrial applications to facilitate the removal of bearings, gears, and other press-fitted components from shafts. Here are some common applications:
1. **Automotive Repair**: Bearing splitters are frequently used in automotive repair shops to remove bearings from axles, crankshafts, and other engine components without causing damage to the parts.
2. **Industrial Machinery Maintenance**: In industrial settings, bearing splitters are essential for maintaining and repairing heavy machinery. They help in disassembling components like motors, pumps, and gearboxes where bearings are commonly used.
3. **Aerospace Engineering**: Bearing splitters are used in the aerospace industry for the maintenance and repair of aircraft engines and other critical components, ensuring precision and safety.
4. **Railway Maintenance**: In the railway sector, bearing splitters assist in the maintenance of train wheels and axles, where bearings are crucial for smooth operation.
5. **Manufacturing**: In manufacturing plants, bearing splitters are used to maintain production line equipment, ensuring minimal downtime by allowing quick and efficient removal of worn or damaged bearings.
6. **Agricultural Equipment Repair**: Bearing splitters are used to service tractors, combines, and other agricultural machinery, which often operate in harsh conditions leading to frequent bearing replacements.
7. **Marine Applications**: In the marine industry, bearing splitters are used for the maintenance of ship engines and other mechanical systems, where corrosion and wear are common issues.
8. **Construction Equipment**: Heavy construction machinery, such as bulldozers and excavators, often require bearing maintenance, where splitters are used to remove and replace bearings efficiently.
9. **Wind Turbines**: Bearing splitters are used in the maintenance of wind turbines, where they help in the removal of large bearings from turbine shafts.
These applications highlight the versatility and importance of bearing splitters in various industries, ensuring the longevity and efficiency of mechanical systems.