Call +(254) 703 030 000 / 751 483 999 / 721 704 777
.....Read More

Frequently Asked Questions
What are the different types of clamps used for woodworking?
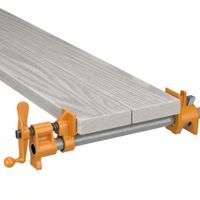
1. **Bar Clamps**: Long, adjustable clamps ideal for large projects like tabletops. They consist of a metal bar with adjustable jaws.
2. **Pipe Clamps**: Similar to bar clamps but use a pipe for the bar, allowing for customizable lengths. They are versatile and strong.
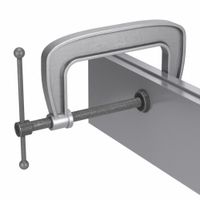
3. **C-Clamps**: Shaped like the letter "C," these are used for smaller projects or when a strong hold is needed in a compact space.
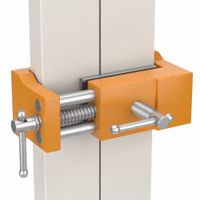
4. **F-Clamps**: Resemble a letter "F" and are used for holding workpieces together. They offer a wide opening capacity.
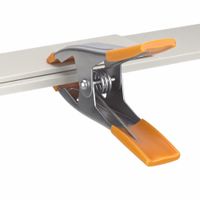
5. **Spring Clamps**: Lightweight and easy to use, these clamps are ideal for quick, temporary holds.
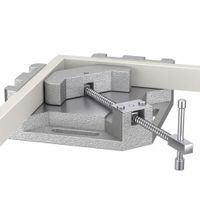
6. **Corner Clamps**: Designed to hold two pieces at a right angle, perfect for assembling frames or boxes.
7. **Parallel Clamps**: Provide even pressure along the entire length of the clamp, ideal for cabinetry and furniture making.
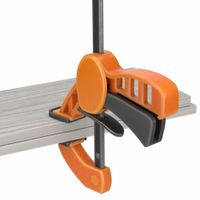
8. **Toggle Clamps**: Used to hold workpieces in place on a workbench, often used in jigs and fixtures.
9. **Band Clamps**: Use a strap to apply pressure around irregular shapes, useful for frames and circular objects.
10. **Hand Screw Clamps**: Feature wooden jaws and are adjustable, providing a strong grip without marring the surface.
11. **Quick-Grip Clamps**: Operated with one hand, these clamps are convenient for quick adjustments and light-duty tasks.
12. **Bench Clamps**: Mounted on a workbench, these provide a stable hold for various tasks.
13. **Edge Clamps**: Specifically designed to apply pressure to the edges of a workpiece, useful for gluing edge banding.
14. **Miter Clamps**: Hold mitered corners together, ensuring precise angles during assembly.
15. **Sash Clamps**: Long clamps used for large frames or sash windows, providing strong, even pressure.
How do you choose the right clamp for a specific project?
To choose the right clamp for a specific project, consider the following factors:
1. **Material and Surface**: Identify the materials you are working with. Soft materials like wood may require clamps with padded jaws to prevent damage, while metal may need stronger, more robust clamps.
2. **Size and Reach**: Determine the size of the workpiece and the reach required. Bar clamps and pipe clamps are suitable for larger projects, while C-clamps or spring clamps work well for smaller tasks.
3. **Clamping Force**: Assess the amount of pressure needed. Heavy-duty projects may require clamps with higher clamping force, such as pipe clamps or parallel clamps, whereas delicate projects might need light-duty clamps like spring clamps.
4. **Type of Clamp**: Choose the type based on the task:
- **C-Clamps**: Versatile for general use.
- **Bar Clamps**: Ideal for woodworking and larger projects.
- **Pipe Clamps**: Suitable for heavy-duty tasks.
- **Spring Clamps**: Quick and easy for light-duty applications.
- **Corner Clamps**: Perfect for assembling frames or corners.
- **Toggle Clamps**: Useful for repetitive tasks in jigs and fixtures.
5. **Adjustability and Ease of Use**: Consider how easily the clamp can be adjusted and whether it offers quick-release features for efficiency.
6. **Durability and Quality**: Opt for clamps made from durable materials like steel or cast iron for longevity, especially for frequent use.
7. **Budget**: Balance quality with cost. Investing in high-quality clamps can be more economical in the long run due to their durability.
8. **Special Features**: Look for features like swivel pads, ergonomic handles, or quick-release mechanisms that enhance functionality and ease of use.
By evaluating these factors, you can select the most appropriate clamp for your project, ensuring efficiency and effectiveness in your work.
What is the difference between a C-clamp and a bar clamp?
A C-clamp and a bar clamp are both tools used to hold objects securely in place, but they differ in design, functionality, and applications.
A C-clamp, named for its C-shaped frame, is typically made of metal and consists of a fixed jaw and a movable jaw, which is adjusted by turning a threaded screw. The screw mechanism allows for precise control over the clamping pressure. C-clamps are generally used for smaller projects or tasks that require a strong, concentrated clamping force. They are ideal for woodworking, metalworking, and other applications where a firm grip is necessary. However, their clamping capacity is limited by the size of the frame, making them less suitable for larger workpieces.
In contrast, a bar clamp, also known as an F-clamp or sliding clamp, features a long metal bar with a fixed jaw at one end and an adjustable jaw that slides along the bar. The adjustable jaw is tightened using a screw or a quick-release mechanism. Bar clamps are designed for larger projects, offering a greater clamping range and the ability to hold wider or longer workpieces. They are commonly used in woodworking, cabinetry, and other applications where a broader clamping area is needed. Bar clamps provide a more even distribution of pressure across the workpiece, reducing the risk of damage.
In summary, the main differences between a C-clamp and a bar clamp lie in their design and intended use. C-clamps are compact and provide strong, localized clamping force, making them suitable for smaller tasks. Bar clamps offer a wider clamping range and are better suited for larger projects, providing even pressure distribution.
How do you properly maintain and store clamps?
To properly maintain and store clamps, follow these steps:
1. **Cleaning**: After each use, wipe down clamps with a clean, dry cloth to remove dust, debris, and any adhesive residue. For stubborn grime, use a mild detergent and water, then dry thoroughly to prevent rust.
2. **Lubrication**: Regularly apply a light machine oil or a silicone-based lubricant to moving parts, such as screws and sliding mechanisms, to ensure smooth operation and prevent corrosion.
3. **Inspection**: Frequently inspect clamps for signs of wear, damage, or rust. Check for bent frames, worn threads, or damaged pads. Replace or repair any compromised parts to maintain functionality and safety.
4. **Rust Prevention**: Store clamps in a dry environment to minimize exposure to moisture. Consider using rust inhibitors or silica gel packs in storage areas to absorb excess humidity.
5. **Storage**: Organize clamps by size and type for easy access. Use pegboards, wall-mounted racks, or dedicated clamp storage racks to keep them off the ground and prevent damage. Ensure clamps are not over-tightened when stored to avoid stress on the frames.
6. **Avoid Overloading**: Do not exceed the clamp's capacity during use, as this can lead to deformation or breakage. Follow manufacturer guidelines for maximum load limits.
7. **Pad Maintenance**: Check and replace clamp pads as needed to ensure they provide adequate protection to workpieces and maintain grip.
8. **Regular Use**: Periodically use all clamps to ensure they remain functional and to prevent seizing from prolonged inactivity.
By following these maintenance and storage practices, clamps will remain in good working condition, ensuring longevity and reliability for future projects.
What are the best practices for using clamps safely?
1. **Select the Right Clamp**: Choose the appropriate type and size of clamp for the task. Consider the material, size, and shape of the workpiece.
2. **Inspect Before Use**: Check clamps for any damage, wear, or defects. Ensure that all moving parts function smoothly and that there are no cracks or bends.
3. **Proper Positioning**: Position clamps evenly and symmetrically to distribute pressure uniformly. Avoid placing clamps too close to the edge of the workpiece to prevent damage.
4. **Secure the Workpiece**: Ensure the workpiece is stable and properly aligned before tightening the clamp. Use additional supports if necessary to prevent movement.
5. **Apply Even Pressure**: Tighten clamps gradually and evenly to avoid warping or damaging the workpiece. Use a torque wrench if precise pressure is required.
6. **Avoid Over-Tightening**: Do not apply excessive force, as this can damage both the clamp and the workpiece. Follow manufacturer guidelines for maximum pressure.
7. **Use Protective Pads**: Place protective pads or blocks between the clamp jaws and the workpiece to prevent surface damage.
8. **Maintain a Clean Workspace**: Keep the area around the clamping setup free of debris and obstructions to ensure safety and efficiency.
9. **Regular Maintenance**: Clean and lubricate clamps regularly to ensure smooth operation and longevity. Replace any worn or damaged parts promptly.
10. **Follow Safety Guidelines**: Wear appropriate personal protective equipment (PPE) such as gloves and safety glasses. Be aware of pinch points and keep hands clear when tightening or releasing clamps.
11. **Release Carefully**: When removing clamps, do so slowly and carefully to avoid sudden shifts in the workpiece that could cause injury or damage.
How do you prevent damage to workpieces when using clamps?
To prevent damage to workpieces when using clamps, follow these guidelines:
1. **Select Appropriate Clamps**: Choose clamps that are suitable for the material and size of the workpiece. Ensure the clamping force is adequate but not excessive.
2. **Use Protective Pads**: Place soft pads or protective covers, such as rubber or felt, between the clamp jaws and the workpiece to distribute pressure evenly and prevent surface marring.
3. **Adjust Clamping Pressure**: Apply just enough pressure to hold the workpiece securely without deforming it. Use clamps with adjustable pressure settings if available.
4. **Position Clamps Correctly**: Place clamps at strategic points to balance the pressure across the workpiece. Avoid clamping near edges or corners where the material is more susceptible to damage.
5. **Use Cauls or Sacrificial Pieces**: Insert cauls or sacrificial pieces of wood between the clamp and the workpiece to spread the pressure and protect the surface.
6. **Check Alignment**: Ensure the workpiece is properly aligned before tightening the clamps to avoid twisting or bending.
7. **Monitor During Clamping**: Continuously check the workpiece for any signs of stress or damage as you tighten the clamps. Adjust as necessary.
8. **Use Specialized Clamps**: For delicate or irregularly shaped workpieces, consider using specialized clamps designed for specific applications, such as vacuum clamps or band clamps.
9. **Avoid Over-Tightening**: Be cautious not to over-tighten clamps, as this can lead to crushing or warping the workpiece.
10. **Regular Maintenance**: Keep clamps in good condition by regularly cleaning and lubricating them to ensure smooth operation and consistent pressure application.
By following these practices, you can minimize the risk of damaging workpieces while using clamps.
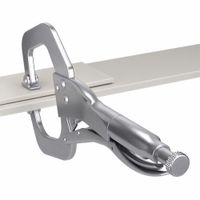
What are the advantages of using trigger clamps over other types?
Trigger clamps offer several advantages over other types of clamps:
1. **Ease of Use**: Trigger clamps are designed for one-handed operation, allowing users to quickly and easily adjust the clamp with minimal effort. This is particularly beneficial when working on projects that require frequent repositioning or adjustments.
2. **Speed**: The quick-release mechanism of trigger clamps enables rapid clamping and unclamping, which can significantly speed up workflow, especially in repetitive tasks or assembly line environments.
3. **Versatility**: Trigger clamps are available in various sizes and can be used for a wide range of applications, from woodworking and metalworking to DIY projects. Their design allows them to hold materials of different shapes and sizes securely.
4. **Non-Marring**: Many trigger clamps come with soft, non-marring pads that protect the workpiece from damage, making them ideal for delicate or finished surfaces.
5. **Adjustable Pressure**: The pressure applied by trigger clamps can be easily adjusted, providing just the right amount of force needed for the task without over-tightening, which can be crucial for sensitive materials.
6. **Portability**: Trigger clamps are generally lightweight and easy to transport, making them convenient for on-site work or moving between different workstations.
7. **Durability**: Made from robust materials like reinforced nylon and steel, trigger clamps are built to withstand heavy use and provide long-lasting performance.
8. **Safety**: The ergonomic design reduces hand fatigue and the risk of injury, while the secure locking mechanism ensures that the clamp remains in place during use.
Overall, trigger clamps combine convenience, efficiency, and versatility, making them a preferred choice for both professional tradespeople and hobbyists.