Call +(254) 703 030 000 / 751 483 999 / 721 704 777
.....Read More

Frequently Asked Questions
What is an infrared temperature sensor and how does it work?
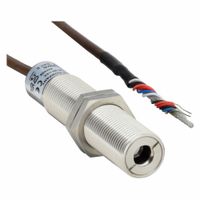
An infrared temperature sensor is a device that measures temperature from a distance by detecting the infrared radiation emitted by an object. All objects emit infrared radiation as a function of their temperature, and this radiation increases with temperature. The sensor captures this radiation and converts it into an electrical signal, which is then processed to determine the temperature of the object.
The sensor typically consists of a lens to focus the infrared radiation onto a detector, which is sensitive to infrared wavelengths. The detector can be a thermopile, pyroelectric detector, or a bolometer, each with its own method of converting infrared energy into an electrical signal. The signal is then amplified and processed by the sensor's electronics to calculate the temperature, often using algorithms that account for emissivity, which is the efficiency with which an object emits infrared radiation.
Infrared temperature sensors are non-contact devices, meaning they can measure temperature without touching the object. This makes them ideal for situations where the object is moving, inaccessible, or too hot to touch. They are widely used in industrial applications, medical thermometers, and environmental monitoring.
The accuracy of an infrared temperature sensor can be affected by factors such as the emissivity of the object, ambient temperature, and the presence of dust or smoke. To ensure accurate readings, the sensor must be calibrated for the specific conditions in which it is used. Some advanced models include features like adjustable emissivity settings, laser pointers for targeting, and digital displays for easy reading.
How accurate are infrared temperature sensors?
Infrared temperature sensors, also known as IR thermometers or pyrometers, are generally accurate within a range of ±1 to ±3 degrees Celsius, depending on the quality and design of the sensor. Their accuracy is influenced by several factors:
1. **Emissivity**: The accuracy of an IR sensor is highly dependent on the emissivity of the object being measured. Emissivity is the efficiency with which an object emits infrared energy. Most IR sensors allow for emissivity adjustments to improve accuracy, but incorrect settings can lead to significant errors.
2. **Distance-to-Spot Ratio**: This ratio determines the area of the surface being measured. A higher ratio allows for more precise measurements from a greater distance. If the sensor is too far from the target, it may measure a larger area than intended, reducing accuracy.
3. **Environmental Conditions**: Factors such as dust, smoke, steam, or other particulates in the air can affect the sensor's readings. Additionally, reflective surfaces can cause inaccuracies due to reflected infrared radiation.
4. **Calibration**: Regular calibration against a known temperature standard is essential for maintaining accuracy. Over time, sensors can drift, leading to less accurate readings.
5. **Sensor Quality**: Higher-quality sensors typically offer better accuracy and reliability. They may include features like adjustable emissivity settings, laser pointers for precise targeting, and advanced optics.
6. **Temperature Range**: The accuracy can vary across different temperature ranges. Some sensors are optimized for specific ranges and may be less accurate outside those limits.
In summary, while IR temperature sensors are generally reliable, their accuracy is contingent upon proper usage, calibration, and consideration of environmental factors. For critical applications, it is advisable to use high-quality sensors and ensure they are properly calibrated and configured.
What are the common applications of infrared temperature sensors?
Common applications of infrared temperature sensors include:
1. **Industrial Monitoring and Control**: Used in manufacturing processes to monitor and control temperatures of machinery, materials, and products, ensuring quality and safety.
2. **Medical Applications**: Employed in non-contact thermometers for measuring body temperature, especially useful in clinical settings and during pandemics for fever screening.
3. **HVAC Systems**: Utilized in heating, ventilation, and air conditioning systems to monitor and regulate temperature, improving energy efficiency and comfort.
4. **Food Safety and Processing**: Applied in food production and storage to ensure proper cooking, cooling, and storage temperatures, preventing spoilage and contamination.
5. **Automotive Industry**: Used in vehicle diagnostics to monitor engine and exhaust temperatures, enhancing performance and safety.
6. **Electronics and Electrical Maintenance**: Employed to detect overheating in circuits, components, and electrical panels, preventing failures and fires.
7. **Research and Development**: Utilized in laboratories for experiments requiring precise temperature measurements without interference.
8. **Building Inspections**: Used in thermal imaging to detect heat loss, insulation issues, and moisture intrusion in buildings.
9. **Firefighting**: Infrared sensors help firefighters see through smoke and darkness to locate hotspots and trapped individuals.
10. **Aerospace and Defense**: Used in thermal imaging systems for surveillance, target acquisition, and night vision.
11. **Agriculture**: Employed in monitoring plant health and soil temperature, optimizing growth conditions and yield.
12. **Environmental Monitoring**: Used in weather stations and environmental studies to measure surface temperatures and study climate change.
13. **Consumer Electronics**: Integrated into devices like smartphones and smart home systems for temperature monitoring and control.
These applications leverage the non-contact, fast-response, and accurate temperature measurement capabilities of infrared sensors.
How do you install an infrared temperature sensor?
1. **Select the Location**: Choose a location that provides a clear line of sight to the target object. Ensure the sensor is not exposed to direct sunlight, moisture, or dust.
2. **Mount the Sensor**: Use brackets or mounting hardware to securely attach the sensor. Ensure it is stable and aligned correctly with the target area.
3. **Connect Wiring**: Follow the manufacturer's wiring diagram. Typically, this involves connecting power supply wires, signal output wires, and any additional connections like grounding.
4. **Power Supply**: Connect the sensor to an appropriate power source, ensuring the voltage and current specifications match the sensor's requirements.
5. **Signal Output**: Connect the sensor's output to a display, data logger, or control system. This could be an analog output (e.g., 4-20 mA, 0-10 V) or a digital output (e.g., RS485, Modbus).
6. **Calibration**: Calibrate the sensor according to the manufacturer's instructions. This may involve setting emissivity values and adjusting for ambient temperature.
7. **Configure Settings**: Use any provided software or interface to configure settings such as emissivity, temperature range, and alarm thresholds.
8. **Test the Sensor**: Verify the sensor's operation by measuring a known temperature source. Adjust settings if necessary to ensure accuracy.
9. **Maintenance**: Regularly clean the sensor lens and check for any obstructions or damage. Recalibrate periodically to maintain accuracy.
10. **Documentation**: Record installation details, calibration settings, and maintenance schedules for future reference.
What accessories are available for infrared temperature sensors?
Accessories for infrared temperature sensors include:
1. **Mounting Brackets and Stands**: These provide stable and adjustable positioning for the sensor, ensuring accurate targeting and measurement.
2. **Air Purge Collars**: Used to keep the lens clean by blowing air across it, preventing dust, smoke, or other contaminants from obstructing the sensor's view.
3. **Cooling Jackets**: These are used to protect the sensor in high-temperature environments, maintaining its operational integrity.
4. **Protective Windows and Lenses**: These safeguard the sensor from harsh environmental conditions while allowing accurate temperature readings.
5. **Laser Sighting Tools**: These help in precise aiming of the sensor, especially useful in applications requiring pinpoint accuracy.
6. **Data Cables and Connectors**: Essential for connecting the sensor to data acquisition systems or computers for data logging and analysis.
7. **Calibration Equipment**: Used to ensure the sensor maintains accuracy over time, often including blackbody calibration sources.
8. **Software Packages**: These provide enhanced data analysis, visualization, and reporting capabilities, often with features for real-time monitoring and alerts.
9. **Display Units**: External displays can be connected to the sensor for real-time temperature readouts, useful in industrial settings.
10. **Filters**: Optical filters can be used to enhance the sensor's performance in specific applications by blocking unwanted wavelengths.
11. **Extension Cables**: These allow for greater flexibility in sensor placement, especially in large or complex installations.
12. **Protective Enclosures**: These offer additional protection against environmental factors like moisture, dust, and mechanical damage.
13. **Alignment Tools**: These assist in the precise alignment of the sensor to the target area, ensuring accurate measurements.
14. **Wireless Modules**: Enable remote monitoring and data transmission, enhancing flexibility and convenience in data handling.
How do you maintain and calibrate an infrared temperature sensor?
To maintain and calibrate an infrared temperature sensor, follow these steps:
1. **Regular Cleaning**: Keep the sensor lens clean to ensure accurate readings. Use a soft cloth and a mild cleaning solution to remove dust, dirt, or smudges. Avoid abrasive materials that could scratch the lens.
2. **Environmental Considerations**: Ensure the sensor is used within its specified environmental conditions, such as temperature and humidity ranges. Protect it from exposure to extreme conditions that could affect performance.
3. **Check for Damage**: Regularly inspect the sensor for physical damage, such as cracks or loose connections, which could impair functionality.
4. **Calibration**:
- **Initial Calibration**: Calibrate the sensor when first installed to establish a baseline for accurate measurements.
- **Periodic Calibration**: Recalibrate at regular intervals, as recommended by the manufacturer, or if the sensor is exposed to harsh conditions or shows signs of drift.
- **Calibration Procedure**: Use a blackbody calibration source, which provides a known temperature reference. Position the sensor at the specified distance from the blackbody. Adjust the sensor settings to match the blackbody temperature reading.
- **Verification**: After calibration, verify the sensor's accuracy by measuring known temperature points and comparing them to the expected values.
5. **Software Updates**: Keep the sensor's firmware updated to ensure optimal performance and compatibility with other systems.
6. **Documentation**: Maintain records of all maintenance and calibration activities, including dates, procedures, and results, to track the sensor's performance over time.
7. **Professional Calibration**: Consider professional calibration services for high-precision applications or if in-house calibration is not feasible.
By following these steps, you can ensure the infrared temperature sensor remains accurate and reliable over its operational life.
What factors should be considered when choosing an infrared temperature sensor?
When choosing an infrared temperature sensor, consider the following factors:
1. **Temperature Range**: Ensure the sensor can measure the required temperature range for your application.
2. **Spectral Response**: Select a sensor with a spectral response suitable for the material being measured, as different materials emit infrared radiation differently.
3. **Field of View (FOV)**: Consider the sensor's FOV to ensure it can accurately measure the target area without interference from surrounding objects.
4. **Distance-to-Spot Ratio (D:S Ratio)**: Choose a sensor with an appropriate D:S ratio to maintain accuracy at the required measurement distance.
5. **Emissivity**: Ensure the sensor can be adjusted for the emissivity of the target material to improve measurement accuracy.
6. **Response Time**: Consider the sensor's response time to ensure it meets the speed requirements of your application.
7. **Environmental Conditions**: Evaluate the sensor's ability to withstand environmental factors such as dust, moisture, and temperature extremes.
8. **Output Signal**: Ensure compatibility with your system by selecting a sensor with the appropriate output signal type (analog, digital, etc.).
9. **Calibration and Accuracy**: Check the sensor's accuracy specifications and whether it requires regular calibration to maintain performance.
10. **Size and Mounting**: Consider the physical size and mounting options to ensure the sensor fits within the available space and can be securely installed.
11. **Cost**: Balance the sensor's features and performance with your budget constraints.
12. **Brand and Support**: Consider the reputation of the manufacturer and the availability of technical support and service.
13. **Application-Specific Requirements**: Address any specific needs related to your application, such as compliance with industry standards or integration with existing systems.