Call +(254) 703 030 000 / 751 483 999 / 721 704 777
- Home
- Power Transmission
- Roller Chains Sprockets
- Roller Chain Links Connectors
.....Read More
Frequently Asked Questions
What is the difference between ANSI and British standard roller chain links?
ANSI (American National Standards Institute) and British Standard roller chain links differ primarily in their design specifications, dimensions, and applications.
1. **Standards and Specifications**:
- ANSI roller chains are governed by the American National Standards Institute, specifically ANSI B29.1.
- British Standard roller chains follow the ISO 606 standard, which is also aligned with BS (British Standards).
2. **Dimensions**:
- ANSI chains are measured in inches and are typically used in North America. They have a specific pitch, roller diameter, and width between inner plates.
- British Standard chains are measured in metric units and are more common in Europe and other regions. They have different pitch sizes and dimensions compared to ANSI chains.
3. **Design and Construction**:
- ANSI chains often have a simpler design with fewer variations in link plates and roller diameters.
- British Standard chains may have more variations in link plate thickness and roller diameters, offering different strength and wear characteristics.
4. **Applications**:
- ANSI chains are widely used in industrial applications in the United States and Canada, such as in machinery, conveyors, and automotive industries.
- British Standard chains are preferred in European industries and are often used in similar applications but may be chosen for compatibility with existing equipment designed to metric standards.
5. **Interchangeability**:
- Due to differences in dimensions and standards, ANSI and British Standard chains are not directly interchangeable. Equipment designed for one standard typically requires chains of the same standard to ensure proper fit and function.
These differences necessitate careful selection based on regional standards, equipment design, and specific application requirements.
How do you measure roller chain link size?
To measure roller chain link size, follow these steps:
1. **Pitch Measurement**: Measure the distance between the centers of two consecutive pins. This is the pitch, a critical dimension that determines the chain size. Use a caliper for accuracy.
2. **Roller Diameter**: Measure the diameter of the roller. This is the cylindrical part that engages with the sprocket teeth. Accurate measurement ensures compatibility with the sprocket.
3. **Inner Width**: Measure the width between the inner plates of the chain. This dimension is crucial for determining the chain's load capacity and compatibility with the sprocket.
4. **Pin Diameter**: Measure the diameter of the pin that holds the links together. This affects the chain's strength and durability.
5. **Overall Width**: Measure the total width of the chain, including the outer plates. This helps in assessing the space required for the chain in its application.
6. **Link Plate Thickness**: Measure the thickness of the link plates. This affects the chain's tensile strength and fatigue resistance.
7. **Number of Links**: Count the number of links in the chain to determine its length. This is essential for ensuring the chain fits the application.
8. **Chain Number**: Identify the chain number, often stamped on the side of the link plates. This number corresponds to standardized dimensions and specifications.
9. **Standard Reference**: Compare your measurements with standard roller chain size charts (e.g., ANSI, ISO) to confirm the chain size.
10. **Visual Inspection**: Check for wear and tear, elongation, or damage, which can affect the chain's performance and measurement accuracy.
These measurements ensure the roller chain fits the intended application and operates efficiently.
How do you install a master link on a roller chain?
To install a master link on a roller chain, follow these steps:
1. **Preparation**: Ensure the chain is clean and free of debris. Identify the open ends of the chain where the master link will be installed.
2. **Align the Chain**: Position the two open ends of the chain so they are aligned and ready to be connected.
3. **Insert the Master Link**: Take the master link and insert its pins through the end links of the chain. The master link consists of an outer plate with two pins and a separate clip or plate.
4. **Attach the Outer Plate**: Place the outer plate over the pins protruding through the chain links. Ensure the holes in the plate align with the pins.
5. **Secure with a Clip or Plate**:
- If using a clip-style master link, slide the clip over the pins. The closed end of the clip should face the direction of chain travel to prevent it from coming off during operation.
- If using a rivet-style master link, use a chain tool to peen or rivet the ends of the pins, securing the outer plate in place.
6. **Check Alignment**: Ensure the master link is properly seated and aligned with the rest of the chain. The link should move freely without binding.
7. **Test the Chain**: Rotate the chain by hand to ensure smooth operation and that the master link is securely fastened.
8. **Final Inspection**: Double-check that the clip or rivet is secure and that the chain is properly tensioned.
By following these steps, you can successfully install a master link on a roller chain, ensuring reliable and efficient operation.
What are the signs of a worn roller chain link?
Signs of a worn roller chain link include:
1. **Elongation**: The chain appears longer than its original length due to wear and stretching, often referred to as "chain stretch."
2. **Sidewear**: Visible wear on the sides of the chain links, which can cause misalignment and affect performance.
3. **Corrosion**: Rust or corrosion on the chain links, which can weaken the chain and lead to failure.
4. **Stiff Links**: Links that do not move freely, indicating internal wear or lack of lubrication.
5. **Excessive Noise**: Increased noise during operation, often a sign of improper lubrication or misalignment.
6. **Visible Cracks or Breaks**: Any visible cracks or breaks in the links or rollers, indicating severe wear or damage.
7. **Sprocket Wear**: Uneven or excessive wear on the sprockets, which can be a result of a worn chain.
8. **Increased Vibration**: More vibration during operation, often due to uneven wear or misalignment.
9. **Discoloration**: Changes in color, often due to overheating or lack of lubrication.
10. **Loose Fit**: The chain fits loosely on the sprockets, indicating elongation or wear.
11. **Missing or Damaged Rollers**: Rollers that are missing or visibly damaged, affecting the chain's ability to engage with the sprockets properly.
12. **Frequent Adjustments Needed**: The need for frequent tension adjustments, indicating that the chain is not maintaining its proper length.
13. **Uneven Wear Patterns**: Irregular wear patterns on the chain links or rollers, suggesting misalignment or improper tension.
Regular inspection and maintenance are crucial to identify these signs early and prevent chain failure.
How do you extend the length of a roller chain?
To extend the length of a roller chain, follow these steps:
1. **Determine the Required Length**: Measure the distance between the sprockets to determine how much additional chain length is needed.
2. **Gather Tools and Materials**: You will need a chain breaker or a punch tool, a master link or connecting link, and the additional chain length.
3. **Break the Chain**: Use the chain breaker tool to remove a link from the existing chain. Position the tool over the pin of the link you wish to remove and turn the handle to push the pin out. This will separate the chain.
4. **Prepare the Additional Chain**: Measure and cut the additional chain to the required length using the chain breaker tool. Ensure that the additional chain has an inner link at one end and an outer link at the other for proper connection.
5. **Connect the Chains**: Align the end of the existing chain with the end of the additional chain. Insert the master link through the aligned ends. Ensure the open ends of the master link face the direction of chain travel to prevent accidental disconnection.
6. **Secure the Master Link**: Place the retaining clip or plate over the master link pins. Use pliers to snap the clip into place, ensuring it is securely fastened.
7. **Check Alignment and Tension**: Ensure the chain is properly aligned on the sprockets and adjust the tension if necessary. The chain should have a slight sag but not be too loose.
8. **Test the Chain**: Run the machinery at a low speed to ensure the chain operates smoothly without binding or slipping.
By following these steps, you can effectively extend the length of a roller chain.
What is the purpose of a connecting link in a roller chain?
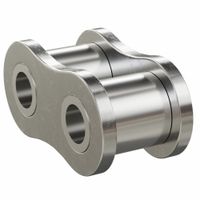
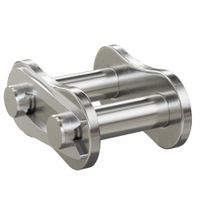
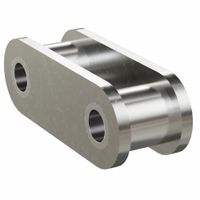
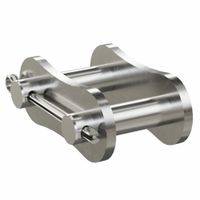
The purpose of a connecting link in a roller chain is to join the ends of the chain together, allowing it to form a continuous loop. This is essential for the chain to function effectively in transmitting mechanical power in various applications, such as bicycles, motorcycles, and industrial machinery. The connecting link, often referred to as a master link, enables easy assembly and disassembly of the chain, facilitating maintenance, repair, or replacement without the need for specialized tools.
Connecting links come in different designs, such as slip-fit or press-fit, to suit various chain types and applications. A slip-fit connecting link is typically used for lighter applications and allows for quick and easy installation and removal. In contrast, a press-fit connecting link provides a more secure connection, suitable for high-load or high-speed applications, by requiring more force to assemble and disassemble.
The connecting link ensures that the chain maintains its integrity and strength, as it is designed to match the tensile strength and load-bearing capacity of the rest of the chain. It is crucial for the connecting link to be properly installed to prevent chain failure, which could lead to equipment damage or safety hazards.
In summary, the connecting link in a roller chain serves as a critical component for joining the chain ends, enabling efficient power transmission, ease of maintenance, and ensuring the chain's structural integrity and performance.
How do you maintain and lubricate roller chain links?
To maintain and lubricate roller chain links effectively, follow these steps:
1. **Inspection**: Regularly inspect the chain for signs of wear, rust, or damage. Check for elongation, misalignment, and any broken or missing links.
2. **Cleaning**: Clean the chain to remove dirt, debris, and old lubricant. Use a brush and a mild solvent or degreaser. Ensure the chain is dry before applying new lubricant.
3. **Lubrication**: Choose the right lubricant based on the operating environment. Use oil for high-speed applications and grease for low-speed, high-load conditions. Apply lubricant to the inside of the chain where the rollers contact the pins and bushings.
4. **Application**: Use a brush, spray, or drip method to apply lubricant. Ensure even coverage and avoid over-lubrication, which can attract dirt. Rotate the chain to distribute the lubricant evenly.
5. **Tension Adjustment**: Check and adjust the chain tension to prevent excessive wear. The chain should have a slight sag, typically about 2-3% of the distance between sprockets.
6. **Alignment**: Ensure the sprockets are aligned to prevent uneven wear. Misalignment can cause the chain to wear prematurely.
7. **Replacement**: Replace the chain if it shows significant wear or elongation beyond 2-3% of its original length. Also, replace sprockets if they are worn to prevent rapid wear of the new chain.
8. **Environment Consideration**: For chains operating in harsh environments, consider using sealed or self-lubricating chains to reduce maintenance frequency.
9. **Record Keeping**: Maintain a log of maintenance activities, including inspection dates, lubrication, and any adjustments or replacements made.
By following these steps, you can extend the life of roller chains, ensure efficient operation, and reduce the risk of unexpected failures.


