Call +(254) 703 030 000 / 751 483 999 / 721 704 777
- Home
- Pipe Hose Tube Fittings
- Tube Pipe Blocking Plugs
.....Read More
Frequently Asked Questions
What are the main types of tube and pipe blocking plugs?
The main types of tube and pipe blocking plugs include:
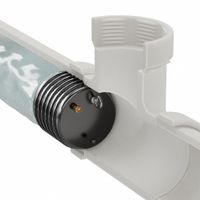
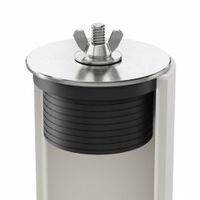
1. **Mechanical Plugs**: These are designed to create a seal by expanding against the inner walls of the pipe or tube. They often use a screw mechanism or a lever to expand rubber or other flexible materials to form a tight seal. Common types include wing nut plugs and expanding rubber plugs.
2. **Inflatable Plugs**: Made from durable materials like rubber or reinforced fabric, these plugs are inserted into the pipe and then inflated to create a seal. They are versatile and can be used in a range of pipe sizes and shapes. Inflatable plugs are often used for testing, maintenance, and temporary sealing.
3. **Threaded Plugs**: These plugs are screwed into the threaded ends of pipes. They are typically made from metal or plastic and are used to seal off the ends of pipes in plumbing and industrial applications. Threaded plugs provide a secure and often permanent seal.
4. **Push-Fit Plugs**: Designed for quick and easy installation, push-fit plugs are inserted into the pipe and held in place by friction or a locking mechanism. They are commonly used in plumbing systems for temporary sealing or during pressure testing.
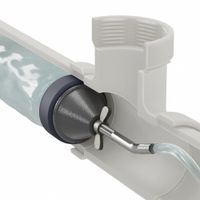
5. **Tapered Plugs**: These plugs have a conical shape that allows them to fit snugly into the pipe opening. They are often used in applications where a quick and temporary seal is needed. Tapered plugs can be made from rubber, plastic, or metal.
6. **High-Temperature Plugs**: Specifically designed to withstand high temperatures, these plugs are used in applications involving hot gases or liquids. They are typically made from materials like silicone or specialized metals.
Each type of plug is selected based on the specific requirements of the application, including the pipe material, pressure, temperature, and whether the seal needs to be temporary or permanent.
How do mechanical blocking plugs work?
Mechanical blocking plugs work by physically obstructing a passage or opening to prevent the flow of fluids, gases, or other materials. They are typically used in piping systems, ducts, or conduits to isolate sections for maintenance, testing, or repair.
The basic design of a mechanical blocking plug includes an expandable element, often made of rubber or another flexible material, which can be compressed or expanded to fit snugly within the opening. The plug is inserted into the opening in a deflated or contracted state. Once in position, a mechanical mechanism, such as a screw or lever, is used to expand the plug. This expansion creates a tight seal against the walls of the opening, effectively blocking the passage.
The sealing mechanism relies on friction and pressure. As the plug expands, it exerts outward pressure against the walls, creating a frictional force that holds it in place and prevents any leakage. The material of the expandable element is chosen for its elasticity and resistance to the specific substances it will encounter, ensuring a reliable seal.
Mechanical blocking plugs are versatile and can be used in various applications, including plumbing, HVAC systems, and industrial processes. They are available in different sizes and configurations to accommodate different diameters and types of openings. Some advanced designs may include features like pressure relief valves or monitoring ports to enhance safety and functionality.
Overall, mechanical blocking plugs are a simple yet effective solution for temporarily sealing openings, providing a reliable method for isolating sections of a system without permanent modifications.
What is the purpose of inflatable blocking plugs?
Inflatable blocking plugs are specialized devices used to temporarily seal or block pipes, ducts, or other conduits. Their primary purpose is to prevent the flow of liquids, gases, or other materials through these channels during maintenance, testing, or emergency situations. Made from durable materials like rubber or reinforced fabric, these plugs can be inflated to fit snugly within the conduit, creating an airtight or watertight seal.
In industrial settings, inflatable blocking plugs are crucial for isolating sections of piping systems to conduct repairs, inspections, or cleaning without shutting down entire operations. They are also used in pressure testing to ensure the integrity of pipelines by sealing off sections and allowing for the controlled introduction of air or water to check for leaks.
In emergency scenarios, such as controlling spills or leaks, these plugs can be quickly deployed to contain hazardous materials, preventing environmental contamination or further damage. Their versatility extends to construction and civil engineering, where they are used to block stormwater or sewage systems temporarily.
Inflatable blocking plugs are available in various sizes and configurations to accommodate different pipe diameters and shapes. Some models are equipped with bypass capabilities, allowing for the controlled release of pressure or flow while maintaining the seal. This feature is particularly useful in situations where complete blockage is not feasible or safe.
Overall, the purpose of inflatable blocking plugs is to provide a reliable, flexible, and efficient solution for managing the flow within conduits, ensuring safety, and facilitating maintenance and testing activities across various industries.
How do you install a mechanical blocking plug?
To install a mechanical blocking plug, follow these steps:
1. **Select the Right Plug**: Choose a plug that matches the size and specifications of the hole or pipe you need to block.
2. **Prepare the Area**: Clean the area around the hole or pipe to ensure a proper seal. Remove any debris, rust, or old sealant.
3. **Inspect the Plug**: Check the plug for any damage or defects. Ensure that all components, such as the rubber seal and tightening mechanism, are intact.
4. **Insert the Plug**: Carefully insert the plug into the hole or pipe. Ensure that it is positioned correctly and that the rubber seal is in contact with the surface.
5. **Tighten the Plug**: Use the appropriate tool, often a wrench or screwdriver, to tighten the plug. This will expand the rubber seal, creating a tight fit. Follow the manufacturer's instructions for the correct torque or number of turns.
6. **Check the Seal**: Once tightened, inspect the plug to ensure it is secure and that there are no gaps. The rubber seal should be evenly compressed.
7. **Test for Leaks**: If applicable, test the plug for leaks by applying pressure or introducing a small amount of fluid. Check for any signs of leakage around the plug.
8. **Final Adjustments**: If leaks are detected, adjust the plug as necessary. Retighten or reposition the plug to achieve a proper seal.
9. **Document the Installation**: Record the installation details, including the date, plug type, and any observations, for future reference.
10. **Regular Inspection**: Periodically check the plug to ensure it remains secure and leak-free, especially in high-pressure or critical applications.
What materials are used for blocking plugs?
Blocking plugs, also known as sealing plugs or stopper plugs, are used to block or seal openings in various applications, such as electrical, plumbing, or automotive systems. The materials used for blocking plugs depend on the specific requirements of the application, including factors like temperature resistance, chemical resistance, and mechanical strength. Common materials include:
1. **Rubber**: Natural rubber or synthetic rubbers like EPDM, silicone, and neoprene are frequently used due to their flexibility, sealing capability, and resistance to water and chemicals. They are ideal for applications requiring a tight seal and some degree of elasticity.
2. **Plastic**: Thermoplastics such as polyethylene (PE), polypropylene (PP), and polyvinyl chloride (PVC) are used for their lightweight, corrosion resistance, and ease of manufacturing. They are suitable for non-extreme temperature applications.
3. **Metal**: Metals like aluminum, brass, and stainless steel are chosen for their strength, durability, and resistance to high temperatures and pressures. Metal plugs are often used in industrial or automotive applications where mechanical strength is crucial.
4. **Cork**: Natural cork is used for its compressibility, lightweight, and ability to form a tight seal. It is often used in applications where a natural, biodegradable material is preferred.
5. **Foam**: Polyurethane or polyethylene foam plugs are used for their cushioning properties and ability to fill irregular spaces. They are often used in packaging or insulation applications.
6. **Composite Materials**: Some plugs are made from composite materials that combine the properties of different substances to achieve specific performance characteristics, such as enhanced strength or chemical resistance.
The choice of material depends on the specific requirements of the application, including environmental conditions, mechanical stresses, and compatibility with other materials.
How do you perform pressure testing with blocking plugs?
To perform pressure testing with blocking plugs, follow these steps:
1. **Preparation**: Ensure the pipeline or system is depressurized and drained. Inspect the area for any damage or debris that could affect the test.
2. **Select Appropriate Blocking Plugs**: Choose the correct size and type of blocking plugs for the pipe diameter and material. Ensure they are rated for the pressure level of the test.
3. **Installation**: Insert the blocking plug into the pipe. For mechanical plugs, tighten the expansion mechanism to create a seal. For inflatable plugs, use an air pump to inflate the plug until it fits snugly against the pipe walls.
4. **Safety Precautions**: Verify that all personnel are clear of the test area. Use barriers or signs to restrict access. Ensure all equipment is rated for the test pressure.
5. **Pressure Testing**: Connect a pressure source to the test section. Gradually increase the pressure to the desired test level. Monitor the pressure gauge to ensure it remains stable.
6. **Monitoring**: Maintain the test pressure for the required duration, typically specified by standards or regulations. Check for any pressure drops, which may indicate leaks.
7. **Inspection**: Visually inspect the test area for leaks or deformations. Use soapy water or electronic leak detectors for more precise leak detection.
8. **Depressurization**: Once the test is complete, slowly release the pressure to avoid sudden decompression. Ensure the system is fully depressurized before removing the blocking plugs.
9. **Removal and Cleanup**: Carefully remove the blocking plugs. Inspect them for any damage. Clean and store them properly for future use.
10. **Documentation**: Record the test results, including pressure levels, duration, and any observations. Ensure compliance with relevant standards and regulations.
What is a bypass in the context of blocking plugs?
In the context of blocking plugs, a bypass refers to a secondary pathway or channel that allows fluid, gas, or electrical current to flow around an obstruction or blockage. Blocking plugs are typically used to seal or block a conduit, pipe, or channel to prevent the passage of substances. However, in certain situations, it may be necessary to maintain some level of flow or connectivity despite the presence of a blocking plug. This is where a bypass comes into play.
A bypass can be an integral part of the blocking plug design or an additional component installed alongside the plug. It ensures that while the main pathway is obstructed, an alternative route is available for the necessary flow. This can be crucial in systems where complete blockage could lead to pressure build-up, system failure, or interruption of essential services.
Bypasses are commonly used in various applications, including plumbing, electrical systems, and industrial processes. For instance, in plumbing, a bypass might allow water to continue flowing to certain parts of a system while maintenance is performed on a blocked section. In electrical systems, a bypass might enable current to circumvent a blocked or faulty circuit, ensuring continued operation of critical components.
The design and implementation of a bypass depend on the specific requirements of the system, including the type of substance being bypassed, the pressure or voltage levels involved, and the need for control over the bypass flow. Bypasses can be temporary or permanent, manually operated or automated, and may include valves or other control mechanisms to regulate flow as needed.
How do you choose the right size of blocking plug for a pipe?
To choose the right size of a blocking plug for a pipe, follow these steps:
1. **Measure the Pipe Diameter**: Determine the internal diameter (ID) of the pipe where the plug will be inserted. Use a caliper or a pipe gauge for accurate measurement.
2. **Consider the Pipe Material**: Different materials may require different types of plugs. Ensure the plug material is compatible with the pipe material to prevent chemical reactions or damage.
3. **Check the Pipe's Pressure Rating**: Ensure the plug can withstand the pipe's pressure. Blocking plugs are rated for specific pressure levels, so choose one that matches or exceeds the pipe's pressure requirements.
4. **Assess the Pipe's Temperature Range**: The plug should be able to withstand the temperature conditions of the pipe's environment. Check the plug's temperature rating to ensure compatibility.
5. **Determine the Plug Type**: Choose between mechanical, inflatable, or test plugs based on the application. Mechanical plugs are suitable for low-pressure applications, while inflatable plugs are ideal for larger pipes and higher pressures.
6. **Review the Plug's Specifications**: Check the manufacturer's specifications for the plug, including its size range, pressure, and temperature ratings, to ensure it meets your requirements.
7. **Consider the Application**: For temporary sealing, a simple mechanical or inflatable plug may suffice. For permanent sealing, ensure the plug is designed for long-term use.
8. **Consult with Experts**: If unsure, consult with a pipe or plug specialist to ensure the correct size and type of plug is selected for your specific application.
9. **Test the Fit**: Before final installation, test the plug in the pipe to ensure a proper fit and seal.
By following these steps, you can select the appropriate blocking plug size for your pipe, ensuring safety and functionality.
What safety precautions should be taken when using blocking plugs?
When using blocking plugs, several safety precautions should be observed to ensure safe and effective operation:
1. **Inspection**: Before use, inspect the blocking plug for any signs of damage, wear, or defects. Ensure that the plug is suitable for the specific application and pressure rating.
2. **Compatibility**: Verify that the blocking plug is compatible with the pipe material and the fluid or gas being contained. Incompatible materials can lead to failure or leaks.
3. **Proper Sizing**: Use the correct size of blocking plug for the pipe. An incorrect size can result in inadequate sealing or damage to the pipe.
4. **Installation**: Follow the manufacturer's instructions for installation. Ensure that the plug is inserted correctly and securely to prevent it from dislodging under pressure.
5. **Pressure Testing**: Conduct a pressure test after installation to confirm that the plug is holding and there are no leaks. Monitor pressure levels to ensure they remain within safe limits.
6. **Personal Protective Equipment (PPE)**: Wear appropriate PPE, such as gloves, goggles, and protective clothing, to protect against potential exposure to hazardous materials or high-pressure releases.
7. **Work Area Safety**: Ensure the work area is clear of unnecessary personnel and equipment. Establish a safety perimeter if working with high-pressure systems.
8. **Monitoring**: Continuously monitor the plug and the system for any signs of failure or pressure changes. Be prepared to take immediate action if a problem arises.
9. **Emergency Procedures**: Have emergency procedures in place, including evacuation routes and first-aid measures, in case of a plug failure or other incident.
10. **Training**: Ensure that all personnel involved in the installation and monitoring of blocking plugs are properly trained and aware of the potential risks and safety procedures.
By adhering to these precautions, the risks associated with using blocking plugs can be minimized, ensuring a safer working environment.
How do you maintain and store blocking plugs after use?
To maintain and store blocking plugs after use, follow these steps:
1. **Cleaning**: Immediately after use, clean the blocking plugs thoroughly to remove any debris, dirt, or contaminants. Use a mild detergent and water for general cleaning. For stubborn residues, a soft brush may be used. Ensure that all surfaces, including crevices, are cleaned.
2. **Inspection**: After cleaning, inspect the plugs for any signs of wear, damage, or deterioration. Check for cracks, tears, or any deformities that could affect their performance. Replace any plugs that are damaged or show signs of significant wear.
3. **Drying**: Allow the plugs to air dry completely. Ensure they are placed in a well-ventilated area to prevent moisture retention, which can lead to mold or material degradation.
4. **Lubrication**: If applicable, apply a suitable lubricant to the plugs to maintain their flexibility and prevent cracking. Use a lubricant recommended by the manufacturer to ensure compatibility with the plug material.
5. **Storage**: Store the plugs in a cool, dry place away from direct sunlight and extreme temperatures. Use a dedicated storage container or rack to keep them organized and prevent deformation. Ensure that the storage area is free from chemicals or substances that could cause damage.
6. **Labeling**: Clearly label the storage area or containers with the type and size of the plugs for easy identification and retrieval.
7. **Regular Maintenance**: Schedule regular maintenance checks to ensure the plugs remain in good condition. This includes periodic cleaning, inspection, and lubrication as needed.
8. **Documentation**: Keep a record of maintenance activities, including cleaning, inspections, and replacements. This helps in tracking the lifespan and performance of the plugs.
By following these steps, blocking plugs can be effectively maintained and stored, ensuring their longevity and reliability for future use.
