Call +(254) 703 030 000 / 751 483 999 / 721 704 777
.....Read More
Frequently Asked Questions
What are the essential parts needed for setting up a grinder?
1. **Grinder Unit**: The main component, which includes the motor and grinding mechanism. Choose based on the type of material you intend to grind.
2. **Power Source**: Ensure a compatible power supply, whether it's electric, pneumatic, or manual, depending on the grinder type.
3. **Grinding Wheel or Burrs**: Select the appropriate grinding wheel or burrs for the material and desired finish. Different materials require specific types of abrasives.
4. **Tool Rest**: Provides support for the workpiece during grinding, ensuring stability and precision.
5. **Safety Guards**: Essential for protecting the user from debris and sparks. Ensure they are properly installed and maintained.
6. **Dust Collection System**: Helps in maintaining a clean work environment and reduces health risks by collecting dust and particles generated during grinding.
7. **Cooling System**: For high-speed or heavy-duty grinding, a cooling system prevents overheating and maintains the integrity of the workpiece.
8. **Work Light**: Adequate lighting is crucial for precision and safety. A built-in or external work light can enhance visibility.
9. **Vibration Dampening**: Mounts or pads to reduce vibration, improving user comfort and precision.
10. **Personal Protective Equipment (PPE)**: Includes safety goggles, gloves, ear protection, and masks to protect the user from potential hazards.
11. **Bench or Stand**: A stable platform to mount the grinder, ensuring it is at a comfortable working height and securely positioned.
12. **Tool Storage**: Organize and store accessories and tools for easy access and efficient workflow.
13. **Maintenance Tools**: Keep necessary tools for regular maintenance and adjustments, such as wrenches and lubricants, readily available.
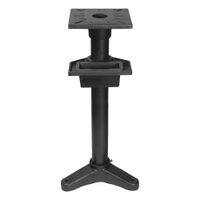
How do I properly mount a grinder to a stand?
1. **Select the Stand**: Choose a sturdy stand designed for your grinder's size and weight. Ensure it has a stable base to prevent tipping.
2. **Gather Tools and Materials**: You will need bolts, nuts, washers, a wrench, a drill, and possibly a metal or wooden mounting plate if the stand does not have a pre-drilled surface.
3. **Position the Grinder**: Place the grinder on the stand to determine the best position for balance and accessibility. Ensure the power switch is easily reachable.
4. **Mark the Mounting Holes**: Use a pencil or marker to outline the mounting holes on the stand or mounting plate. Ensure the grinder is centered and aligned properly.
5. **Drill Holes**: If the stand or mounting plate is not pre-drilled, use a drill to create holes where marked. Use a drill bit appropriate for the material (metal or wood).
6. **Attach the Grinder**: Align the grinder’s mounting holes with the drilled holes on the stand. Insert bolts through the holes, adding washers for stability.
7. **Secure with Nuts**: Thread nuts onto the bolts from underneath the stand. Use a wrench to tighten them securely, ensuring the grinder is firmly attached without wobbling.
8. **Check Stability**: Test the grinder by gently shaking it to ensure it is securely mounted. Adjust and tighten bolts if necessary.
9. **Connect Power**: Ensure the grinder is unplugged during installation. Once mounted, plug it in and test its operation to ensure everything is functioning correctly.
10. **Safety Check**: Verify that all safety guards are in place and that the grinder operates smoothly without vibrations.
11. **Final Adjustments**: Make any necessary adjustments to the grinder’s position for optimal use and comfort.
What accessories are recommended for maintaining a grinding machine?
1. **Grinding Wheels**: Regularly replace worn-out grinding wheels to ensure efficient operation and precision.
2. **Wheel Dressers**: Use wheel dressers to maintain the wheel's shape and remove any debris or glazing.
3. **Coolant Systems**: Implement a coolant system to reduce heat and friction, prolonging the life of the grinding wheel and machine.
4. **Dust Collection Systems**: Install dust collectors to minimize airborne particles, ensuring a clean working environment and protecting machine components.
5. **Lubricants**: Apply appropriate lubricants to moving parts to reduce wear and tear and ensure smooth operation.
6. **Balancing Tools**: Use balancing tools to ensure the grinding wheel is properly balanced, reducing vibration and improving accuracy.
7. **Safety Guards**: Ensure safety guards are in place to protect operators from debris and accidental contact with the grinding wheel.
8. **Tool Rests**: Adjust tool rests to the correct position to support the workpiece and maintain precision.
9. **Gauges and Calipers**: Use gauges and calipers to measure workpieces and ensure they meet specifications.
10. **Maintenance Kits**: Keep a maintenance kit with essential tools and spare parts for quick repairs and adjustments.
11. **Vibration Dampeners**: Install vibration dampeners to reduce machine vibration, enhancing precision and operator comfort.
12. **Workpiece Holders**: Use appropriate holders or fixtures to secure workpieces, ensuring stability during grinding.
13. **Personal Protective Equipment (PPE)**: Equip operators with PPE such as goggles, gloves, and ear protection to ensure safety.
14. **Alignment Tools**: Use alignment tools to ensure the machine components are correctly aligned for optimal performance.
15. **Cleaning Supplies**: Regularly clean the machine with appropriate supplies to prevent buildup of debris and contaminants.
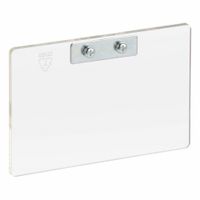
How do eye shields protect operators during grinding operations?
Eye shields protect operators during grinding operations by serving as a physical barrier against flying debris, sparks, and dust generated during the process. Grinding involves the removal of material from a workpiece, which can produce high-speed particles that pose a risk of eye injury. The eye shield, typically made of impact-resistant materials like polycarbonate, is designed to withstand these high-velocity particles, preventing them from reaching the operator's eyes.
Additionally, eye shields help protect against the intense light and heat produced during grinding, which can cause discomfort or even damage to the eyes over prolonged exposure. They also reduce the risk of eye irritation from dust and fine particles that can become airborne during grinding.
By providing a clear view of the work area, eye shields allow operators to maintain precision and control while ensuring safety. They are often adjustable and can be positioned to cover the eyes completely, offering comprehensive protection without obstructing visibility.
In summary, eye shields are a crucial safety feature in grinding operations, safeguarding operators from physical injuries, irritation, and potential long-term damage to their eyes.
What are the steps to replace worn-out parts on a grinder?
1. **Unplug the Grinder**: Ensure the grinder is disconnected from any power source to prevent accidental operation.
2. **Consult the Manual**: Refer to the user manual for specific instructions and diagrams related to your grinder model.
3. **Gather Tools and Parts**: Collect necessary tools such as screwdrivers, wrenches, and replacement parts.
4. **Disassemble the Grinder**: Remove the outer casing or cover by unscrewing the fasteners. Keep track of all screws and small parts.
5. **Identify Worn-out Parts**: Inspect components like the grinding wheel, motor brushes, bearings, and power cord for wear and damage.
6. **Remove the Worn Parts**: Carefully detach the worn-out parts. For grinding wheels, use a wrench to loosen the nut holding the wheel in place. For motor brushes, slide them out of their holders.
7. **Install New Parts**: Place the new parts in the correct position. Secure the new grinding wheel by tightening the nut. Insert new motor brushes into their holders.
8. **Reassemble the Grinder**: Reattach the outer casing or cover, ensuring all screws and fasteners are tightened securely.
9. **Test the Grinder**: Plug the grinder back in and perform a test run to ensure it operates smoothly and safely.
10. **Perform Regular Maintenance**: Regularly check and maintain the grinder to extend its lifespan and ensure optimal performance.
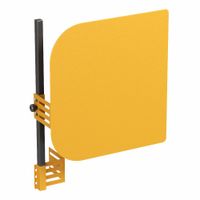
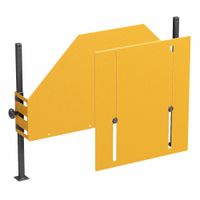
How do guards enhance safety when using a grinding machine?
Guards enhance safety when using a grinding machine by providing a physical barrier between the operator and the moving parts of the machine, such as the grinding wheel. This barrier helps prevent accidental contact with the wheel, which can cause serious injuries. Guards also contain fragments in case the wheel shatters, reducing the risk of flying debris that could harm the operator or bystanders.
Additionally, guards help in maintaining the correct positioning of the workpiece, ensuring that it does not slip or get caught in the machine, which could lead to accidents. They also prevent the operator from being exposed to sparks and dust generated during the grinding process, which can cause respiratory issues or eye injuries.
By covering the wheel, guards also help in reducing the risk of entanglement with loose clothing or jewelry, which can be pulled into the machine. Furthermore, guards often include safety features like interlocks that prevent the machine from operating unless the guard is in place, ensuring that the machine is only used under safe conditions.
Overall, guards are a critical component of the safety system in grinding operations, minimizing the risk of accidents and injuries by providing protection against mechanical hazards, containing debris, and ensuring safe operation practices.
What is the proper height for mounting a grinder on a stand?
The proper height for mounting a grinder on a stand typically ranges from 34 to 38 inches from the floor to the center of the grinder wheel. This height is generally considered ergonomic for most users, allowing for comfortable operation without excessive bending or reaching. The ideal height can vary based on the user's height and the specific application, so adjustments may be necessary to suit individual needs. It's important to ensure that the grinder is stable and secure on the stand to prevent accidents. Additionally, the work area should be well-lit, and safety equipment such as goggles and gloves should be used.