Call +(254) 703 030 000 / 751 483 999 / 721 704 777
.....Read More

Frequently Asked Questions
What are the essential parts of a vise?
A vise is a mechanical device used to secure an object to allow work to be performed on it. The essential parts of a vise include:
1. **Jaws**: The vise has two jaws, one fixed and one movable. The jaws are the parts that hold the workpiece securely. They are often made of hardened steel and may have serrated surfaces for better grip.
2. **Base**: The base is the foundation of the vise, providing stability. It is usually bolted to a workbench or table to ensure the vise remains stationary during use.
3. **Screw**: The screw is a threaded rod that moves the movable jaw. By turning the handle attached to the screw, the user can open or close the jaws to accommodate different sizes of workpieces.
4. **Handle**: The handle is attached to the screw and is used to turn it. It is typically a long rod that provides leverage, making it easier to tighten or loosen the jaws.
5. **Slide**: The slide is the mechanism that allows the movable jaw to travel along the base. It ensures smooth and precise movement of the jaw as the screw is turned.
6. **Anvil**: Some vises have an anvil surface on the back of the fixed jaw. This flat, hardened surface can be used for hammering or shaping metal.
7. **Guide Rails**: Guide rails help align the movable jaw as it slides back and forth, ensuring it remains parallel to the fixed jaw.
8. **Spindle Nut**: The spindle nut is housed within the movable jaw and engages with the screw. It translates the rotational motion of the screw into linear motion, moving the jaw.
These components work together to provide a secure grip on the workpiece, allowing for precise and stable work.
How do I maintain my vise to ensure it stays in good working order?
1. **Regular Cleaning**: After each use, clean the vise with a brush or cloth to remove metal shavings, dust, and debris. This prevents buildup that can affect its operation.
2. **Lubrication**: Apply a light machine oil or grease to the screw, guide rails, and other moving parts regularly. This reduces friction and prevents rust.
3. **Rust Prevention**: Store the vise in a dry environment. If exposed to moisture, wipe it down and apply a rust inhibitor or a thin layer of oil to protect the metal surfaces.
4. **Inspection**: Periodically check for wear and tear. Look for cracks, worn threads, or misalignment. Address any issues immediately to prevent further damage.
5. **Jaw Maintenance**: Ensure the jaws are clean and free of debris. Replace or repair them if they become worn or damaged to maintain a firm grip.
6. **Tightening Mechanism**: Regularly check the tightening mechanism for smooth operation. If it becomes stiff, clean and lubricate it.
7. **Alignment**: Ensure the vise is properly aligned and securely mounted to the workbench. Misalignment can cause uneven pressure and damage.
8. **Avoid Over-tightening**: Do not apply excessive force when tightening the vise. This can damage the screw and other components.
9. **Use Properly**: Use the vise for its intended purpose. Avoid using it as an anvil or for tasks beyond its capacity.
10. **Storage**: When not in use, keep the vise closed to protect the screw and internal components from dust and damage.
By following these maintenance steps, you can ensure your vise remains in optimal working condition for years.
What accessories can enhance the functionality of my vise?
1. **Soft Jaws**: Protect delicate workpieces from damage by using soft jaws made of materials like aluminum, rubber, or plastic.
2. **Vise Jaw Pads**: These pads provide additional grip and prevent marring of the workpiece, ideal for holding irregularly shaped objects.
3. **Pipe Jaws**: Specialized jaws designed to securely hold round or cylindrical objects, such as pipes or tubing.
4. **Vise Swivel Base**: Allows the vise to rotate, providing flexibility in positioning the workpiece for better access and comfort.
5. **Bench Dog Holes**: Integrate with bench dogs to hold larger workpieces securely on a workbench, expanding the vise's capacity.
6. **Vise Handle Extensions**: Increase leverage for tightening or loosening the vise, useful for larger or more stubborn workpieces.
7. **Magnetic Jaw Covers**: Easily attach to the vise jaws to provide a non-marring surface and can be quickly removed or replaced.
8. **Vise Stops**: Adjustable stops that help in positioning and holding workpieces at a consistent height or angle.
9. **Quick-Release Mechanism**: Allows for rapid adjustment of the vise jaws, saving time when frequently changing workpieces.
10. **Vise Mounting Plate**: Facilitates easy removal and reattachment of the vise, allowing for more workspace flexibility.
11. **Vise Workbench Stand**: Elevates the vise to a more comfortable working height, reducing strain during prolonged use.
12. **Vise Anvil**: Provides a flat surface for hammering or shaping metal, expanding the vise's utility in metalworking tasks.
13. **Vise Light**: An attached light source to illuminate the work area, improving visibility and precision.
14. **Vise Dust Cover**: Protects the vise from dust and debris when not in use, prolonging its lifespan.
15. **Vise Clamps**: Additional clamps can be used to secure the vise to the workbench, enhancing stability.
How do vise handles improve clamping pressure?
Vise handles improve clamping pressure by providing mechanical advantage and better control over the force applied. The handle acts as a lever, allowing the user to exert greater force with less effort. When the handle is turned, it rotates the screw mechanism inside the vise, which translates rotational motion into linear motion, moving the jaws closer together. This mechanism amplifies the input force, enabling the vise to exert significant clamping pressure on the workpiece.
The length of the handle is crucial; a longer handle increases the lever arm, allowing for more torque to be applied with the same amount of force. This means that even a modest amount of force applied at the end of a long handle can generate substantial clamping pressure at the jaws. Additionally, the handle's design, often featuring a comfortable grip, ensures that the user can apply force efficiently without slipping, further enhancing the clamping capability.
Moreover, the screw thread's pitch and design play a role in determining how much the jaws move per turn of the handle. A finer thread pitch allows for more precise adjustments and can increase the clamping force by requiring more turns to achieve the same jaw movement, thus distributing the force more effectively.
In summary, vise handles improve clamping pressure by leveraging mechanical advantage through their length and design, allowing for efficient force application and precise control over the clamping process.
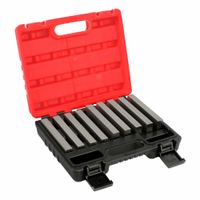
What are parallels, and how do they work with a vise?
Parallels are precision-ground metal bars or plates used in machining and metalworking to elevate and support workpieces within a vise. They ensure that the workpiece is held parallel to the vise jaws and the machine table, providing a stable and level surface for accurate machining operations.
When using a vise, parallels are placed on the vise's base, and the workpiece is positioned on top of them. This setup allows the workpiece to be raised to the desired height, ensuring that it is aligned correctly with the cutting tool. Parallels come in pairs and are available in various thicknesses and heights to accommodate different workpiece sizes and machining requirements.
The primary function of parallels is to provide clearance between the workpiece and the vise jaws, preventing the cutting tool from accidentally contacting the vise. This is crucial for maintaining the integrity of both the tool and the vise. Additionally, parallels help distribute clamping pressure evenly across the workpiece, reducing the risk of deformation or damage during machining.
Parallels are typically made from hardened steel or other durable materials to withstand the forces exerted during machining. They are precision-ground to ensure flatness and parallelism, which is essential for maintaining the accuracy of the machining process.
In summary, parallels are essential tools in machining that work with a vise to elevate, support, and align workpieces, ensuring precision and preventing damage during machining operations.
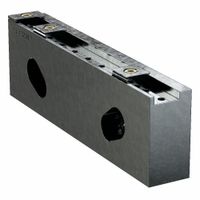
How can modular machine-vise jaws increase the versatility of my vise?
Modular machine-vise jaws enhance the versatility of a vise by allowing for quick and easy customization to accommodate various workpiece shapes, sizes, and materials. These jaws can be interchanged or adjusted without the need for a complete vise change, saving time and increasing efficiency.
1. **Customization**: Modular jaws can be tailored to specific applications, enabling the vise to securely hold irregularly shaped or delicate workpieces that standard jaws might not accommodate.
2. **Quick Changeover**: The ability to swiftly swap out jaws reduces downtime between tasks, facilitating a seamless transition from one project to another and improving overall productivity.
3. **Cost-Effectiveness**: Instead of purchasing multiple vises for different tasks, modular jaws allow a single vise to perform a wide range of functions, reducing the need for additional equipment.
4. **Enhanced Grip**: Specialized jaw designs, such as those with serrated, soft, or rubberized surfaces, provide better grip and protection for specific materials, minimizing the risk of damage.
5. **Increased Precision**: Modular jaws can be precisely aligned and adjusted, ensuring accurate positioning and clamping of the workpiece, which is crucial for high-precision machining tasks.
6. **Versatile Applications**: They support a variety of machining operations, including milling, drilling, and grinding, by adapting to the specific requirements of each process.
7. **Extended Tool Life**: By using the appropriate jaw for each task, wear and tear on both the vise and the workpiece are minimized, extending the lifespan of the tools and materials involved.
In summary, modular machine-vise jaws transform a standard vise into a highly adaptable tool, capable of handling diverse machining challenges with efficiency and precision.
What are the best practices for installing and using vise accessories?
1. **Selection**: Choose accessories compatible with your vise type and size. Ensure they are designed for the specific tasks you intend to perform.
2. **Installation**:
- **Clean Surfaces**: Before installation, clean the vise and accessory surfaces to remove debris and ensure a secure fit.
- **Alignment**: Align accessories properly to avoid misalignment that can lead to uneven pressure or damage.
- **Secure Fastening**: Use appropriate bolts or screws to fasten accessories, ensuring they are tight but not over-tightened to prevent damage.
3. **Usage**:
- **Correct Application**: Use accessories for their intended purpose. For example, use soft jaws for delicate materials to prevent marring.
- **Regular Inspection**: Frequently check for wear and tear. Replace accessories that show signs of damage to maintain safety and efficiency.
- **Proper Storage**: Store accessories in a dry, organized space to prevent rust and ensure they are easily accessible.
4. **Maintenance**:
- **Lubrication**: Regularly lubricate moving parts to ensure smooth operation and prevent rust.
- **Cleaning**: After use, clean accessories to remove any material residue that could affect future performance.
5. **Safety**:
- **Personal Protective Equipment (PPE)**: Always wear appropriate PPE, such as gloves and safety glasses, when installing or using vise accessories.
- **Load Limits**: Adhere to the load limits of both the vise and accessories to prevent accidents or equipment failure.
6. **Training**: Ensure all users are trained in the correct installation and use of vise accessories to promote safety and efficiency.