Call +(254) 703 030 000 / 751 483 999 / 721 704 777
- Home
- Hardware
- Sealing Supplies
- O Rings O Ring Kits
.....Read More
Frequently Asked Questions
What are O-rings used for?
O-rings are mechanical gaskets used to create a seal between two or more parts, preventing the passage of liquids or gases. They are typically made from elastomeric materials like rubber, silicone, or fluorocarbon, which provide flexibility and resilience. O-rings are designed to fit into a groove and are compressed between two surfaces, forming a tight seal that can withstand pressure, temperature variations, and chemical exposure.
Common applications of O-rings include:
1. **Hydraulic Systems**: O-rings are used in hydraulic cylinders and pumps to prevent fluid leaks and maintain pressure.
2. **Pneumatic Systems**: They seal air and gas in pneumatic tools and machinery, ensuring efficient operation.
3. **Automotive Industry**: O-rings are found in engines, fuel systems, and air conditioning units to prevent leaks and ensure proper function.
4. **Aerospace**: They are critical in aircraft systems, including fuel, hydraulic, and environmental control systems, where reliability is paramount.
5. **Plumbing**: O-rings are used in faucets, valves, and pipe connections to prevent water leaks.
6. **Medical Devices**: They ensure airtight and watertight seals in equipment like syringes and pumps.
7. **Food and Beverage Industry**: O-rings made from food-grade materials are used in processing equipment to prevent contamination.
8. **Electronics**: They protect sensitive components from dust and moisture.
O-rings are favored for their simplicity, cost-effectiveness, and ease of installation. They can accommodate a wide range of temperatures and pressures, making them versatile for various industrial and commercial applications. Proper selection of material and size is crucial to ensure optimal performance and longevity of the seal.
How do I choose the right O-ring material?
To choose the right O-ring material, consider the following factors:
1. **Temperature Range**: Determine the operating temperature range. Materials like silicone and fluorocarbon (Viton) are suitable for high temperatures, while nitrile (Buna-N) is better for moderate temperatures.
2. **Chemical Compatibility**: Assess the chemicals the O-ring will contact. Fluorocarbon is resistant to oils and fuels, while EPDM is suitable for water and steam. Use compatibility charts to match materials with specific chemicals.
3. **Pressure and Application**: Consider the pressure the O-ring will face. For high-pressure applications, materials like PTFE or metal O-rings may be necessary. Also, consider dynamic vs. static applications; dynamic applications may require materials with better wear resistance.
4. **Hardness (Durometer)**: Choose the appropriate hardness. Softer materials (lower durometer) provide better sealing but may wear faster, while harder materials (higher durometer) offer durability but may not seal as effectively.
5. **Environmental Factors**: Consider exposure to UV, ozone, and weather. Silicone and EPDM are resistant to these factors, making them suitable for outdoor applications.
6. **Regulatory Requirements**: Ensure compliance with industry standards and regulations, such as FDA, NSF, or military specifications, which may dictate material choices.
7. **Cost and Availability**: Balance performance needs with budget constraints. Some materials, like perfluoroelastomer, offer excellent performance but at a higher cost.
8. **Special Requirements**: Consider any unique requirements, such as electrical conductivity or non-toxicity, which may necessitate specific materials.
By evaluating these factors, you can select an O-ring material that meets the operational demands and environmental conditions of your application.
What is the difference between a standard O-ring and a backup O-ring?
A standard O-ring is a circular, elastomeric sealing device used to prevent the passage of fluids or gases between two surfaces. It is typically made from materials like rubber, silicone, or other polymers, and is designed to fit into a groove and compress during assembly to create a seal. Standard O-rings are used in a wide range of applications, from automotive engines to household appliances, due to their simplicity, cost-effectiveness, and versatility.
A backup O-ring, on the other hand, is used in conjunction with a standard O-ring to enhance the sealing system's performance, particularly in high-pressure or high-temperature environments. Backup O-rings are typically made from more rigid materials, such as PTFE (Teflon) or hard rubber, and are designed to prevent the extrusion of the standard O-ring under pressure. They are placed in the groove behind the standard O-ring, providing additional support and preventing deformation or damage to the primary seal.
The key differences between the two are their function and material composition. While the standard O-ring is the primary sealing element, the backup O-ring serves as a supportive component to extend the life and reliability of the seal, especially in demanding conditions. Backup O-rings are crucial in applications where the standard O-ring alone might fail due to extreme pressures or temperatures, ensuring the integrity of the sealing system.
How do I measure an O-ring?
To measure an O-ring accurately, follow these steps:
1. **Inner Diameter (ID):**
- Place the O-ring on a flat surface.
- Use a caliper to measure the distance from one inner edge directly across to the opposite inner edge. This is the inner diameter.
2. **Outer Diameter (OD):**
- Measure the distance from one outer edge directly across to the opposite outer edge using a caliper. This is the outer diameter.
3. **Cross-Section (CS):**
- Use a caliper to measure the thickness of the O-ring. This is done by measuring the distance from the inner edge to the outer edge at the thickest part of the O-ring. Alternatively, you can calculate the cross-section by subtracting the inner diameter from the outer diameter and dividing by two: CS = (OD - ID) / 2.
4. **Check for Uniformity:**
- Rotate the O-ring and take multiple measurements to ensure it is not deformed and has a consistent cross-section.
5. **Use a Pi Tape (Optional):**
- For larger O-rings, a pi tape can be used to measure the circumference, which can then be used to calculate the diameter: Diameter = Circumference / π.
6. **Reference a Size Chart:**
- Once measurements are taken, compare them to an O-ring size chart to determine the standard size.
7. **Consider Material and Hardness:**
- Note the material and hardness (durometer) of the O-ring, as these can affect performance and compatibility.
Ensure all measurements are precise and taken in millimeters or inches, depending on your requirement. Accurate measurement is crucial for ensuring the O-ring fits properly and functions effectively in its application.
How do I install an O-ring correctly?
1. **Select the Correct O-Ring**: Ensure the O-ring material and size are appropriate for the application and environment.
2. **Inspect the O-Ring**: Check for any damage, such as cuts or abrasions, and ensure it is clean.
3. **Prepare the Installation Area**: Clean the groove and surrounding area where the O-ring will be installed to remove any debris or contaminants.
4. **Lubricate the O-Ring**: Use a compatible lubricant to reduce friction during installation. This helps prevent twisting or tearing. Ensure the lubricant is suitable for the O-ring material and application.
5. **Stretch the O-Ring Gently**: If necessary, stretch the O-ring evenly to fit over the part. Avoid excessive stretching to prevent damage.
6. **Install the O-Ring**:
- For static applications, place the O-ring into the groove, ensuring it is seated evenly without twisting.
- For dynamic applications, roll the O-ring into place rather than sliding it to avoid twisting.
7. **Avoid Sharp Edges**: Use tools with rounded edges or protective covers to guide the O-ring over sharp edges during installation.
8. **Check for Proper Fit**: Ensure the O-ring is seated properly in the groove without any pinching or distortion.
9. **Reassemble Components**: Carefully reassemble the components, ensuring the O-ring remains in place and is not pinched or displaced.
10. **Test the Seal**: After installation, test the system to ensure the O-ring is sealing correctly without leaks.
By following these steps, you can ensure a proper O-ring installation, minimizing the risk of leaks and extending the life of the seal.
What are common causes of O-ring failure?
Common causes of O-ring failure include:
1. **Compression Set**: O-rings can lose their elasticity due to prolonged compression, leading to a permanent deformation that prevents them from sealing effectively.
2. **Extrusion and Nibbling**: High pressure can force the O-ring material into gaps between mating surfaces, causing it to be pinched or torn.
3. **Thermal Degradation**: Excessive heat can cause O-rings to harden, crack, or become brittle, compromising their sealing ability.
4. **Chemical Attack**: Exposure to incompatible chemicals can lead to swelling, softening, or degradation of the O-ring material.
5. **Abrasion**: Repeated motion or friction against rough surfaces can wear down the O-ring, leading to leaks.
6. **Installation Damage**: Improper installation can cause cuts, nicks, or twists in the O-ring, affecting its performance.
7. **Outgassing**: In vacuum applications, volatile components in the O-ring material can evaporate, leading to shrinkage and loss of sealing capability.
8. **Spiral Failure**: Occurs when the O-ring twists during installation or operation, leading to a spiral cut along its surface.
9. **Overstretching**: Stretching an O-ring beyond its elastic limit during installation can cause it to lose its shape and sealing properties.
10. **Inadequate Lubrication**: Lack of lubrication can increase friction and wear, leading to premature failure.
11. **Material Incompatibility**: Using an O-ring material that is not suitable for the application environment can lead to rapid degradation.
12. **Pressure Fluctuations**: Rapid changes in pressure can cause the O-ring to flex excessively, leading to fatigue and failure.
13. **UV and Ozone Exposure**: Prolonged exposure to UV light or ozone can cause surface cracking and degradation of the O-ring material.
How do I splice an O-ring using a splicing kit?
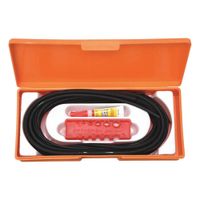
1. **Gather Materials**: Ensure you have an O-ring splicing kit, which typically includes O-ring cord, adhesive, a cutting tool, and a splicing jig.
2. **Measure and Cut**: Determine the required length of the O-ring by measuring the circumference of the groove where it will be placed. Use the cutting tool to cut the O-ring cord to this length, ensuring a clean, straight cut.
3. **Prepare the Ends**: Place the ends of the cut cord into the splicing jig. This tool helps align the ends for a precise and even splice.
4. **Apply Adhesive**: Apply a small amount of adhesive to one end of the cord. Use an adhesive suitable for the material of the O-ring, typically provided in the kit.
5. **Join the Ends**: Press the two ends together firmly within the splicing jig. Ensure they are aligned perfectly to avoid any gaps or misalignment.
6. **Hold and Cure**: Hold the ends together for the time specified by the adhesive manufacturer, usually a few minutes, to allow the adhesive to set.
7. **Inspect the Splice**: Once the adhesive has cured, remove the O-ring from the jig and inspect the splice. It should be smooth and seamless, with no visible gaps or excess adhesive.
8. **Test the O-ring**: Before installation, gently stretch the O-ring to ensure the splice holds and there are no weak points.
9. **Install**: Place the spliced O-ring into its groove, ensuring it fits snugly and evenly.
10. **Check for Leaks**: After installation, check the system for leaks or failures to ensure the O-ring is functioning correctly.


