Call +(254) 703 030 000 / 751 483 999 / 721 704 777
.....Read More

Frequently Asked Questions
How do I repair a faulty relay accessory?
1. **Identify the Faulty Relay**: Locate the relay in the circuit or device. Check the schematic or manual to ensure you have the correct relay.
2. **Safety First**: Disconnect power to the device to prevent electric shock. Ensure the device is completely powered down.
3. **Inspect the Relay**: Look for visible signs of damage such as burn marks, corrosion, or a melted casing. Listen for a clicking sound when the relay is activated; absence may indicate a fault.
4. **Test the Relay**: Use a multimeter to test the relay. Set the multimeter to the continuity or resistance setting. Check the coil terminals for continuity. A lack of continuity indicates a broken coil.
5. **Check the Contacts**: Measure resistance across the relay contacts. High resistance or no continuity when the relay is activated suggests faulty contacts.
6. **Clean the Contacts**: If contacts are dirty or corroded, clean them with contact cleaner or fine sandpaper. Ensure the relay is dry before testing again.
7. **Replace the Relay**: If cleaning doesn’t work or the coil is faulty, replace the relay. Ensure the new relay matches the specifications of the old one (voltage, current, pin configuration).
8. **Reinstall and Test**: Install the new or repaired relay back into the circuit. Reconnect power and test the device to ensure proper operation.
9. **Monitor Performance**: Observe the device for any irregularities to confirm the relay is functioning correctly.
10. **Consult a Professional**: If the problem persists, consult a professional technician for further diagnosis and repair.
What are the best practices for maintaining relay accessories?
1. **Regular Inspection**: Conduct routine visual inspections to check for signs of wear, corrosion, or damage. Ensure all connections are secure and components are intact.
2. **Cleaning**: Keep relay accessories clean from dust, dirt, and moisture. Use appropriate cleaning agents and tools to avoid damaging sensitive parts.
3. **Testing**: Perform regular functional tests to ensure relays operate correctly. Use testing equipment to simulate conditions and verify performance.
4. **Calibration**: Periodically calibrate relays to maintain accuracy. Follow manufacturer guidelines for calibration intervals and procedures.
5. **Environmental Control**: Maintain a stable environment with controlled temperature and humidity to prevent adverse effects on relay performance.
6. **Lubrication**: Apply suitable lubricants to moving parts as recommended by the manufacturer to reduce friction and wear.
7. **Replacement of Worn Parts**: Replace any worn or damaged components promptly to prevent failure. Keep spare parts readily available.
8. **Documentation**: Maintain detailed records of maintenance activities, including inspections, tests, and replacements, to track performance and identify trends.
9. **Training**: Ensure personnel are adequately trained in handling and maintaining relay accessories to prevent mishandling and ensure safety.
10. **Compliance with Standards**: Adhere to industry standards and manufacturer specifications for maintenance procedures to ensure reliability and safety.
11. **Use of Quality Components**: Use high-quality, compatible components and accessories to ensure optimal performance and longevity.
12. **Monitoring**: Implement monitoring systems to detect anomalies in real-time, allowing for proactive maintenance and reducing downtime.
13. **Safety Precautions**: Follow all safety protocols during maintenance to protect personnel and equipment from electrical hazards.
How can I enhance the functionality of my electrical relays?
To enhance the functionality of your electrical relays, consider the following strategies:
1. **Select the Right Type**: Choose relays that match your application requirements, such as solid-state relays for high-speed switching or electromagnetic relays for general purposes.
2. **Use Quality Components**: Invest in high-quality relays from reputable manufacturers to ensure reliability and longevity.
3. **Implement Protective Measures**: Use snubber circuits to protect against voltage spikes and suppressors to minimize electromagnetic interference.
4. **Optimize Control Circuits**: Design control circuits that provide stable and precise input signals to the relay coils, reducing the risk of malfunction.
5. **Regular Maintenance**: Schedule regular inspections and maintenance to clean contacts, check for wear, and ensure proper operation.
6. **Upgrade to Smart Relays**: Consider upgrading to programmable or smart relays that offer advanced features like remote monitoring, diagnostics, and integration with automation systems.
7. **Ensure Proper Installation**: Follow manufacturer guidelines for installation, ensuring correct orientation, secure mounting, and proper electrical connections.
8. **Temperature Management**: Implement cooling solutions or choose relays with higher thermal ratings to prevent overheating in high-load applications.
9. **Load Management**: Avoid overloading by ensuring the relay's current and voltage ratings match the application's requirements.
10. **Use Auxiliary Contacts**: Add auxiliary contacts for additional control and feedback options, enhancing the relay's versatility.
11. **Implement Redundancy**: Use redundant relay configurations to increase reliability and ensure continuous operation in critical applications.
12. **Monitor Performance**: Use monitoring systems to track relay performance and detect issues early, allowing for timely interventions.
By applying these strategies, you can significantly enhance the functionality, reliability, and lifespan of your electrical relays.
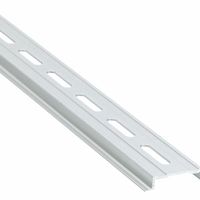
What is the proper way to mount relays using DIN-rails and mounting hardware?
To mount relays on DIN-rails, follow these steps:
1. **Select the Right Relay and DIN-Rail**: Ensure the relay is compatible with DIN-rail mounting. Choose the appropriate DIN-rail type (e.g., TS35, TS15) based on the relay and application requirements.
2. **Prepare the DIN-Rail**: Cut the DIN-rail to the required length using a hacksaw or a specialized DIN-rail cutter. Deburr the edges to prevent injury or damage to components.
3. **Install the DIN-Rail**: Secure the DIN-rail to the panel or enclosure using screws or bolts. Ensure it is level and firmly attached to prevent movement or vibration.
4. **Attach Mounting Hardware**: Use relay sockets or bases designed for DIN-rail mounting. These typically have a clip or latch mechanism for easy attachment to the rail.
5. **Mount the Relay**:
- **Snap-On Method**: Align the relay socket with the DIN-rail and press down until it clicks into place.
- **Screw-On Method**: If the relay or socket requires screws, align it with the rail and tighten the screws to secure it.
6. **Wire the Relay**: Connect the relay's terminals according to the wiring diagram. Ensure all connections are tight and secure to prevent electrical faults.
7. **Test the Installation**: Once mounted and wired, test the relay to ensure it operates correctly. Check for proper engagement and secure connections.
8. **Label and Document**: Label the relay and document the installation for future reference and maintenance.
9. **Safety Check**: Ensure all components are properly grounded and that the installation complies with relevant electrical standards and regulations.
By following these steps, you ensure a secure and efficient relay installation on a DIN-rail system.
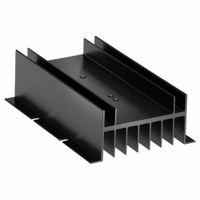
How do I choose the right heat sink for my solid-state relay?
1. **Determine Power Dissipation**: Calculate the power dissipation of the SSR using the formula: Power Dissipation (W) = Load Current (A) x Voltage Drop across SSR (V).
2. **Thermal Resistance**: Check the SSR's datasheet for its thermal resistance (Rθjc) and the maximum allowable junction temperature (Tjmax). Calculate the required thermal resistance of the heat sink (Rθsa) using: Rθsa = (Tjmax - Ta) / Power Dissipation - Rθjc - Rθcs, where Ta is the ambient temperature and Rθcs is the thermal resistance between the case and the heat sink.
3. **Heat Sink Material**: Choose a heat sink made of materials with high thermal conductivity, such as aluminum or copper, to efficiently dissipate heat.
4. **Size and Shape**: Select a heat sink with adequate surface area. Larger surface areas and finned designs improve heat dissipation. Ensure the heat sink fits within your device's spatial constraints.
5. **Mounting and Orientation**: Consider the mounting method and orientation. Vertical fin orientation is generally more effective for natural convection. Ensure the heat sink can be securely attached to the SSR.
6. **Airflow**: Evaluate the cooling environment. If natural convection is insufficient, consider forced air cooling with a fan to enhance heat dissipation.
7. **Thermal Interface Material**: Use thermal paste or pads to improve thermal conductivity between the SSR and the heat sink.
8. **Testing**: After installation, test the SSR under load to ensure it operates within safe temperature limits.
9. **Compliance and Safety**: Ensure the heat sink and SSR assembly comply with relevant safety and industry standards.
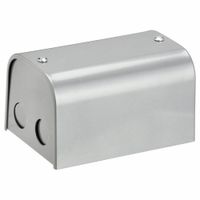
What are the benefits of using relay protective covers and enclosures?
Relay protective covers and enclosures offer several benefits:
1. **Physical Protection**: They shield relays from physical damage due to impacts, vibrations, or accidental contact, ensuring the longevity and reliability of the relay components.
2. **Environmental Shielding**: These covers protect against environmental factors such as dust, moisture, and corrosive elements, which can degrade relay performance and lead to failures.
3. **Electrical Safety**: Enclosures prevent accidental contact with live parts, reducing the risk of electrical shock to personnel and ensuring compliance with safety standards.
4. **Thermal Management**: They help in managing heat dissipation, preventing overheating of relays, which can lead to malfunction or reduced lifespan.
5. **Noise Reduction**: Enclosures can dampen noise generated by relays, contributing to a quieter operational environment.
6. **Security**: They provide a barrier against unauthorized access or tampering, enhancing the security of the relay systems.
7. **Aesthetic and Organizational Benefits**: Enclosures offer a neat and organized appearance, which is particularly beneficial in complex installations, aiding in maintenance and troubleshooting.
8. **Customization and Scalability**: Many enclosures are customizable to fit specific relay configurations and can be scaled to accommodate future expansions or modifications.
9. **Compliance with Standards**: Using protective covers and enclosures helps in meeting industry standards and regulations, which is crucial for operational approval and insurance purposes.
10. **Cost Efficiency**: By preventing damage and reducing maintenance needs, they contribute to lower operational costs and extend the service life of relay systems.
Overall, relay protective covers and enclosures are essential for ensuring the safe, efficient, and reliable operation of electrical systems.
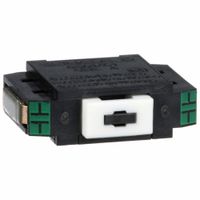
How do relay communication modules work to increase relay functionalities?
Relay communication modules enhance relay functionalities by enabling communication between relays and other devices in a power system. These modules facilitate the exchange of data, control signals, and status information, thereby improving the overall efficiency and reliability of the system.
1. **Data Acquisition**: Relay communication modules collect data from the power system, such as voltage, current, frequency, and fault conditions. This data is crucial for monitoring system performance and detecting anomalies.
2. **Remote Monitoring and Control**: By enabling remote access, these modules allow operators to monitor and control relays from a central location. This reduces the need for on-site personnel and speeds up response times to system events.
3. **Protocol Support**: They support various communication protocols like IEC 61850, DNP3, and Modbus, ensuring compatibility and interoperability with different devices and systems.
4. **Event Reporting and Logging**: Communication modules can log events and disturbances, providing a historical record that aids in troubleshooting and analysis. This feature is essential for understanding system behavior and improving future performance.
5. **Automation and Integration**: These modules facilitate the integration of relays into automated systems, enabling functions like load shedding, fault isolation, and system restoration without human intervention.
6. **Cybersecurity**: Advanced communication modules incorporate cybersecurity measures to protect against unauthorized access and data breaches, ensuring the integrity and confidentiality of the communication.
7. **Scalability and Flexibility**: They offer scalable solutions that can be easily expanded or reconfigured to meet changing system requirements, providing flexibility in system design and operation.
By incorporating these functionalities, relay communication modules significantly enhance the capabilities of relays, making them more intelligent and adaptable to modern power system demands.