Call +(254) 703 030 000 / 751 483 999 / 721 704 777
.....Read More

Frequently Asked Questions
What is a miter saw used for?
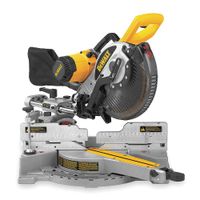
A miter saw is a specialized power tool used primarily for making precise crosscuts and miter cuts in a workpiece. It is commonly used in woodworking, carpentry, and various construction projects. The saw consists of a mounted circular blade that can be pulled down onto the material to make cuts at a variety of angles.
The primary function of a miter saw is to make accurate crosscuts, which are cuts made across the grain of the wood. It is particularly useful for cutting molding, trim, and other materials that require precise angles. The saw can be adjusted to cut at different angles, typically ranging from 0 to 45 degrees, allowing for the creation of miter joints, which are essential in framing, crown molding, and other decorative applications.
There are several types of miter saws, including standard miter saws, compound miter saws, and sliding compound miter saws. A standard miter saw can make straight and angled cuts, while a compound miter saw can also tilt to make bevel cuts, which are angled cuts along the thickness of the material. Sliding compound miter saws add the ability to move the blade forward and backward, increasing the cutting capacity for wider materials.
Miter saws are valued for their speed, accuracy, and ease of use. They are equipped with features such as laser guides, adjustable fences, and dust collection systems to enhance precision and maintain a clean work environment. Overall, a miter saw is an essential tool for anyone needing to make precise, angled cuts quickly and efficiently.
How do you use a miter saw safely?
1. **Read the Manual**: Familiarize yourself with the specific miter saw model by reading the manufacturer's manual.
2. **Wear Safety Gear**: Always wear safety glasses, hearing protection, and a dust mask to protect against debris and noise.
3. **Inspect the Saw**: Check the blade for sharpness and damage. Ensure all guards are in place and functioning.
4. **Secure the Work Area**: Ensure the work area is clean and well-lit. Remove any obstructions and ensure the saw is on a stable surface.
5. **Use Clamps**: Secure the material with clamps to prevent movement during cutting.
6. **Adjust the Saw**: Set the miter and bevel angles as needed for your cut. Ensure the saw is unplugged when making adjustments.
7. **Position the Material**: Place the material firmly against the fence and table. Ensure your hands are at least 6 inches away from the blade.
8. **Start the Saw**: Turn on the saw and allow the blade to reach full speed before making contact with the material.
9. **Make the Cut**: Lower the blade slowly and steadily through the material. Do not force the saw; let the blade do the work.
10. **Release the Trigger**: Once the cut is complete, release the trigger and wait for the blade to stop completely before raising it.
11. **Remove the Material**: Once the blade has stopped, remove the cut material and any offcuts from the work area.
12. **Unplug the Saw**: When finished, unplug the saw to prevent accidental starts.
13. **Regular Maintenance**: Keep the saw clean and perform regular maintenance as recommended by the manufacturer.
What is the difference between a miter saw and a chop saw?
A miter saw and a chop saw are both power tools used for cutting, but they have distinct differences in design, functionality, and application.
A miter saw is designed for precision and versatility. It features a pivoting arm that allows the blade to be angled in various directions, enabling it to make angled cuts, known as miter cuts, as well as bevel cuts. This makes it ideal for tasks that require precision, such as cutting moldings, trim, and other detailed woodworking projects. Miter saws often come with a sliding feature, allowing the blade to move forward and backward, increasing the cutting capacity for wider materials.
In contrast, a chop saw is a more robust and straightforward tool primarily used for cutting metal and other tough materials. It operates with a fixed vertical cutting motion, meaning it can only make straight, 90-degree cuts. Chop saws are typically equipped with abrasive wheels instead of toothed blades, which are better suited for cutting through hard materials. They are favored in construction and metalworking for their durability and ability to handle heavy-duty tasks.
In summary, the main differences lie in their functionality and intended use: miter saws offer precision and versatility for woodworking with the ability to make angled cuts, while chop saws provide power and durability for straight cuts in metalworking and construction.
How do you choose the right miter saw blade?
To choose the right miter saw blade, consider the following factors:
1. **Blade Size**: Match the blade diameter to your miter saw's specifications, typically 8-1/4", 10", or 12".
2. **Tooth Count**: Higher tooth count (80-100) is ideal for fine, smooth cuts in wood and delicate materials. Lower tooth count (24-60) is suitable for rough cuts and faster material removal.
3. **Tooth Configuration**:
- **ATB (Alternate Top Bevel)**: Good for crosscutting wood.
- **FTG (Flat Top Grind)**: Best for ripping wood.
- **TCG (Triple Chip Grind)**: Ideal for cutting hard materials like laminate and metal.
4. **Material**: Choose carbide-tipped blades for durability and longevity, especially for frequent use.
5. **Kerf Width**: Thin kerf blades require less power and are suitable for portable saws, while full kerf blades are more robust and used in stationary saws.
6. **Hook Angle**: Positive hook angles are aggressive and fast, suitable for ripping. Negative or zero hook angles are safer for crosscutting and prevent material from climbing the blade.
7. **Application**:
- **Wood**: Use general-purpose or crosscut blades.
- **Metal**: Use blades specifically designed for metal cutting.
- **Plastic/Laminate**: Use blades with a high tooth count and TCG configuration.
8. **Brand and Quality**: Opt for reputable brands known for quality and reliability to ensure precision and safety.
9. **Budget**: Balance cost with quality; investing in a good blade can save money in the long run by reducing the need for frequent replacements.
10. **Specific Needs**: Consider any specific project requirements, such as the need for ultra-smooth finishes or cutting specific materials.
What are the benefits of a sliding miter saw?
A sliding miter saw offers several benefits that enhance its functionality and versatility compared to a standard miter saw:
1. **Increased Cutting Capacity**: The sliding feature allows the saw blade to move forward and backward, significantly increasing the cutting capacity. This makes it ideal for cutting wider and thicker materials, such as large boards and lumber.
2. **Versatility**: It can perform a variety of cuts, including crosscuts, miter cuts, bevel cuts, and compound cuts. This versatility makes it suitable for a wide range of woodworking projects, from framing to fine woodworking.
3. **Precision and Accuracy**: Sliding miter saws are designed to provide precise and accurate cuts. They often come with features like laser guides, adjustable fences, and positive stops, which help ensure consistent and accurate cutting angles.
4. **Efficiency**: The ability to slide the saw head reduces the need to reposition the material, saving time and effort. This efficiency is particularly beneficial in high-volume or repetitive cutting tasks.
5. **Ease of Use**: Many sliding miter saws are equipped with user-friendly features such as ergonomic handles, easy-to-read scales, and quick-release clamps, making them easier to operate, even for beginners.
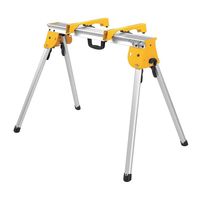
6. **Portability**: While they are generally larger than non-sliding models, many sliding miter saws are designed to be portable, with features like foldable stands and carrying handles, allowing for easy transport to different job sites.
7. **Safety Features**: Modern sliding miter saws often include safety features such as blade guards, electric brakes, and dust collection systems, which help protect the user and maintain a clean work environment.
Overall, a sliding miter saw is a powerful and versatile tool that enhances productivity, precision, and safety in woodworking and construction projects.
How do you make accurate cuts with a miter saw?
1. **Choose the Right Blade**: Use a high-quality, sharp blade appropriate for the material you're cutting. A fine-tooth blade is ideal for precise cuts.
2. **Measure and Mark**: Measure the workpiece accurately using a tape measure. Mark the cut line clearly with a pencil or a marking tool.
3. **Set the Miter Angle**: Adjust the miter saw to the desired angle. Use the miter gauge or angle finder for precision. Lock the saw at the correct angle.
4. **Secure the Workpiece**: Clamp the workpiece firmly to the saw table to prevent movement during cutting. Ensure it is flush against the fence.
5. **Align the Blade**: Lower the saw blade to align it with the cut line. Ensure the blade is on the waste side of the line to maintain the correct dimensions.
6. **Check the Bevel Angle**: If making a bevel cut, adjust the bevel angle accordingly and lock it in place.
7. **Test Cut**: Make a test cut on a scrap piece of wood to verify the angle and fit.
8. **Position Yourself Safely**: Stand in a balanced position, keeping hands away from the blade path.
9. **Start the Saw**: Turn on the saw and allow the blade to reach full speed before making the cut.
10. **Make the Cut**: Lower the blade smoothly through the workpiece without forcing it. Let the saw do the work.
11. **Finish and Inspect**: Once the cut is complete, release the trigger and wait for the blade to stop before lifting it. Inspect the cut for accuracy.
12. **Adjust if Necessary**: If the cut is not accurate, adjust the saw settings and repeat the process.
What maintenance is required for a miter saw?
1. **Cleaning**: Regularly clean the miter saw to remove sawdust and debris. Use a brush or compressed air to clean the blade guard, table, and fence.
2. **Blade Maintenance**: Inspect the blade for dullness or damage. Sharpen or replace the blade as needed. Ensure the blade is properly aligned and securely fastened.
3. **Lubrication**: Lubricate moving parts such as the pivot points, hinges, and slides with a light machine oil to ensure smooth operation.
4. **Alignment**: Check and adjust the alignment of the blade, fence, and bevel settings. Use a square to ensure the blade is perpendicular to the table and the fence is at a right angle to the blade.
5. **Safety Features**: Inspect safety features like the blade guard and ensure they are functioning properly. Replace any damaged or malfunctioning parts.
6. **Power Cord and Switch**: Examine the power cord for any signs of wear or damage. Ensure the switch operates smoothly and replace it if it becomes faulty.
7. **Dust Collection System**: If equipped, check the dust collection system for clogs and ensure it is functioning effectively. Clean or replace filters as necessary.
8. **Calibration**: Periodically calibrate the miter and bevel angles to ensure accurate cuts. Use a protractor or angle gauge for precise adjustments.
9. **Storage**: Store the miter saw in a dry, clean area to prevent rust and corrosion. Cover it when not in use to protect it from dust and moisture.
10. **User Manual**: Refer to the manufacturer’s manual for specific maintenance instructions and recommended service intervals. Follow any additional guidelines provided.