Call +(254) 703 030 000 / 751 483 999 / 721 704 777

Showing 0 products
Frequently Asked Questions
What is the purpose of concrete testing equipment?
The purpose of concrete testing equipment is to ensure the quality, durability, and safety of concrete structures. These tools and devices are used to assess various properties of concrete, both in its fresh and hardened states, to ensure it meets the required standards and specifications for construction projects.
1. **Quality Control**: Concrete testing equipment helps in maintaining the quality of concrete by measuring its properties such as workability, strength, and consistency. This ensures that the concrete mix is suitable for the intended application and meets the design requirements.
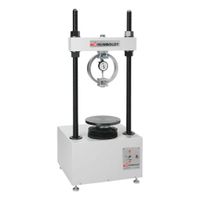
2. **Strength Assessment**: Equipment like compression testing machines are used to determine the compressive strength of concrete, which is a critical factor in structural integrity. This helps in verifying that the concrete can withstand the loads and stresses it will encounter during its service life.
3. **Durability Evaluation**: Tests for permeability, freeze-thaw resistance, and chemical resistance are conducted to assess the durability of concrete. This ensures that the concrete will perform well under environmental conditions and have a long service life.
4. **Safety Assurance**: By ensuring that concrete meets the necessary standards, testing equipment helps in preventing structural failures, which can lead to accidents and loss of life. It ensures that the concrete structure is safe for use.
5. **Compliance with Standards**: Concrete testing equipment is used to ensure compliance with local and international standards and regulations. This is crucial for legal and contractual obligations in construction projects.
6. **Problem Diagnosis**: In case of any issues with concrete structures, testing equipment can help diagnose problems such as cracks, voids, or other defects, allowing for timely repairs and maintenance.
Overall, concrete testing equipment is essential for ensuring the reliability and safety of concrete structures, thereby protecting investments and lives.
How do you test the strength of concrete?
To test the strength of concrete, several methods are employed:
1. **Compressive Strength Test**: This is the most common test. Concrete samples, usually in the form of cubes or cylinders, are cured and then subjected to a compressive load in a testing machine until they fail. The maximum load applied is recorded, and the compressive strength is calculated by dividing this load by the cross-sectional area of the sample.
2. **Split Tensile Strength Test**: This test measures the tensile strength of concrete. A cylindrical concrete specimen is placed horizontally between the loading surfaces of a compression testing machine and loaded until failure. The tensile strength is calculated using the formula based on the maximum load applied and the dimensions of the specimen.
3. **Flexural Strength Test**: This test determines the bending strength of concrete. A concrete beam is subjected to a load at its center while supported at both ends. The flexural strength is calculated based on the maximum load the beam can withstand before failure.
4. **Rebound Hammer Test**: A non-destructive test where a spring-driven hammer impacts the concrete surface, and the rebound distance is measured. This rebound number gives an indication of the surface hardness and, indirectly, the strength of the concrete.
5. **Ultrasonic Pulse Velocity Test**: Another non-destructive method where ultrasonic waves are passed through the concrete. The velocity of these waves is measured, and higher velocities typically indicate higher concrete quality and strength.
6. **Core Cutting and Testing**: Concrete cores are drilled from the structure and tested for compressive strength. This method provides direct strength measurements but is destructive.
7. **Pull-out Test**: Measures the force required to pull an embedded metal rod or disc from the concrete, providing an indirect measure of tensile strength.
Each method has its specific applications, advantages, and limitations, and often multiple tests are used in combination to assess concrete strength comprehensively.
What equipment is used for asphalt testing?
Equipment used for asphalt testing includes:
1. **Marshall Stability Test Apparatus**: Used to determine the stability and flow of asphalt mixtures. It includes a loading machine, compaction mold, and breaking head.
2. **Superpave Gyratory Compactor**: Simulates the compaction of asphalt mixtures under traffic conditions to determine the density and air voids.
3. **Asphalt Content Ignition Oven**: Determines the asphalt binder content by burning off the asphalt and measuring the remaining aggregate.
4. **Penetrometer**: Measures the penetration of a needle into asphalt to assess its hardness or softness.
5. **Ductility Testing Machine**: Evaluates the ductility of asphalt by stretching a sample until it breaks.
6. **Viscometer**: Measures the viscosity of asphalt binder to determine its flow characteristics at different temperatures.
7. **Dynamic Shear Rheometer (DSR)**: Assesses the viscoelastic properties of asphalt binders at various temperatures and frequencies.
8. **Bending Beam Rheometer (BBR)**: Measures the low-temperature stiffness and relaxation properties of asphalt binders.
9. **Rolling Thin Film Oven (RTFO)**: Simulates short-term aging of asphalt binders during mixing and construction.
10. **Pressure Aging Vessel (PAV)**: Simulates long-term aging of asphalt binders to predict performance over time.
11. **Core Drilling Machine**: Extracts cylindrical samples from asphalt pavements for testing.
12. **Nuclear Density Gauge**: Measures the density and moisture content of in-place asphalt pavements.
13. **Hamburg Wheel Tracking Device**: Evaluates the rutting and moisture susceptibility of asphalt mixtures.
14. **Asphalt Mixture Performance Tester (AMPT)**: Tests the mechanical properties of asphalt mixtures, including stiffness and fatigue.
15. **Los Angeles Abrasion Machine**: Assesses the abrasion resistance of aggregates used in asphalt mixtures.
These tools are essential for ensuring the quality, durability, and performance of asphalt pavements.
How is pavement testing conducted?
Pavement testing is conducted through a series of methods to evaluate the structural integrity, surface condition, and performance of pavement materials. The process typically involves both non-destructive and destructive testing techniques.
1. **Visual Inspection**: This initial step involves a detailed survey to identify surface distresses such as cracks, potholes, and rutting. Inspectors document the type, severity, and extent of these distresses.
2. **Non-Destructive Testing (NDT)**:
- **Falling Weight Deflectometer (FWD)**: This device simulates the load of a passing wheel and measures the pavement's deflection response, providing data on its structural capacity.
- **Ground Penetrating Radar (GPR)**: GPR uses electromagnetic waves to detect subsurface features, layer thickness, and moisture content.
- **Laser Profilers**: These measure surface roughness and texture, providing data on ride quality and surface wear.
3. **Destructive Testing**:
- **Core Sampling**: Cores are extracted from the pavement to analyze material properties, layer thickness, and composition in a laboratory setting.
- **Dynamic Cone Penetrometer (DCP)**: This tool assesses the strength of subgrade and base layers by measuring penetration resistance.
4. **Laboratory Testing**: Samples obtained from core sampling undergo various tests to determine properties such as density, moisture content, and material composition.
5. **Data Analysis and Reporting**: The collected data is analyzed to assess the pavement's current condition and predict future performance. This analysis helps in planning maintenance and rehabilitation strategies.
6. **Advanced Techniques**: Technologies like 3D imaging and infrared thermography are increasingly used for more detailed assessments.
These methods collectively provide a comprehensive understanding of pavement conditions, guiding maintenance and rehabilitation efforts to ensure safety and longevity.
What are the common tests for asphalt quality?
Common tests for asphalt quality include:
1. **Penetration Test**: Measures the hardness or softness of asphalt by determining the depth a standard needle penetrates under specific conditions of load, time, and temperature.
2. **Softening Point Test**: Determines the temperature at which asphalt attains a particular degree of softening. The Ring-and-Ball method is commonly used.
3. **Ductility Test**: Assesses the asphalt's ability to stretch without breaking, indicating its flexibility and elasticity.
4. **Viscosity Test**: Measures the asphalt's resistance to flow, providing insight into its temperature susceptibility and workability.
5. **Flash Point Test**: Determines the temperature at which asphalt emits vapors that can ignite, ensuring safety during handling and application.
6. **Specific Gravity Test**: Measures the density of asphalt, which is crucial for mix design calculations.
7. **Solubility Test**: Assesses the purity of asphalt by determining the percentage of material soluble in a specific solvent, indicating the presence of impurities.
8. **Loss on Heating Test**: Evaluates the volatility of asphalt by measuring the weight loss after heating, indicating its stability at high temperatures.
9. **Marshall Stability Test**: Determines the load-bearing capacity and flow of asphalt mixtures, essential for mix design and performance evaluation.
10. **Superpave Tests**: Includes a series of tests like the Dynamic Shear Rheometer (DSR) and Bending Beam Rheometer (BBR) to evaluate the performance of asphalt under varying temperatures and loading conditions.
11. **Stripping Test**: Assesses the asphalt's resistance to moisture-induced damage, crucial for durability.
12. **Aggregate Tests**: Though not directly testing asphalt, evaluating the quality of aggregates used in the mix is essential for overall performance. This includes tests for gradation, shape, and strength.
These tests ensure that asphalt meets the required specifications for durability, performance, and safety in road construction and maintenance.
How do you ensure concrete is mixed correctly?
To ensure concrete is mixed correctly, follow these steps:
1. **Select Quality Materials**: Use high-quality cement, clean aggregates (sand and gravel), and potable water. Ensure materials are free from impurities.
2. **Determine Mix Ratio**: Choose the appropriate mix ratio based on the project requirements. Common ratios are 1:2:3 (cement:sand:gravel) for general purposes.
3. **Measure Accurately**: Use precise measurements for each component. Use a container or bucket to maintain consistency in volume.
4. **Mixing Method**: Decide between hand mixing or machine mixing. For small projects, hand mixing is sufficient. For larger projects, use a concrete mixer.
5. **Mixing Process**:
- **Hand Mixing**: On a clean, non-porous surface, mix sand and cement until uniform. Gradually add gravel and mix thoroughly. Create a crater, add water slowly, and mix until the desired consistency is achieved.
- **Machine Mixing**: Add half the water into the mixer, followed by cement, sand, and gravel. Add the remaining water gradually. Mix until the concrete is uniform and workable.
6. **Check Consistency**: Perform a slump test to ensure the concrete has the right consistency. The slump should match the project specifications.
7. **Mixing Time**: Mix for at least 2-3 minutes after all materials are in the mixer. Over-mixing can lead to segregation, while under-mixing results in poor consistency.
8. **Avoid Contamination**: Ensure the mixing area and tools are clean to prevent contamination.
9. **Temperature and Weather**: Consider environmental conditions. In hot weather, use cold water and work quickly. In cold weather, use warm water and protect the mix from freezing.
10. **Quality Control**: Conduct regular tests on the mixed concrete to ensure it meets the required strength and durability standards.
What is the importance of compaction in asphalt testing?
Compaction in asphalt testing is crucial for ensuring the durability, stability, and longevity of asphalt pavements. Proper compaction reduces air voids in the asphalt mix, which is essential for several reasons:
1. **Durability**: Compaction minimizes the presence of air voids, which can allow water infiltration. Water can weaken the pavement structure, leading to issues like stripping, raveling, and potholes. By reducing air voids, compaction enhances the pavement's resistance to water damage and extends its lifespan.
2. **Load Bearing Capacity**: Well-compacted asphalt can better distribute and bear the loads from traffic. This prevents deformation and rutting, maintaining a smooth and safe driving surface. Proper compaction ensures that the pavement can withstand heavy traffic loads without significant structural damage.
3. **Density and Strength**: Achieving the desired density through compaction is critical for the strength of the asphalt. Adequate compaction ensures that the asphalt mix achieves its designed density, which is directly related to its strength and ability to resist shear forces.
4. **Performance and Safety**: Compacted asphalt provides a uniform surface that enhances skid resistance, improving safety for vehicles. It also ensures that the pavement performs as expected under various environmental and traffic conditions.
5. **Economic Efficiency**: Proper compaction reduces the need for frequent maintenance and repairs, leading to cost savings over the pavement's lifecycle. It ensures that the initial investment in pavement construction yields long-term benefits.
In summary, compaction is a vital process in asphalt testing that directly impacts the pavement's performance, safety, and economic efficiency. It ensures that the asphalt mix achieves the necessary properties to function effectively under anticipated conditions.
How do you verify the composition of concrete?
To verify the composition of concrete, several tests and procedures are employed:
1. **Material Testing**:
- **Cement**: Check for fineness, setting time, and strength.
- **Aggregates**: Assess size, shape, texture, and specific gravity. Conduct sieve analysis and check for impurities.
- **Water**: Ensure it is potable and free from harmful substances.
2. **Mix Design Verification**:
- Confirm the mix proportions align with the design specifications. This includes the ratio of cement, water, aggregates, and any admixtures.
3. **Fresh Concrete Tests**:
- **Slump Test**: Measures workability and consistency.
- **Air Content Test**: Determines the air voids in the mix, crucial for durability.
- **Temperature**: Ensure it is within the specified range for optimal curing.
4. **Hardened Concrete Tests**:
- **Compressive Strength Test**: Conducted on cured samples (cylinders or cubes) to ensure they meet the required strength.
- **Flexural Strength Test**: Assesses the concrete's ability to resist bending.
- **Density Test**: Ensures the concrete has the correct mass per unit volume.
5. **Chemical Analysis**:
- **X-Ray Fluorescence (XRF)**: Determines the elemental composition.
- **Thermogravimetric Analysis (TGA)**: Assesses the thermal stability and composition.
6. **Non-Destructive Testing (NDT)**:
- **Ultrasonic Pulse Velocity**: Evaluates the uniformity and detects flaws.
- **Rebound Hammer Test**: Estimates surface hardness and strength.
7. **Documentation and Compliance**:
- Review batch tickets, delivery records, and ensure compliance with standards like ASTM, ACI, or local codes.
These methods collectively ensure the concrete's composition meets the required specifications for strength, durability, and performance.
What are the standards for pavement testing?
Standards for pavement testing are established to ensure the quality, durability, and safety of road surfaces. Key standards include:
1. **ASTM Standards**: The American Society for Testing and Materials (ASTM) provides numerous standards for pavement testing, such as:
- ASTM D6927 for Marshall Stability and Flow of Asphalt Mixtures.
- ASTM D1559 for Resistance to Plastic Flow of Bituminous Mixtures.
- ASTM D1195/D1195M for Repetitive Static Plate Load Tests of Soils and Flexible Pavement Components.
2. **AASHTO Standards**: The American Association of State Highway and Transportation Officials (AASHTO) offers standards like:
- AASHTO T 283 for Resistance of Compacted Asphalt Mixtures to Moisture-Induced Damage.
- AASHTO T 209 for Theoretical Maximum Specific Gravity and Density of Bituminous Paving Mixtures.
3. **EN Standards**: European Norms (EN) provide guidelines such as:
- EN 12697 series for Bituminous Mixtures, including tests for determining the thickness, density, and voids.
4. **BS Standards**: British Standards (BS) include:
- BS 598 for Sampling and Examination of Bituminous Mixtures for Roads and Other Paved Areas.
5. **ISO Standards**: The International Organization for Standardization (ISO) offers standards like:
- ISO 13473 for Characterization of Pavement Texture by Use of Surface Profiles.
6. **FWD Testing**: Falling Weight Deflectometer (FWD) testing is a common method for assessing pavement structural capacity, guided by various national and international standards.
These standards cover a range of tests, including material composition, load-bearing capacity, surface texture, and resistance to environmental factors. They are crucial for designing, constructing, and maintaining pavements to ensure they meet safety and performance requirements.
How do you determine the load-bearing capacity of asphalt?
To determine the load-bearing capacity of asphalt, several factors and tests are considered:
1. **Material Properties**: Evaluate the composition of the asphalt mix, including the type and size of aggregates, asphalt binder grade, and any additives. The quality and proportion of these materials affect the strength and durability of the asphalt.
2. **Thickness**: The thickness of the asphalt layer is crucial. Thicker layers generally support more load. The design thickness is determined based on expected traffic loads and environmental conditions.
3. **Subgrade Support**: Assess the strength and stability of the subgrade, as it provides foundational support. Conduct tests like the California Bearing Ratio (CBR) or Plate Load Test to evaluate subgrade strength.
4. **Compaction**: Proper compaction increases the density and load-bearing capacity of asphalt. Use a nuclear density gauge or core samples to ensure the asphalt is compacted to the desired level.
5. **Temperature and Environmental Conditions**: Consider the impact of temperature fluctuations and weather conditions on asphalt performance. Asphalt is more flexible in warmer temperatures and more brittle in colder conditions.
6. **Traffic Analysis**: Analyze expected traffic loads, including the number and weight of vehicles. Use this data to calculate the Equivalent Single Axle Load (ESAL), which helps in designing the pavement structure.
7. **Structural Design Models**: Utilize pavement design software and models, such as the Mechanistic-Empirical Pavement Design Guide (MEPDG), to simulate and predict the load-bearing capacity based on various inputs.
8. **Field Tests**: Conduct field tests like the Falling Weight Deflectometer (FWD) to measure deflections and back-calculate the pavement's load-bearing capacity.
By integrating these assessments, engineers can accurately determine the load-bearing capacity of asphalt, ensuring it meets the demands of its intended use.