Call +(254) 703 030 000 / 751 483 999 / 721 704 777
.....Read More
Frequently Asked Questions
What are the standard sizes for chain link fence posts?
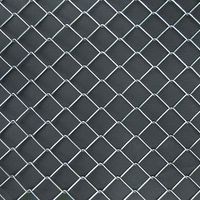
Chain link fence posts come in various standard sizes, which are typically determined by the height and purpose of the fence. The main types of posts used in chain link fencing are terminal posts, line posts, and top rails, each serving a specific function.
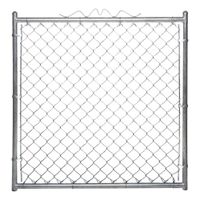
1. **Terminal Posts**: These are the corner, end, and gate posts that provide structural support. Standard sizes for terminal posts range from 2 1/2 inches to 4 inches in diameter. The height of terminal posts is usually 2 feet longer than the height of the fence fabric to allow for proper installation in the ground.
2. **Line Posts**: These are the intermediate posts placed between terminal posts to support the chain link fabric. Standard sizes for line posts range from 1 5/8 inches to 2 3/8 inches in diameter. The height of line posts is typically 1 foot longer than the height of the fence fabric.
3. **Top Rails**: These are horizontal bars that run along the top of the fence, connecting the terminal and line posts. Standard sizes for top rails are usually 1 3/8 inches to 1 5/8 inches in diameter.
The choice of post size can also depend on the gauge of the chain link fabric, the wind load, and the specific application, such as residential, commercial, or industrial use. For example, heavier gauge fabric or higher fences may require larger diameter posts for added strength and stability. Additionally, local building codes and regulations may influence the required sizes for chain link fence posts.
How do you install a chain link fence?
1. **Planning and Permits**: Determine the fence line and check local regulations for permits or restrictions.
2. **Gather Materials and Tools**: Purchase chain link fabric, posts, top rails, tension bars, tension bands, gate, and necessary hardware. Tools include post hole digger, level, pliers, wrench, and concrete.
3. **Mark the Fence Line**: Use stakes and string to outline the fence path. Mark post locations, spacing them 6-10 feet apart.
4. **Dig Post Holes**: Use a post hole digger to create holes for terminal and line posts. Terminal posts should be deeper and wider.
5. **Set Terminal Posts**: Place terminal posts in holes, ensuring they are level and aligned. Fill holes with concrete, sloping it away from the post for drainage. Allow concrete to cure.
6. **Install Line Posts**: Stretch a string between terminal posts to ensure alignment. Set line posts in holes, fill with concrete, and let cure.
7. **Attach Top Rail**: Connect top rail to terminal posts using rail ends and secure with bolts. Cut to fit between posts if necessary.
8. **Unroll and Attach Chain Link Fabric**: Unroll fabric along the fence line. Insert a tension bar through the end of the fabric and attach it to the terminal post using tension bands and bolts.
9. **Stretch the Fabric**: Use a fence puller to stretch the fabric taut. Attach to line posts with wire ties and to the top rail with tie wires.
10. **Secure and Adjust**: Attach the other end of the fabric to the terminal post with a tension bar and bands. Adjust for tension and height.
11. **Install Gates**: Attach gate hinges and latch to the gate posts. Hang the gate and ensure it swings freely.
12. **Final Adjustments**: Check for alignment and tension. Make necessary adjustments for a secure and even fence.
What tools are needed for chain link fence installation?
For chain link fence installation, the following tools are typically needed:
1. **Measuring Tape**: To measure the area where the fence will be installed and ensure accurate placement of posts.
2. **Post Hole Digger or Auger**: For digging holes to set the fence posts.
3. **Level**: To ensure that posts are vertically straight.
4. **Shovel**: For digging and adjusting the soil around the posts.
5. **Concrete Mix**: To secure the posts in the ground.
6. **Wheelbarrow**: For mixing and transporting concrete.
7. **Fence Stretcher**: To pull the chain link fabric tight and secure it to the posts.
8. **Pliers**: For twisting and cutting wire ties.
9. **Wire Cutters**: To cut the chain link fabric and wire ties to the desired length.
10. **Wrench or Socket Set**: For tightening nuts and bolts on tension bands and gate hardware.
11. **Hammer**: For driving in tension bands and other hardware.
12. **String Line and Stakes**: To mark the fence line and ensure straight alignment.
13. **Tension Bar**: To attach the chain link fabric to the end posts.
14. **Come-Along or Winch**: To help stretch the chain link fabric tightly.
15. **Gloves**: To protect hands from sharp edges and tools.
16. **Safety Glasses**: To protect eyes from debris and sharp wire ends.
17. **Chalk Line**: For marking straight lines on the ground.
18. **Fence Ties**: To secure the chain link fabric to the top rail and line posts.
These tools will help ensure a successful and efficient installation of a chain link fence.
How do you attach chain link fabric to posts?
To attach chain link fabric to posts, follow these steps:
1. **Prepare Materials**: Gather chain link fabric, tension bars, tension bands, carriage bolts, nuts, and tie wires. Ensure you have a post hole digger, pliers, and a wrench.
2. **Install Terminal Posts**: Set terminal posts (end, corner, and gate posts) in concrete, ensuring they are plumb and aligned. Allow concrete to cure.
3. **Attach Tension Bands**: Slide tension bands onto each terminal post before the concrete sets. Space them evenly, with the flat side facing outward.
4. **Insert Tension Bar**: Unroll the chain link fabric and weave a tension bar through the first row of links. This bar will provide stability and a point of attachment.
5. **Connect Fabric to Terminal Post**: Position the tension bar against the terminal post. Secure it using the tension bands and carriage bolts. Tighten nuts with a wrench.
6. **Stretch the Fabric**: Use a come-along or fence puller to stretch the fabric taut along the line posts. Ensure the fabric is level and free of sagging.
7. **Attach to Line Posts**: Secure the fabric to line posts using tie wires. Wrap the wire around the post and through the fabric, twisting it tightly with pliers.
8. **Secure Bottom and Top**: Use additional tie wires to attach the top and bottom of the fabric to the tension wire or rail, ensuring the fence is stable.
9. **Trim Excess Fabric**: Cut any excess fabric with bolt cutters, ensuring a clean edge.
10. **Final Adjustments**: Check for tension and alignment. Make any necessary adjustments to ensure the fence is secure and aesthetically pleasing.
What is the cost of installing a chain link fence per foot?
The cost of installing a chain link fence per foot typically ranges from $8 to $18. This price can vary based on several factors, including the height and gauge of the fence, the type of coating (galvanized or vinyl), local labor rates, and any additional features such as privacy slats or gates.
How do you maintain and repair a chain link fence?
To maintain and repair a chain link fence, follow these steps:
1. **Regular Inspection**: Periodically check the fence for damage, rust, or loose fittings. Look for bent or broken links, sagging sections, and damaged posts.
2. **Cleaning**: Remove dirt, debris, and vegetation around the fence. Use a garden hose or pressure washer to clean the fence, removing any accumulated grime or rust.
3. **Rust Prevention**: Apply a rust-inhibiting primer and paint to any rusted areas. Use a wire brush to remove rust before applying the primer. Regularly apply a protective coating to prevent future rust.
4. **Tightening and Adjustments**: Tighten loose nuts and bolts on the fence fittings. Adjust the tension of the chain link fabric by using a come-along tool to pull the mesh taut and reattach it to the posts.
5. **Repairing Damaged Sections**: For small holes or tears, use pliers to weave a new piece of chain link into the damaged area. For larger sections, cut out the damaged part and replace it with new mesh, securing it with tension bars and ties.
6. **Post Repair**: Check for leaning or damaged posts. Straighten leaning posts by digging around the base, realigning, and packing the soil firmly. Replace broken posts by removing the old one and setting a new post in concrete.
7. **Gate Maintenance**: Ensure gates swing freely and latch properly. Lubricate hinges and latches with oil. Adjust or replace sagging gates by tightening hinges or installing an anti-sag kit.
8. **Vegetation Control**: Trim plants and trees near the fence to prevent damage and reduce moisture buildup, which can lead to rust.
Regular maintenance and prompt repairs will extend the life of your chain link fence, keeping it functional and aesthetically pleasing.
What are the differences between galvanized and vinyl-coated chain link fences?
Galvanized chain link fences are made from steel wire that has been coated with a layer of zinc to prevent rust and corrosion. This process, known as galvanization, enhances the durability and longevity of the fence, making it suitable for various weather conditions. Galvanized fences are typically silver in color and are valued for their strength and cost-effectiveness. They are commonly used in industrial, commercial, and residential settings where functionality is prioritized over aesthetics.
Vinyl-coated chain link fences, on the other hand, involve an additional layer of vinyl or PVC coating over the galvanized steel wire. This coating provides an extra level of protection against rust and corrosion, further extending the fence's lifespan. The vinyl coating is available in various colors, such as black, green, or brown, allowing for better aesthetic integration with the surrounding environment. This makes vinyl-coated fences a popular choice for residential areas, parks, and recreational facilities where appearance is important.
In terms of maintenance, both types require minimal upkeep, but vinyl-coated fences may require occasional cleaning to maintain their appearance. The vinyl coating also provides a smoother surface, reducing the risk of injury from sharp edges, which can be a consideration for areas frequented by children or pets.
Cost-wise, galvanized fences are generally less expensive than vinyl-coated ones due to the additional materials and processing involved in the latter. However, the choice between the two often depends on the specific needs and preferences regarding durability, appearance, and budget.