Call +(254) 703 030 000 / 751 483 999 / 721 704 777
.....Read More

Frequently Asked Questions
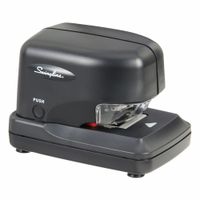
What is the best electric stapler for office use?
The best electric stapler for office use is the Swingline Optima 45 Electric Stapler. This model is renowned for its reliability, efficiency, and user-friendly features, making it ideal for high-volume office environments. It can staple up to 45 sheets of paper at once, which is significantly higher than many other models, ensuring it can handle most office tasks with ease.
The Optima 45 is equipped with a Jam-Free technology that minimizes the risk of paper jams, a common issue with electric staplers. This feature ensures smooth operation and reduces downtime, enhancing productivity in the office. Additionally, it offers both automatic and manual stapling modes, providing flexibility depending on user preference or specific tasks.
Another standout feature is its adjustable depth guide, which allows for precise staple placement, ensuring documents are neatly and securely fastened. The stapler is also designed with a flat clinch mechanism, which means the staples lie flat against the paper, reducing bulk and making it easier to stack documents.
The Swingline Optima 45 is powered by an AC adapter, ensuring consistent performance without the need for frequent battery replacements. Its durable construction and sleek design make it a long-lasting addition to any office setting. Furthermore, it is relatively quiet during operation, minimizing disruptions in a busy office environment.
Overall, the Swingline Optima 45 Electric Stapler combines high capacity, reliability, and user-friendly features, making it the best choice for office use.
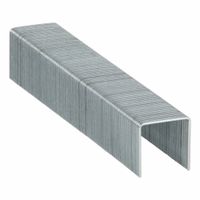
How do you choose the right size of staples for a stapler?
To choose the right size of staples for a stapler, follow these steps:
1. **Check Stapler Specifications**: Look at the stapler itself or its manual for any specifications regarding staple size. Most staplers have this information printed on them or included in the packaging.
2. **Determine Staple Type**: Identify the type of stapler you have. Common types include standard, mini, heavy-duty, and specialty staplers. Each type uses different staple sizes.
3. **Gauge Staple Leg Length**: Consider the thickness of the paper stack you intend to staple. Standard staples typically have a leg length of 1/4 inch, suitable for up to 20 sheets of paper. For thicker stacks, use staples with longer legs, such as 3/8 inch or 1/2 inch, which are used in heavy-duty staplers.
4. **Check Crown Width**: The crown width is the top part of the staple. Standard staples usually have a crown width of 1/2 inch. Ensure the crown width matches the stapler's requirements.
5. **Consider Staple Capacity**: Match the staple capacity with your stapler's capacity. Heavy-duty staplers require larger staples that can handle more sheets.
6. **Test Fit**: If unsure, test a few staples to ensure they fit properly in the stapler and can penetrate the paper stack without jamming.
7. **Consult Manufacturer**: If in doubt, consult the stapler manufacturer’s website or customer service for guidance on compatible staple sizes.
By following these steps, you can ensure that you select the correct staple size for your stapler, ensuring efficient and trouble-free stapling.
What are the benefits of using an electric stapler over a manual one?
An electric stapler offers several advantages over a manual stapler, enhancing efficiency and ease of use in various settings.
Firstly, electric staplers provide increased speed and efficiency. They can staple multiple sheets of paper quickly and consistently, which is particularly beneficial in high-volume environments like offices or print shops. This automation reduces the time and effort required compared to manual stapling, allowing for faster completion of tasks.
Secondly, electric staplers offer consistent performance. They apply the same amount of pressure with each staple, ensuring uniformity and reducing the risk of jams or misaligned staples. This reliability is crucial for maintaining a professional appearance in documents.
Thirdly, electric staplers reduce physical strain. Manual stapling can lead to hand fatigue or repetitive strain injuries, especially when dealing with large volumes of paperwork. Electric staplers eliminate the need for manual force, making them a more ergonomic choice for users.
Additionally, electric staplers often come with adjustable settings, allowing users to customize the stapling depth and position according to their needs. This versatility can accommodate different paper sizes and thicknesses, enhancing their functionality.
Moreover, electric staplers can handle larger capacities. They are designed to staple thicker stacks of paper than most manual staplers, making them suitable for binding reports, booklets, or other substantial documents.
Finally, electric staplers contribute to a more organized and efficient workspace. Their ability to handle tasks quickly and with minimal effort allows users to focus on other important activities, improving overall productivity.
In summary, electric staplers offer speed, consistency, reduced physical strain, versatility, and the ability to handle larger capacities, making them a valuable tool in environments that require frequent and efficient stapling.
How do you maintain and clean a stapler to ensure longevity?
To maintain and clean a stapler for longevity, follow these steps:
1. **Regular Inspection**: Frequently check the stapler for any visible damage or wear. Look for bent or broken parts, especially in the staple magazine and the anvil.
2. **Cleaning**:
- **Exterior**: Wipe the exterior with a damp cloth to remove dust and grime. Use a mild detergent if necessary, but ensure the stapler is dry before use.
- **Interior**: Open the stapler and remove any jammed staples. Use a small brush or compressed air to clean out dust and debris from the staple magazine and the anvil area.
3. **Lubrication**: Apply a small amount of light machine oil to the moving parts, such as the hinge and the staple pusher, to ensure smooth operation. Wipe off any excess oil to prevent dust accumulation.
4. **Staple Quality**: Use high-quality staples that are compatible with your stapler. Inferior staples can cause jams and damage the stapler.
5. **Proper Use**: Avoid overloading the stapler with too many sheets of paper. Check the stapler’s capacity and adhere to it to prevent stress on the mechanism.
6. **Storage**: Store the stapler in a dry place to prevent rust. Keep it away from moisture and direct sunlight.
7. **Jams**: If a staple jam occurs, gently remove the jammed staple with a pair of tweezers. Avoid using excessive force, which can damage the stapler.
8. **Professional Servicing**: For heavy-duty staplers, consider professional servicing if you notice persistent issues or if the stapler is used frequently in a high-volume setting.
By following these maintenance and cleaning steps, you can ensure the longevity and efficient performance of your stapler.
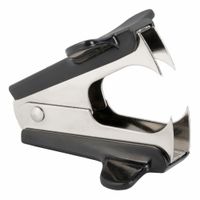
What is the best way to remove staples without damaging paper?
The best way to remove staples without damaging paper involves using a staple remover tool designed for this purpose. Follow these steps:
1. **Choose the Right Tool**: Use a claw-style staple remover for standard staples or a flat staple remover for more delicate tasks. A staple puller with a flat, thin blade can also be effective for precision work.
2. **Prepare the Document**: Place the document on a flat, stable surface to prevent bending or tearing during the removal process.
3. **Position the Remover**: For a claw-style remover, slide the two prongs under the staple's arms on the back side of the paper. Ensure the prongs are fully inserted to avoid tearing.
4. **Lift the Staple**: Gently squeeze the remover's handles to lift the staple's arms. This action should raise the staple slightly without pulling it out completely, reducing the risk of tearing.
5. **Remove the Staple**: Once the arms are lifted, flip the document over. Use your fingers or a flat tool to carefully pull the staple out from the front side. If using a flat remover, slide it under the staple's top and gently lift it out.
6. **Check for Damage**: Inspect the paper for any tears or holes. If the paper is slightly torn, use a small piece of clear tape to reinforce the area.
7. **Practice Caution**: Always work slowly and carefully to minimize the risk of damage. If the paper is particularly delicate, consider using a thin, flat tool like a letter opener to assist in lifting the staple.
By following these steps, you can effectively remove staples while preserving the integrity of the paper.
How do you fix a jammed stapler?
To fix a jammed stapler, follow these steps:
1. **Safety First**: Ensure your hands are dry and the stapler is on a stable surface to prevent injury.
2. **Open the Stapler**: Lift the top part of the stapler. For a desktop stapler, this usually involves pulling the top upwards. For a heavy-duty or electric stapler, consult the manual for specific instructions.
3. **Remove the Staple Strip**: Gently pull out the staple strip. If it’s stuck, wiggle it slightly to loosen it without forcing it, which could cause further damage.
4. **Locate the Jam**: Look for the jammed staple. It’s often stuck in the front where the staples are ejected.
5. **Use a Tool**: Use a pair of needle-nose pliers or tweezers to carefully remove the jammed staple. Be gentle to avoid damaging the stapler’s mechanism.
6. **Check for Debris**: Inspect the stapler for any small pieces of staples or debris that might cause future jams. Remove any obstructions.
7. **Reassemble**: Once the jam is cleared, reinsert the staple strip. Ensure it’s aligned correctly and not bent.
8. **Test the Stapler**: Close the stapler and test it on a piece of paper to ensure it’s functioning properly. If it still jams, check for any misalignment or damage.
9. **Lubricate if Necessary**: If the stapler frequently jams, consider applying a small amount of lubricant to the moving parts to ensure smooth operation.
10. **Prevent Future Jams**: Avoid overloading the stapler and use the correct staple size to prevent future jams. Regular maintenance and cleaning can also help.
If the stapler continues to malfunction, it may need professional repair or replacement.
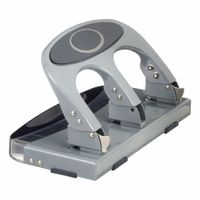
What are the differences between a single-hole punch and a three-hole punch?
A single-hole punch and a three-hole punch are both tools used to create holes in paper, but they differ in design, functionality, and application.
A single-hole punch is a compact, handheld device designed to punch one hole at a time. It typically features a lever mechanism that, when pressed, drives a sharp metal cylinder through the paper to create a hole. Single-hole punches are versatile and can be used for various tasks, such as creating holes for tags, tickets, or small-scale projects. They are ideal for situations where only one hole is needed or when the placement of the hole is not standardized.
In contrast, a three-hole punch is a larger, often desktop-based tool designed to punch three evenly spaced holes simultaneously. This type of punch is specifically tailored for preparing documents to be inserted into three-ring binders, which are common in offices and educational settings. The three-hole punch usually has adjustable paper guides to ensure consistent hole placement and can handle multiple sheets of paper at once, making it efficient for processing large volumes of documents.
The primary differences between the two include:
1. **Number of Holes**: Single-hole punches create one hole, while three-hole punches create three holes at once.
2. **Purpose**: Single-hole punches are used for varied, often non-standardized tasks, whereas three-hole punches are designed for organizing documents in binders.
3. **Size and Portability**: Single-hole punches are smaller and more portable, while three-hole punches are larger and typically stationary.
4. **Capacity**: Three-hole punches generally have a higher sheet capacity, allowing them to punch through more pages at once compared to single-hole punches.
These differences make each tool suitable for specific tasks, with the single-hole punch offering flexibility and the three-hole punch providing efficiency for document organization.
How do you sharpen a hole punch?
To sharpen a hole punch, you can follow these steps:
1. **Gather Materials**: You will need aluminum foil, wax paper, and a piece of sandpaper or a sharpening stone.
2. **Disassemble the Hole Punch**: If possible, disassemble the hole punch to access the cutting mechanism. This may not be possible with all models, but it can make the process easier.
3. **Use Aluminum Foil**: Take a sheet of aluminum foil and fold it several times to create a thick layer. Punch through the foil multiple times. The metal in the foil helps to hone the edges of the punch, making it sharper.
4. **Use Sandpaper**: If the punch is still not sharp enough, take a piece of fine-grit sandpaper. Punch through the sandpaper several times. The abrasive surface of the sandpaper will help to sharpen the cutting edges further.
5. **Use a Sharpening Stone**: For a more thorough sharpening, use a small sharpening stone. Carefully rub the cutting edges of the punch against the stone at the correct angle. This method requires more precision and care to avoid damaging the punch.
6. **Test the Sharpness**: After sharpening, test the hole punch on a piece of paper to ensure it cuts cleanly. If necessary, repeat the sharpening process.
7. **Lubricate with Wax Paper**: Finally, punch through a sheet of wax paper several times. This will lubricate the cutting edges, making the punch operate more smoothly.
8. **Reassemble the Hole Punch**: If you disassembled the punch, reassemble it carefully, ensuring all parts are correctly aligned.
By following these steps, you can effectively sharpen your hole punch and restore its cutting efficiency.
What is the maximum number of sheets a standard stapler can staple at once?
A standard office stapler is typically designed to staple between 20 to 30 sheets of 20-pound paper at once. The exact number can vary based on the specific model and brand of the stapler. Some heavy-duty staplers can handle more, but for a typical desk stapler, 20 sheets is a common maximum. Factors such as the thickness of the paper, the quality of the stapler, and the length of the staples used can also affect the maximum number of sheets that can be stapled together.
How do you properly align paper in a hole punch to ensure accurate holes?
To properly align paper in a hole punch for accurate holes, follow these steps:
1. **Select the Right Hole Punch**: Ensure you have a hole punch that matches the number of holes you need (e.g., two-hole, three-hole, or adjustable multi-hole punch).
2. **Check the Paper Capacity**: Verify the hole punch's capacity to avoid overloading. Punching too many sheets at once can lead to misalignment and uneven holes.
3. **Align the Paper Stack**: Tap the stack of paper on a flat surface to ensure all sheets are even. This helps in achieving uniform holes across all pages.
4. **Adjust the Hole Punch Guide**: Most hole punches have a paper guide or ruler. Adjust this guide to the size of your paper (e.g., letter, A4) to ensure consistent hole placement.
5. **Position the Paper**: Insert the paper stack into the hole punch, ensuring it is flush against the guide. This ensures the holes are placed at the correct distance from the edge.
6. **Center the Paper**: If your hole punch does not have a guide, visually center the paper by aligning the edges with the punch's markings or using a ruler for precision.
7. **Apply Even Pressure**: Hold the paper stack firmly in place and apply even pressure on the hole punch handle. This ensures clean cuts and prevents the paper from shifting.
8. **Check the Holes**: After punching, inspect the holes to ensure they are clean and aligned. If necessary, adjust the guide or paper position and re-punch.
9. **Practice**: If you're new to using a hole punch, practice with a few sheets to get a feel for the alignment and pressure needed.
By following these steps, you can achieve precise and consistent hole placement in your documents.