Call +(254) 703 030 000 / 751 483 999 / 721 704 777
.....Read More
Frequently Asked Questions
What are the best replacement wheels for my blower?
To find the best replacement wheels for your blower, consider the following factors:
1. **Compatibility**: Ensure the wheels are compatible with your specific blower model. Check the manufacturer's specifications or user manual for wheel size and type.
2. **Material**: Choose durable materials like rubber or polyurethane for longevity and better traction. Rubber wheels offer good grip and shock absorption, while polyurethane wheels are resistant to wear and chemicals.
3. **Size**: Match the wheel size to your blower's requirements. Larger wheels can provide better maneuverability over uneven terrain, while smaller wheels may be suitable for flat surfaces.
4. **Load Capacity**: Ensure the wheels can support the weight of the blower. Check the load rating to avoid overloading, which can lead to premature wear or failure.
5. **Axle Compatibility**: Verify that the wheel's bore size matches the axle diameter of your blower. Some wheels come with bushings or adapters to fit different axle sizes.
6. **Tread Pattern**: Consider the tread pattern based on the surface you'll be using the blower on. Aggressive treads are better for rough or grassy surfaces, while smooth treads work well on paved areas.
7. **Ease of Installation**: Look for wheels that are easy to install, preferably with a simple bolt-on design. This can save time and effort during replacement.
8. **Brand Reputation**: Opt for wheels from reputable brands known for quality and reliability. Reading customer reviews can provide insights into performance and durability.
9. **Cost**: Balance quality with budget. While cheaper options may be tempting, investing in higher-quality wheels can save money in the long run by reducing the need for frequent replacements.
By considering these factors, you can select the best replacement wheels that enhance the performance and longevity of your blower.
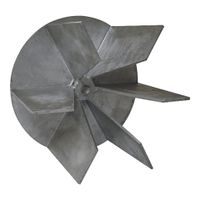
How do I replace the impeller on my blower?
1. **Safety First**: Disconnect the power supply to the blower to prevent accidental start-up.
2. **Access the Blower**: Remove any covers or panels to access the blower assembly. This may require unscrewing or unclipping parts of the housing.
3. **Locate the Impeller**: Identify the impeller within the blower assembly. It is typically mounted on the motor shaft.
4. **Remove the Old Impeller**:
- Loosen the set screw or bolt that secures the impeller to the motor shaft. This may require an Allen wrench or a socket wrench.
- Gently pull the impeller off the shaft. If it is stuck, use a puller tool or apply penetrating oil to ease removal.
5. **Inspect and Clean**: Check the motor shaft and surrounding area for debris or damage. Clean the shaft to ensure a smooth installation of the new impeller.
6. **Install the New Impeller**:
- Align the new impeller with the motor shaft. Ensure it is oriented correctly according to the airflow direction.
- Slide the impeller onto the shaft until it is seated properly.
- Tighten the set screw or bolt to secure the impeller. Ensure it is firmly attached but avoid over-tightening.
7. **Reassemble the Blower**: Replace any covers or panels that were removed. Ensure all screws and clips are securely fastened.
8. **Test the Blower**: Reconnect the power supply and test the blower to ensure the new impeller is functioning correctly and there are no unusual noises or vibrations.
9. **Final Check**: Observe the blower in operation for a few minutes to confirm everything is working smoothly.
Where can I find parts for my specific blower model?
1. **Manufacturer's Website**: Visit the official website of the blower's manufacturer. They often have a section for replacement parts or a store locator to find authorized dealers.
2. **Authorized Dealers**: Contact local authorized dealers or service centers for your blower brand. They can provide genuine parts and expert advice.
3. **Online Retailers**: Websites like Amazon, eBay, or specialized online stores such as RepairClinic, PartsWarehouse, or eReplacementParts offer a wide range of blower parts. Ensure compatibility by checking model numbers.
4. **Local Hardware Stores**: Visit local hardware or home improvement stores like Home Depot or Lowe’s. They may stock common parts or can order them for you.
5. **Specialty Stores**: Look for stores that specialize in outdoor power equipment. They often carry parts for various blower models.
6. **Forums and Online Communities**: Join forums or online communities related to outdoor equipment. Members often share resources and advice on where to find specific parts.
7. **Second-Hand Options**: Check classified ads, garage sales, or online marketplaces like Craigslist or Facebook Marketplace for used parts or blowers being sold for parts.
8. **Repair Shops**: Contact local repair shops that specialize in outdoor equipment. They might have spare parts or can guide you on where to find them.
9. **Catalogs and Manuals**: Refer to the blower’s user manual or parts catalog, which often lists part numbers and recommended sources for replacements.
10. **Direct Contact**: Call or email the manufacturer’s customer service for guidance on where to purchase parts for your specific model.
How do I know if my blower's motor needs replacement?
To determine if your blower's motor needs replacement, look for the following signs:
1. **Unusual Noises**: Grinding, squealing, or rattling sounds may indicate worn-out bearings or internal damage.
2. **Overheating**: If the motor becomes excessively hot to the touch, it may be failing due to electrical issues or mechanical wear.
3. **Burning Smell**: A burnt odor can suggest overheating or electrical problems, such as a short circuit or burnt windings.
4. **Poor Performance**: Reduced airflow or inconsistent operation can indicate a failing motor struggling to maintain power.
5. **Frequent Tripping**: If circuit breakers trip often when the blower is in use, it may be drawing too much current due to internal faults.
6. **Vibrations**: Excessive vibrations can be a sign of an imbalanced motor or failing components.
7. **Failure to Start**: If the motor doesn't start or starts slowly, it could be due to a failing capacitor or internal motor issues.
8. **Age and Wear**: Older motors or those with visible wear and tear may be nearing the end of their lifespan.
9. **Increased Energy Bills**: A failing motor may consume more power, leading to higher energy costs.
10. **Visual Inspection**: Check for visible damage, corrosion, or burnt components.
If you notice any of these signs, it may be time to consult a professional technician to assess the motor's condition and determine if replacement is necessary.
What accessories can enhance the performance of my blower?
To enhance the performance of your blower, consider the following accessories:
1. **Nozzle Attachments**: Different nozzles can concentrate airflow for specific tasks. Flat nozzles are ideal for sweeping debris, while round nozzles can increase airspeed for stubborn debris.
2. **Gutter Cleaning Kits**: These extendable tubes allow you to clean gutters without a ladder, improving safety and efficiency.
3. **Vacuum Kits**: Convert your blower into a vacuum to collect leaves and debris, which is useful for areas where blowing is impractical.
4. **Mulching Kits**: These kits shred leaves and debris into fine mulch, reducing waste volume and providing material for composting.
5. **Extension Tubes**: Longer tubes can help reach high or distant areas, making it easier to clean roofs or large yards.
6. **Shoulder Straps and Harnesses**: These accessories distribute weight evenly, reducing fatigue during extended use and improving maneuverability.
7. **Dust Bags**: For blowers with vacuum capabilities, high-capacity dust bags can reduce the frequency of emptying, enhancing efficiency.
8. **Fuel Stabilizers**: For gas blowers, fuel stabilizers prevent fuel degradation, ensuring consistent performance and easier starts.
9. **High-Performance Air Filters**: Upgraded air filters can improve engine efficiency and longevity by providing cleaner air intake.
10. **Battery Packs**: For cordless blowers, additional or higher-capacity battery packs extend runtime, allowing for longer work periods without recharging.
11. **Maintenance Kits**: Regular maintenance is crucial for optimal performance. Kits typically include spark plugs, air filters, and fuel filters.
12. **Noise Reduction Mufflers**: These can reduce the noise output of gas blowers, making them more pleasant to use in noise-sensitive areas.
By selecting the right accessories, you can tailor your blower to meet specific needs, improve its efficiency, and extend its lifespan.
How do I maintain my blower to prevent damage?
1. **Regular Cleaning**: After each use, clean the blower to remove debris, dust, and leaves. Use a brush or compressed air to clean the air intake and exhaust areas.
2. **Check and Replace Filters**: Inspect the air filter regularly. Clean it if it's reusable or replace it if it's worn out or damaged. A clean filter ensures efficient airflow and prevents engine strain.
3. **Inspect the Spark Plug**: Check the spark plug for wear and carbon buildup. Clean or replace it annually to ensure easy starting and smooth operation.
4. **Fuel Management**: Use fresh, clean fuel and the correct fuel mixture if it's a two-stroke engine. Avoid using old or contaminated fuel, which can cause engine problems.
5. **Check Fuel Lines and Tank**: Regularly inspect fuel lines for cracks or leaks. Ensure the fuel tank is clean and free from debris.
6. **Lubricate Moving Parts**: Apply lubricant to moving parts like the throttle cable and any other pivot points to prevent rust and ensure smooth operation.
7. **Inspect and Tighten Bolts and Screws**: Regularly check and tighten any loose bolts or screws to prevent parts from vibrating loose during operation.
8. **Check the Impeller**: Inspect the impeller for damage or wear. A damaged impeller can reduce performance and cause further damage.
9. **Storage**: Store the blower in a dry, sheltered place. If storing for an extended period, drain the fuel tank and run the engine until it stops to prevent fuel system issues.
10. **Follow Manufacturer’s Guidelines**: Always refer to the user manual for specific maintenance schedules and procedures recommended by the manufacturer.
Regular maintenance not only extends the life of your blower but also ensures it operates efficiently and safely.
What are the signs that my blower's belt needs replacing?
1. **Squealing or Squeaking Noises**: Unusual noises when the blower is operating can indicate a worn or loose belt.
2. **Visible Wear and Tear**: Inspect the belt for cracks, fraying, or glazing. Any visible damage suggests the belt is nearing the end of its life.
3. **Poor Airflow**: Reduced airflow from vents can be a sign that the belt is slipping or not functioning properly.
4. **Burning Smell**: A burning rubber smell can indicate that the belt is overheating due to friction or misalignment.
5. **Frequent Cycling**: If the blower turns on and off more frequently than usual, it might be struggling due to a faulty belt.
6. **Vibrations or Shaking**: Excessive vibrations or shaking of the blower unit can be caused by a misaligned or damaged belt.
7. **Increased Energy Bills**: A blower working harder due to a failing belt can lead to higher energy consumption.
8. **Belt Looseness**: If the belt feels loose when you press on it, it may need tightening or replacement.
9. **Age of the Belt**: If the belt is several years old, it may be time for a replacement as part of regular maintenance.
10. **Blower Not Working**: If the blower fails to start, a broken belt could be the cause.