Call +(254) 703 030 000 / 751 483 999 / 721 704 777
.....Read More

Frequently Asked Questions
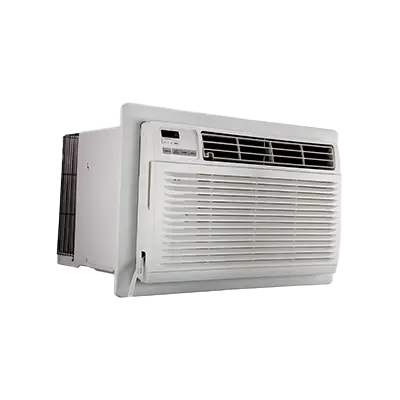
What is the difference between a through-the-wall air conditioner and a window air conditioner?
A through-the-wall air conditioner and a window air conditioner differ primarily in installation, design, and application.
**Installation**:
- A through-the-wall air conditioner is installed by cutting a hole in an exterior wall, fitting the unit into a sleeve that supports its weight. This requires more permanent structural modification and professional installation.
- A window air conditioner is installed in a window opening, typically supported by the window frame and sometimes additional brackets. It is easier to install and remove, making it more suitable for temporary or seasonal use.
**Design**:
- Through-the-wall units are designed to be flush with the wall, providing a more seamless appearance. They often have a more robust build to withstand external elements.
- Window units extend outside the window, which can obstruct views and reduce natural light. They are generally more compact and portable.
**Application**:
- Through-the-wall air conditioners are ideal for rooms without suitable windows or where window space is a premium. They are often used in permanent installations in homes or commercial spaces.
- Window air conditioners are more versatile for renters or those who need a temporary cooling solution. They can be easily moved or stored when not in use.
**Efficiency and Performance**:
- Through-the-wall units often have better insulation and sealing, leading to improved energy efficiency and performance.
- Window units may have more air leakage, potentially reducing efficiency, but advancements in design have minimized this issue.
**Cost**:
- Through-the-wall units generally have higher upfront costs due to installation and structural modifications.
- Window units are typically less expensive and more accessible for budget-conscious consumers.
In summary, the choice between the two depends on factors like permanence, budget, and specific cooling needs.
How do I install a through-the-wall air conditioner?
1. **Select Location**: Choose a wall that can support the unit, away from direct sunlight and obstructions.
2. **Measure and Mark**: Measure the air conditioner and mark the wall for the opening, ensuring it's slightly larger than the unit.
3. **Cut the Opening**: Use a stud finder to avoid cutting through studs. Cut the drywall with a drywall saw and the exterior wall with a reciprocating saw.
4. **Frame the Opening**: Use 2x4 lumber to create a frame inside the wall opening for support. Ensure it's level and secure.
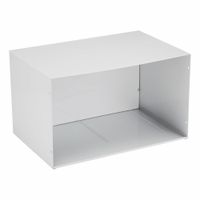
5. **Install the Sleeve**: Insert the wall sleeve into the opening. It should be slightly tilted outward for drainage. Secure it with screws.
6. **Seal the Sleeve**: Use weatherproof caulk around the sleeve to prevent air and water leaks.
7. **Install the Air Conditioner**: Slide the air conditioner into the sleeve. Secure it according to the manufacturer's instructions.
8. **Connect Power**: Plug the unit into a dedicated electrical outlet. If necessary, hire an electrician to install a new outlet.
9. **Test the Unit**: Turn on the air conditioner to ensure it operates correctly. Check for vibrations or noise.
10. **Finish Interior and Exterior**: Patch and paint the interior wall around the unit. On the exterior, use trim to cover gaps and ensure a weatherproof seal.
11. **Maintenance**: Regularly clean filters and check for any signs of wear or damage.
What size wall air conditioner do I need for my room?
To determine the appropriate size wall air conditioner for your room, you need to consider the room's square footage and other factors that affect cooling needs. Here's a step-by-step guide:
1. **Measure the Room**: Calculate the square footage by multiplying the room's length by its width. For example, a room that is 15 feet long and 12 feet wide is 180 square feet.
2. **BTU Calculation**: Use the British Thermal Unit (BTU) as a measure of cooling capacity. Generally, you need about 20 BTUs per square foot. For a 180 square foot room, you would need a 3,600 BTU unit.
3. **Adjust for Room Characteristics**:
- **Ceiling Height**: If the ceiling is higher than 8 feet, increase the BTU capacity by 10%.
- **Sunlight**: If the room receives a lot of sunlight, increase the BTU by 10%. If it's heavily shaded, decrease by 10%.
- **Occupancy**: Add 600 BTUs for each additional person regularly occupying the room.
- **Appliances**: If the room has heat-generating appliances, add extra BTUs to compensate.
4. **Room Type**: Consider the room's purpose. Kitchens typically require more cooling power due to heat from cooking appliances.
5. **Insulation and Windows**: Poor insulation or large windows may require a higher BTU rating to maintain comfort.
6. **Climate**: Consider the local climate. Hotter climates may require a higher BTU rating.
By considering these factors, you can select a wall air conditioner that efficiently cools your room without wasting energy. Always consult the manufacturer's guidelines and consider professional advice for precise sizing.
Can a through-the-wall air conditioner be used in a window?
No, a through-the-wall air conditioner is not designed to be used in a window. These units are specifically engineered for installation through a wall, which involves a different structural setup compared to window units. The main differences include:
1. **Design and Structure**: Through-the-wall units are typically heavier and have a solid, enclosed back, unlike window units that have venting on the sides and back. This design is meant to fit snugly into a wall sleeve, providing stability and support.
2. **Venting and Airflow**: Window air conditioners are designed to vent hot air out the sides and back, which is facilitated by the open space in a window installation. Through-the-wall units vent directly out the back, which would be obstructed in a window setting, leading to inefficient operation and potential overheating.
3. **Installation Requirements**: Installing a through-the-wall unit in a window would require significant modifications, such as creating a custom support system to hold the unit securely. This can compromise the safety and efficiency of the unit.
4. **Aesthetic and Functional Fit**: The dimensions and aesthetic design of through-the-wall units are meant to blend with wall installations, not windows. This can lead to poor sealing, increased energy loss, and potential water leakage if improperly installed in a window.
5. **Warranty and Safety Concerns**: Using a through-the-wall unit in a window may void the warranty and pose safety risks due to improper installation and support.
For these reasons, it is recommended to use an air conditioner specifically designed for window installation to ensure proper function, safety, and efficiency.
How do I maintain and clean a wall air conditioner?
1. **Turn Off Power**: Ensure the unit is unplugged or the circuit breaker is off to prevent electrical hazards.
2. **Remove and Clean Filters**: Open the front panel and remove the air filters. Wash them with warm, soapy water, rinse thoroughly, and let them dry completely before reinserting.
3. **Clean the Coils**: Use a soft brush or vacuum with a brush attachment to remove dust and debris from the evaporator and condenser coils. For stubborn dirt, use a coil cleaner spray.
4. **Check the Drainage**: Ensure the drainage hole or pipe is clear to prevent water buildup. Use a pipe cleaner or a small brush to clear any blockages.
5. **Clean the Exterior**: Wipe down the exterior of the unit with a damp cloth. Avoid using harsh chemicals that could damage the surface.
6. **Inspect the Fins**: Check the aluminum fins on the coils for any bending. Use a fin comb to straighten them gently, improving airflow and efficiency.
7. **Check the Seal**: Inspect the seal between the air conditioner and the wall to ensure it is intact. Replace it if there are any gaps or damage to prevent air leaks.
8. **Reassemble and Test**: Once everything is clean and dry, reassemble the unit, plug it back in, and turn it on to ensure it operates correctly.
9. **Regular Maintenance**: Perform these cleaning steps every few months, especially before and after the cooling season, to maintain efficiency and prolong the unit's lifespan.
What are the energy efficiency ratings for wall air conditioners?
Energy efficiency ratings for wall air conditioners are primarily determined by the Energy Efficiency Ratio (EER) and the Seasonal Energy Efficiency Ratio (SEER).
1. **Energy Efficiency Ratio (EER):** This measures the cooling capacity of an air conditioner in British Thermal Units (BTUs) per hour relative to the power input in watts. A higher EER indicates a more efficient unit. EER is calculated under specific test conditions, typically at an outdoor temperature of 95°F, an indoor temperature of 80°F, and 50% relative humidity.
2. **Seasonal Energy Efficiency Ratio (SEER):** SEER is a broader measure of efficiency that accounts for variations in temperature over a typical cooling season. It is the ratio of the total cooling output during the normal cooling season divided by the total electric energy input during the same period. SEER ratings are generally higher than EER ratings because they consider a range of operating conditions.
3. **Energy Star Certification:** Wall air conditioners that meet or exceed specific EER and SEER thresholds may qualify for Energy Star certification, indicating they are among the most energy-efficient models available. Energy Star-rated units typically have a SEER of 14 or higher and an EER of 11 or higher.
4. **Coefficient of Performance (COP):** Although less common for air conditioners, COP is another measure of efficiency, representing the ratio of useful heating or cooling provided to work required. Higher COP values indicate better efficiency.
When selecting a wall air conditioner, consider both EER and SEER ratings to ensure optimal energy efficiency, which can lead to lower energy bills and reduced environmental impact.
How do I choose the right accessories for my wall air conditioner?
To choose the right accessories for your wall air conditioner, consider the following factors:
1. **Compatibility**: Ensure that any accessory you purchase is compatible with your specific air conditioner model. Check the manufacturer's recommendations or consult the user manual.
2. **Functionality**: Identify the purpose of the accessory. Common accessories include remote controls, smart thermostats, air filters, and mounting brackets. Choose based on your needs, such as improved air quality, enhanced control, or better stability.
3. **Energy Efficiency**: Opt for accessories that enhance the energy efficiency of your unit. Smart thermostats and programmable timers can help reduce energy consumption by optimizing operation times.
4. **Air Quality**: Consider accessories like high-efficiency particulate air (HEPA) filters or activated carbon filters to improve indoor air quality by trapping dust, pollen, and odors.
5. **Noise Reduction**: If noise is a concern, look for accessories designed to minimize sound, such as vibration dampeners or noise-reducing covers.
6. **Aesthetic Appeal**: Choose accessories that complement your interior decor. Decorative covers or custom panels can help the unit blend seamlessly with your room’s design.
7. **Ease of Installation**: Select accessories that are easy to install, especially if you plan to do it yourself. Some may require professional installation, which could add to the cost.
8. **Durability and Quality**: Invest in high-quality accessories from reputable brands to ensure longevity and reliability.
9. **Cost**: Balance your budget with the benefits offered by the accessory. Sometimes, spending a bit more upfront can lead to long-term savings and improved performance.
10. **Reviews and Recommendations**: Read customer reviews and seek recommendations to gauge the effectiveness and reliability of the accessory.
By considering these factors, you can select the right accessories to enhance the performance, efficiency, and aesthetics of your wall air conditioner.