Call +(254) 703 030 000 / 751 483 999 / 721 704 777

Frequently Asked Questions
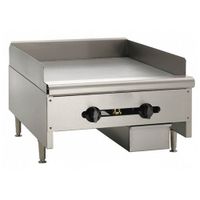
What is the difference between a charbroiler and a griddle?
A charbroiler and a griddle are both cooking appliances used in commercial kitchens, but they serve different purposes and have distinct features.
A charbroiler is designed to grill food, providing a flavor similar to outdoor grilling. It uses gas or electric heat to cook food placed on a series of grates. The heat source is typically located beneath the grates, and the design allows for the drippings from the food to fall onto the heat source, creating smoke that imparts a charred, smoky flavor. Charbroilers are ideal for cooking meats like steaks, burgers, and chicken, giving them grill marks and a distinct taste. They are often used in restaurants that want to replicate the flavor of outdoor grilling indoors.
In contrast, a griddle is a flat cooking surface, usually made of steel, that is heated from below. It provides an even, consistent heat across the entire surface, making it suitable for cooking a wide variety of foods, including pancakes, eggs, bacon, and sandwiches. Griddles do not impart a smoky flavor or grill marks, as they lack the open flame and grates of a charbroiler. They are versatile and can be used for both breakfast and lunch items, making them a staple in diners and cafes.
In summary, the main differences between a charbroiler and a griddle are their cooking surfaces and the flavors they impart. A charbroiler uses grates and an open flame to provide a smoky, grilled flavor, while a griddle offers a flat, even surface for cooking a wide range of foods without added flavor.
How do you clean a sandwich press?
1. **Unplug and Cool Down**: Ensure the sandwich press is unplugged and has cooled down completely to avoid burns.
2. **Remove Crumbs and Loose Debris**: Use a dry paper towel or a soft brush to sweep away any loose crumbs or food particles from the plates.
3. **Wipe with a Damp Cloth**: Dampen a soft cloth or sponge with warm water. Wipe down the plates to remove any remaining food residue. Avoid using excessive water to prevent it from entering the electrical components.
4. **Use a Mild Detergent**: If there are stubborn stains or grease, apply a small amount of mild dish soap to the damp cloth and gently scrub the affected areas. Avoid abrasive cleaners or scouring pads that can damage the non-stick surface.
5. **Rinse and Wipe**: Rinse the cloth or sponge with clean water and wipe the plates again to remove any soap residue.
6. **Clean the Exterior**: Wipe the exterior of the sandwich press with a damp cloth to remove any splatters or fingerprints.
7. **Dry Thoroughly**: Use a dry cloth or paper towel to thoroughly dry the plates and exterior to prevent rust or water spots.
8. **Clean Drip Tray (if applicable)**: If your sandwich press has a removable drip tray, wash it with warm soapy water, rinse, and dry it before reinserting.
9. **Reassemble and Store**: Once everything is dry, reassemble any removable parts and store the sandwich press in a clean, dry place.
10. **Regular Maintenance**: Regularly clean your sandwich press after each use to maintain its performance and longevity.
Can you use a griddle for making crepes?
Yes, you can use a griddle for making crepes. A griddle provides a large, flat cooking surface that is ideal for spreading the crepe batter thinly and evenly. Here’s how you can effectively use a griddle for making crepes:
1. **Preheat the Griddle**: Set the griddle to medium heat. It’s important to ensure the griddle is evenly heated to avoid hot spots that can cause uneven cooking.
2. **Prepare the Batter**: Use a standard crepe batter recipe, which typically includes flour, eggs, milk, and a pinch of salt. The batter should be smooth and slightly runny to spread easily.
3. **Grease the Surface**: Lightly grease the griddle with butter or oil. Use a paper towel to spread it evenly, ensuring a thin layer to prevent sticking without making the crepes greasy.
4. **Pour and Spread the Batter**: Pour a small amount of batter onto the griddle. Quickly use a crepe spreader or the back of a ladle to spread the batter into a thin, even layer. The large surface of the griddle allows for easy maneuvering.
5. **Cook the Crepe**: Let the crepe cook for about 1-2 minutes until the edges start to lift and the bottom is lightly browned. Flip the crepe using a spatula and cook the other side for about 30 seconds.
6. **Adjust Temperature as Needed**: If the crepes are browning too quickly or not cooking evenly, adjust the heat accordingly.
7. **Serve and Enjoy**: Once cooked, remove the crepe and fill it with your choice of sweet or savory fillings.
Using a griddle can be advantageous for making multiple crepes at once due to its size, making it a practical choice for serving larger groups.
What foods can be cooked on a charbroiler?
A charbroiler is a versatile cooking appliance that can be used to prepare a wide variety of foods, imparting a distinct smoky flavor and attractive grill marks. Here are some foods that can be cooked on a charbroiler:
1. **Meats**:
- **Steaks**: Ribeye, sirloin, and filet mignon are popular choices.
- **Burgers**: Ground beef, turkey, or plant-based patties.
- **Chicken**: Breasts, thighs, wings, and whole spatchcocked chicken.
- **Pork**: Chops, ribs, and tenderloin.
- **Lamb**: Chops and kebabs.
2. **Seafood**:
- **Fish**: Salmon, tuna, swordfish, and halibut steaks.
- **Shellfish**: Shrimp, scallops, and lobster tails.
3. **Vegetables**:
- **Peppers**: Bell peppers, jalapeños, and poblano peppers.
- **Zucchini and Squash**: Sliced lengthwise for even cooking.
- **Corn on the Cob**: Grilled with or without husks.
- **Mushrooms**: Portobello caps and skewered button mushrooms.
- **Asparagus**: Lightly oiled and seasoned.
4. **Fruits**:
- **Pineapple**: Sliced rings or spears.
- **Peaches**: Halved and pitted.
- **Watermelon**: Sliced into thick wedges.
5. **Bread**:
- **Flatbreads**: Such as naan or pita.
- **Sandwiches**: Paninis or grilled cheese.
6. **Tofu and Plant-Based Proteins**:
- **Tofu**: Marinated and sliced.
- **Tempeh**: Grilled with a glaze or marinade.
7. **Skewers and Kebabs**:
- **Mixed Skewers**: Combining meats, seafood, and vegetables.
These foods benefit from the high heat and direct flame of a charbroiler, which enhances their natural flavors and textures.
How do you season a new griddle?
To season a new griddle, follow these steps:
1. **Clean the Griddle**: Wash the griddle with warm, soapy water to remove any manufacturing residues. Rinse thoroughly and dry completely with a clean cloth or paper towel.
2. **Preheat the Griddle**: Place the griddle on your stove or heat source and turn it on to medium heat. Allow it to heat up for about 10-15 minutes. This helps open the metal's pores.
3. **Apply Oil**: Choose a high smoke point oil like vegetable, canola, or flaxseed oil. Pour a small amount onto the griddle and use a paper towel or cloth to spread it evenly across the entire surface, including the sides and edges. Ensure a thin, even layer without any pooling.
4. **Heat the Oil**: Continue heating the griddle until the oil starts to smoke. This process polymerizes the oil, creating a non-stick, protective layer. Let it smoke for about 10-15 minutes.
5. **Cool Down**: Turn off the heat and allow the griddle to cool completely. This helps the oil bond to the metal surface.
6. **Repeat**: For optimal seasoning, repeat the oiling and heating process 2-3 more times. Each layer builds up the seasoning, enhancing the non-stick surface and rust resistance.
7. **Maintenance**: After each use, clean the griddle with a scraper or spatula to remove food particles. Avoid using soap. Reapply a thin layer of oil to maintain the seasoning.
By following these steps, your griddle will develop a durable, non-stick surface that improves with use.
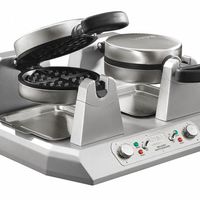
What is the best way to clean a waffle maker?
1. **Unplug and Cool Down**: Ensure the waffle maker is unplugged and has cooled down completely to avoid burns.
2. **Remove Removable Plates**: If your waffle maker has removable plates, take them out for easier cleaning.
3. **Wipe Excess Oil and Crumbs**: Use a dry paper towel or cloth to wipe away any excess oil or crumbs from the plates.
4. **Clean the Plates**:
- **Non-Removable Plates**: Use a damp cloth or sponge with a mild dish soap to gently clean the plates. Avoid using too much water to prevent it from seeping into the electrical components.
- **Removable Plates**: Wash them in warm, soapy water or place them in the dishwasher if they are dishwasher-safe.
5. **Tackle Stubborn Stains**: For stuck-on batter, create a paste with baking soda and water. Apply it to the stains, let it sit for a few minutes, then gently scrub with a soft brush or cloth.
6. **Clean the Exterior**: Wipe the exterior with a damp cloth. For stainless steel surfaces, use a stainless steel cleaner or a mixture of vinegar and water for a streak-free finish.
7. **Dry Thoroughly**: Ensure all parts are completely dry before reassembling or storing the waffle maker to prevent mold and mildew.
8. **Reassemble and Store**: Once dry, reassemble any removable parts and store the waffle maker in a clean, dry place.
9. **Regular Maintenance**: To prevent buildup, clean the waffle maker after each use and apply a light coat of cooking spray or oil before cooking to make future cleaning easier.
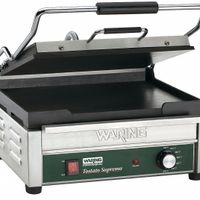
How do you prevent food from sticking to a panini press?
To prevent food from sticking to a panini press, start by preheating the press to ensure even cooking and reduce sticking. Lightly coat the grill plates with a high smoke point oil, such as canola or vegetable oil, using a brush or paper towel. Avoid using aerosol cooking sprays, as they can leave a sticky residue over time.
Use bread with a firm texture, like sourdough or ciabatta, which is less likely to stick compared to softer breads. Butter or oil the outer sides of the bread before placing it on the grill, as this creates a barrier between the bread and the grill plates. For fillings, ensure they are not overly wet, as excess moisture can cause sticking. Pat dry ingredients like tomatoes or pickles before adding them to the sandwich.
If your panini press has removable plates, clean them thoroughly after each use to prevent residue build-up, which can cause sticking. For non-removable plates, wipe them down with a damp cloth while they are still warm, but not hot, to remove any leftover food particles.
Consider using parchment paper or a reusable non-stick grill mat between the food and the grill plates. These options provide a non-stick surface and make cleaning easier without affecting the grill marks on the sandwich.
Finally, avoid overloading the sandwich with fillings, as this can cause ingredients to spill out and stick to the grill. By following these steps, you can minimize sticking and enjoy perfectly grilled paninis.