Call +(254) 703 030 000 / 751 483 999 / 721 704 777
.....Read More


Frequently Asked Questions
What are the differences between nails and screws?
Nails and screws are both fasteners used to join materials, but they differ significantly in their design, application, and holding power.
Nails are typically smooth, pointed metal shafts with a flattened head. They are driven into materials using a hammer, relying on friction and the displacement of wood fibers for their holding power. Nails are generally quicker and easier to install, making them suitable for applications where speed is a priority, such as framing or sheathing. However, their holding power is primarily resistive, meaning they can be pulled out relatively easily, especially if the material expands or contracts.
Screws, on the other hand, have a threaded shaft and a head that can be driven by a screwdriver or power tool. The threads cut into the material as the screw is rotated, creating a much stronger mechanical bond. This threading provides superior tensile strength, meaning screws are much more resistant to pull-out forces. Screws are ideal for applications requiring a strong, long-lasting connection, such as furniture assembly, decking, or attaching hinges. While they take longer to install, their superior holding power and ability to be removed and reinserted make them a more versatile option for many projects. Different types of heads and threads also allow screws to be optimized for various materials and applications.
How do you choose the right size nail for a project?
Choosing the right nail size for a project depends on several factors, primarily the materials being joined and the desired holding strength. A general rule of thumb is that the nail should be three times as long as the thickness of the material being fastened. For example, if you are nailing a 1-inch thick board, you would typically use a 3-inch nail.
However, this rule isn't absolute. When nailing into a stud or joist, the nail should be long enough to penetrate well into the denser material for a secure hold. For softer woods, a thicker nail might be needed to prevent pull-through, while for hardwoods, a thinner, harder nail might be more appropriate to avoid splitting the wood.
Consider the nail's gauge (thickness) as well. Thicker gauge nails offer more shear strength, making them suitable for structural applications, while thinner nails are better for decorative or delicate work where splitting is a concern.
Finally, the type of nail head also plays a role. Flat heads offer maximum holding power, while finishing nails with smaller heads can be countersunk for a cleaner appearance. Always assess the specific demands of your project to ensure you select the optimal nail for durability and safety.
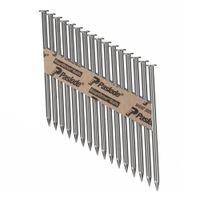
What are collated nails and how are they used?
Collated nails are fasteners that are joined together in a specific arrangement, typically using a strip of plastic, paper, or wire. This collation allows for rapid feeding into power nailers, significantly increasing efficiency compared to loading individual nails. They are widely used in construction and woodworking for various applications, including framing, sheathing, decking, fencing, and roofing. Different types of collated nails exist, such as strip nails (often used for framing and sheathing), coil nails (common for roofing and siding), and plastic-collated nails (frequently used in finish carpentry). The choice of collation method and nail type depends on the specific application, the type of nailer being used, and the desired fastening strength and appearance. Their primary benefit lies in streamlining the fastening process, reducing manual labor, and improving productivity on job sites.
How do you properly drive a nail into wood?
Driving a nail into wood correctly involves a few key steps to ensure a secure and flush finish. First, select the appropriate nail for your project – consider the type of wood, the desired holding power, and the size and type of the material you're fastening. For softer woods, a thinner nail might suffice, while harder woods often require a stronger, perhaps even galvanized, nail.
Before you begin, ensure you have the right hammer. A claw hammer is standard, but for smaller nails or precise work, a lighter hammer might be more suitable. Grip the hammer firmly near the end of the handle for maximum leverage.
To start, hold the nail upright with one hand, positioning its point precisely where you want it to go. With your other hand, lightly tap the nail head with the hammer a few times to get it started and ensure it stands independently in the wood. This initial tap helps prevent the nail from bending and ensures accuracy.
Once the nail is stable, remove your hand from the nail and use full, consistent swings to drive it into the wood. The power comes from your arm and shoulder, not just your wrist. Aim for the center of the nail head with each swing. Continue striking until the nail head is flush with, or slightly below, the surface of the wood. If you want a perfectly concealed finish, you can use a nail set to recess the nail head further, then fill the hole with wood putty.
Always wear safety glasses to protect your eyes from flying debris or errant nails. Pay attention to the grain of the wood; driving nails along the grain can sometimes cause the wood to split. If you encounter resistance or the nail bends, remove it and try a new spot or a different type of nail.
What are the best types of nails for construction projects?
The best types of nails for construction projects depend heavily on the specific application and materials involved.
Commonly, common nails are widely used for general framing and construction, offering good holding power due to their large heads and thick shanks. For more secure fastening, especially in wood, ring-shank nails provide superior withdrawal resistance because of their annular rings. Similarly, screw-shank (or spiral-shank) nails offer even greater holding power, often used in flooring or deck construction to prevent boards from lifting.
When working with treated lumber or in outdoor environments, it's crucial to use corrosion-resistant nails like galvanized nails or stainless steel nails to prevent rust and degradation. Finish nails and brad nails, with their smaller heads, are preferred for trim work and molding where a less visible fastener is desired. Roofing nails, characterized by their large heads and short shanks, are specifically designed for attaching roofing materials.
Choosing the right nail involves considering factors such as the type of wood, the required holding strength, exposure to moisture, and aesthetic preferences.
How do you remove a nail without damaging the material?
To remove a nail without damaging the material, start by protecting the surrounding surface with a thin piece of wood or a putty knife. Use a claw hammer, preferably one with a straight claw, and gently pry the nail out. If the nail is stubborn, you can rock the hammer back and forth slightly to loosen it, but avoid twisting or bending the nail, which could damage the material or break the nail. For very tight nails, a nail puller or a pair of nippers might be more effective. When using nippers, grip the nail head firmly and roll the tool against the material to lift the nail out. Always apply even pressure and be patient to prevent splintering or marring the surface. If the nail is bent or difficult to extract, you may need to try to straighten it slightly before pulling.
What are spikes used for in construction?
Spikes are used in construction for a variety of purposes, primarily for fastening and anchoring. They are essentially large nails, typically made of steel, designed to provide strong, durable connections. Common applications include framing, where spikes are used to secure large timbers and beams together, especially in heavy-duty construction like bridge building or timber-framed structures. They are also employed in railway construction to fasten rails to wooden ties, providing stability and maintaining gauge. Beyond structural applications, spikes can be used for landscaping features, securing retaining walls, or anchoring playground equipment. Their robust nature allows them to withstand significant loads and environmental stresses, making them ideal for applications requiring a strong, permanent bond.
How do you use a nail gun safely?
Using a nail gun safely is crucial to prevent serious injuries. Always wear appropriate personal protective equipment (PPE), including safety glasses to protect against flying debris, hearing protection to guard against noise exposure, and work gloves for a better grip and hand protection. Before operating, inspect the nail gun for any damage, loose parts, or air leaks. Ensure the nails are compatible with the gun and loaded correctly.
Always read and understand the manufacturer's instructions before use. Never point the nail gun at yourself or others, and keep your fingers away from the trigger when not actively fastening. When operating, maintain a firm grip on the tool and keep a balanced stance. Use the sequential firing mode when possible, as it requires the nose to be pressed against the workpiece before the trigger can be pulled, reducing the risk of accidental discharge.
Be mindful of the workpiece material; avoid nailing into knots, metal, or other hard objects that could cause the nail to ricochet. Secure your workpiece to prevent it from shifting. When clearing a jam, disconnect the air supply or power source first. Never bypass safety features or attempt to modify the tool. Store the nail gun properly in a clean, dry place when not in use, and keep it out of reach of children. Regular maintenance, as recommended by the manufacturer, will also ensure safe and efficient operation.
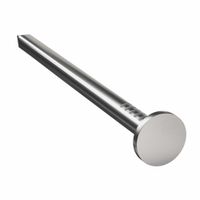
What are U-drive screws and when should they be used?
U-drive screws, also known as hammer drive screws or unslotted round head screws, are a type of fastener designed for permanent, tamper-resistant connections, primarily in soft materials. Unlike conventional screws that require threading into a pre-tapped hole or forming their own threads, U-drive screws are installed by simply hammering them into a slightly smaller pilot hole.
Key characteristics of U-drive screws include: * **Unslotted Round Head:** Their unslotted head prevents removal with a screwdriver, making them suitable for applications where tampering or loosening is undesirable.
* **Multiple Starting Threads (Flutes):** The shank features several helical, sharp-crested threads or flutes, which are designed to displace material as the screw is driven in, creating a secure, interference fit.
* **Tapered Tip:** A tapered or pointed tip facilitates easier insertion into the pilot hole.When should they be used?
U-drive screws are ideal for attaching nameplates, data plates, emblems, and other decorative or informational items to materials such as: * **Plastics:** They create strong, durable bonds in various plastic types.
* **Wood:** Suitable for permanent attachments where removal is not anticipated.
* **Castings:** Can be used in soft metal castings, provided a proper pilot hole is drilled.
* **Other soft materials:** Any material where a secure, non-removable fastening is required and the material can be displaced by the screw's threads.Their primary advantage lies in their speed of installation and their tamper-proof nature, making them a common choice in manufacturing and assembly where permanent attachment is paramount. However, due to their installation method, they are generally not suitable for applications requiring high tensile strength or repeated assembly/disassembly.
How do you prevent nails from splitting wood?
To prevent nails from splitting wood, especially when working with hardwoods or near the edge of a board, several techniques can be employed. Pre-drilling pilot holes is one of the most effective methods. The diameter of the pilot hole should be slightly smaller than the nail's shank, allowing the nail to grip the wood without forcing the fibers apart.
Another technique is to blunt the tip of the nail with a hammer. A sharp nail acts like a wedge, pushing wood fibers apart, while a blunted tip tears through the fibers, reducing the likelihood of a split.
Using thinner nails or ring-shank nails can also help. Thinner nails exert less pressure on the wood, and ring-shank nails, designed for better holding power, also distribute stress more evenly. Additionally, angling the nails slightly when driving them in can help, as this avoids creating a single line of stress.
Finally, consider the type of wood. Softer woods are less prone to splitting than hardwoods. When working with very brittle or dry wood, applying a little wax or soap to the nail before driving it in can reduce friction and make the process smoother, further minimizing the risk of splitting.