Call +(254) 703 030 000 / 751 483 999 / 721 704 777
.....Read More

Frequently Asked Questions
What are the different types of anchors for masonry surfaces?
There are several types of anchors used for masonry surfaces, each designed for specific applications and load requirements:
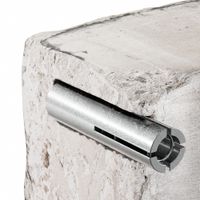
1. **Expansion Anchors**: These are the most common type and include wedge anchors, sleeve anchors, and drop-in anchors. They work by expanding against the walls of the hole in the masonry, providing a secure hold. Wedge anchors are ideal for heavy-duty applications, while sleeve anchors are versatile for medium-duty tasks.
2. **Chemical Anchors**: Also known as adhesive anchors, these involve injecting a resin-based adhesive into the drilled hole before inserting the anchor. They provide strong, reliable bonds and are suitable for high-load applications. They are particularly useful in situations where vibration or dynamic loads are present.
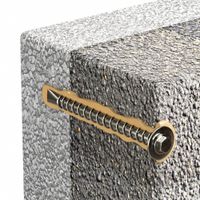
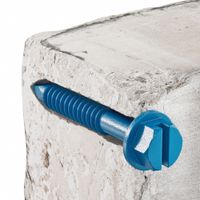
3. **Concrete Screws**: These are threaded fasteners that tap threads into the masonry as they are driven in. They are easy to install and remove, making them suitable for light to medium-duty applications. They are often used for temporary installations or where adjustments may be needed.
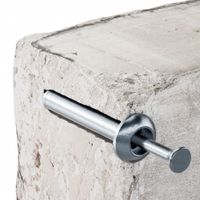
4. **Hammer Drive Anchors**: These are light-duty anchors that are driven into a pre-drilled hole with a hammer. They are quick to install and are typically used for securing fixtures that do not bear significant loads.
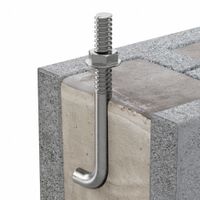
5. **Toggle Bolts**: These are used for hollow masonry applications. They consist of a bolt and a spring-loaded toggle that expands behind the wall, providing a secure hold. They are suitable for medium to heavy-duty applications.
6. **Plastic Anchors**: These are used for light-duty applications and are inserted into a pre-drilled hole. The screw is then driven into the anchor, causing it to expand and grip the surrounding material.
Each type of anchor has its specific use case, and the choice depends on factors such as load requirements, environmental conditions, and the nature of the masonry material.
How do I choose the right anchor for my project?
Choosing the right anchor for your project involves several key considerations:
1. **Type of Project**: Determine the nature of your project. Is it for a boat, construction, or a wall hanging? Each requires different types of anchors.
2. **Material**: Consider the material of the anchor. Common materials include stainless steel, galvanized steel, and plastic. Stainless steel is corrosion-resistant, making it ideal for marine environments, while galvanized steel is suitable for general construction.
3. **Load Capacity**: Assess the weight and load the anchor needs to support. This is crucial for safety and effectiveness. Check the manufacturer's specifications for load ratings.
4. **Surface Type**: Identify the surface where the anchor will be used. Different anchors are designed for different surfaces like concrete, drywall, or soil. For example, toggle bolts are suitable for drywall, while wedge anchors are ideal for concrete.
5. **Environmental Conditions**: Consider environmental factors such as moisture, temperature, and exposure to chemicals. These can affect the anchor's performance and longevity.
6. **Installation Method**: Evaluate the ease of installation. Some anchors require special tools or expertise, while others are more straightforward to install.
7. **Cost**: Balance your budget with quality. While cheaper anchors may save money initially, they might not offer the durability or safety required for your project.
8. **Regulations and Standards**: Ensure compliance with any relevant building codes or industry standards, which may dictate specific types of anchors for certain applications.
9. **Expert Advice**: Consult with professionals or suppliers who can provide insights based on experience and technical knowledge.
By considering these factors, you can select an anchor that meets the specific needs of your project, ensuring safety, durability, and effectiveness.
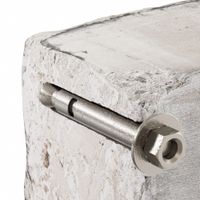
What is the difference between wedge anchors and sleeve anchors?
Wedge anchors and sleeve anchors are both types of mechanical anchors used to secure objects to concrete, but they differ in design, application, and installation.
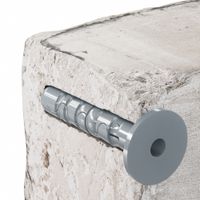
Wedge anchors are designed for use in solid concrete. They consist of a threaded stud, an expansion clip, a nut, and a washer. When installed, the anchor is inserted into a pre-drilled hole, and as the nut is tightened, the expansion clip at the bottom of the anchor is pulled up, wedging against the sides of the hole. This creates a strong, permanent hold. Wedge anchors are known for their high load-bearing capacity and are often used in heavy-duty applications.
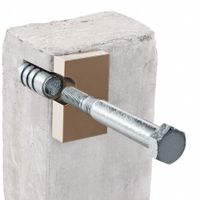
Sleeve anchors, on the other hand, are more versatile and can be used in concrete, brick, or block. They consist of a threaded bolt, an expansion sleeve, a nut, and a washer. When the nut is tightened, the bolt is pulled up, causing the sleeve to expand against the walls of the hole. This expansion provides the holding power. Sleeve anchors are generally easier to install and are suitable for medium-duty applications. They are often used for securing fixtures like handrails, light fixtures, and signs.
In summary, the main differences lie in their design and application: wedge anchors are ideal for solid concrete and heavy loads, while sleeve anchors offer versatility for use in various base materials and are suitable for medium-duty tasks.
How do I install anchors into concrete, block, or brick?
1. **Select the Right Anchor**: Choose the appropriate anchor type (e.g., sleeve, wedge, or expansion anchors) based on the load requirements and material (concrete, block, or brick).
2. **Gather Tools and Materials**: You will need a hammer drill, masonry bit, anchors, a hammer, a wrench, a vacuum or brush, and safety gear (gloves, goggles).
3. **Mark the Spot**: Use a pencil or marker to indicate where the anchor will be installed. Ensure the location is free from cracks or edges to avoid weakening the material.
4. **Drill the Hole**: Attach the correct size masonry bit to the hammer drill. Drill a hole to the depth specified by the anchor manufacturer, usually slightly deeper than the anchor length. Keep the drill perpendicular to the surface.
5. **Clean the Hole**: Use a vacuum or brush to remove dust and debris from the hole to ensure a secure fit for the anchor.
6. **Insert the Anchor**: Place the anchor into the hole. For sleeve and expansion anchors, tap it gently with a hammer until it is flush with the surface. For wedge anchors, insert the anchor and tap it until the washer and nut are flush with the surface.
7. **Secure the Anchor**: Tighten the nut or screw using a wrench or screwdriver. For wedge anchors, tightening the nut will expand the anchor, securing it in place. For sleeve anchors, tightening the bolt will expand the sleeve against the hole walls.
8. **Check Stability**: Ensure the anchor is firmly in place by applying a slight pull or push. If it moves, it may need to be reinstalled or a larger anchor may be required.
Can anchors be removed and reused?
Yes, anchors can be removed and reused, but several factors must be considered to ensure their effectiveness and safety. The feasibility of reusing anchors depends on the type of anchor, the material it is made from, and the conditions under which it was used.
1. **Type of Anchor**: Different types of anchors, such as permanent, temporary, or removable anchors, have varying levels of reusability. Temporary and removable anchors are designed for reuse, while permanent anchors are typically not intended for removal.
2. **Material**: Anchors made from durable materials like stainless steel or galvanized steel are more likely to be reusable, as they resist corrosion and wear. However, they must be inspected for any signs of damage or degradation before reuse.
3. **Condition of Use**: The environment in which the anchor was used affects its reusability. Anchors used in harsh conditions, such as saltwater or corrosive environments, may suffer from corrosion or wear, reducing their lifespan and suitability for reuse.
4. **Inspection and Maintenance**: Before reusing an anchor, it should be thoroughly inspected for any signs of damage, such as bending, cracking, or corrosion. Regular maintenance, such as cleaning and lubrication, can extend the life of an anchor and ensure its safe reuse.
5. **Regulations and Standards**: Compliance with industry standards and regulations is crucial. Some industries have specific guidelines regarding the reuse of anchors to ensure safety and reliability.
6. **Installation and Removal**: Proper techniques must be used during the installation and removal of anchors to prevent damage. Incorrect handling can compromise the integrity of the anchor, making it unsuitable for reuse.
In summary, while anchors can be removed and reused, careful consideration of the type, material, condition, and compliance with safety standards is essential to ensure their continued effectiveness and safety.
What are the load capacities of different masonry anchors?
The load capacities of masonry anchors vary based on their type, size, and the material they are used in. Here are some common types of masonry anchors and their typical load capacities:
1. **Expansion Anchors**: These are suitable for concrete, brick, and block. Load capacities can range from 50 to 2,000 pounds, depending on the anchor size and the masonry material.
2. **Sleeve Anchors**: Used in concrete, brick, and block, sleeve anchors can support loads from 200 to 1,200 pounds. The load capacity depends on the diameter and length of the anchor.
3. **Wedge Anchors**: Ideal for solid concrete, wedge anchors offer high load capacities, typically ranging from 1,000 to 5,000 pounds. The specific capacity depends on the anchor's diameter and embedment depth.
4. **Drop-In Anchors**: These are used in solid concrete and have load capacities ranging from 500 to 2,000 pounds. The capacity is influenced by the anchor size and the depth of installation.
5. **Concrete Screws**: Suitable for concrete, brick, and block, concrete screws can handle loads from 200 to 1,200 pounds. The load capacity is determined by the screw diameter and length.
6. **Chemical Anchors**: These provide high load capacities, often exceeding 5,000 pounds, depending on the adhesive used, the anchor size, and the base material.
7. **Toggle Bolts**: Used in hollow block and brick, toggle bolts can support loads from 100 to 500 pounds, depending on the bolt size and the wall thickness.
8. **Plastic Anchors**: Suitable for light-duty applications in brick and block, plastic anchors typically support loads up to 50 pounds.
The actual load capacity can vary based on installation quality, environmental conditions, and specific product specifications. Always refer to manufacturer guidelines and conduct on-site testing for precise load capacity assessments.
How do I determine the correct size of pilot hole for an anchor?
To determine the correct size of a pilot hole for an anchor, follow these steps:
1. **Identify the Anchor Type**: Different anchors require different pilot hole sizes. Common types include plastic expansion anchors, toggle bolts, and sleeve anchors.
2. **Check Manufacturer's Instructions**: Always refer to the manufacturer's guidelines for the specific anchor you are using. They often provide recommended pilot hole sizes.
3. **Material Consideration**: The material into which you are drilling (e.g., drywall, concrete, wood) affects the pilot hole size. Softer materials may require smaller holes, while harder materials may need larger ones.
4. **Anchor Diameter**: As a general rule, the pilot hole should be slightly smaller than the anchor's diameter. For example, if using a 1/4-inch anchor, the pilot hole might be 3/16-inch.
5. **Test Fit**: If unsure, start with a smaller hole and test the fit. The anchor should fit snugly without excessive force. If it’s too tight, incrementally increase the hole size.
6. **Use a Drill Bit Guide**: Some drill bit sets come with a guide indicating which bit to use for different anchor sizes.
7. **Consider Anchor Length**: Ensure the pilot hole is deep enough to accommodate the full length of the anchor.
8. **Trial and Error**: If no guidelines are available, use trial and error. Start with a smaller hole and gradually increase until the anchor fits securely.
9. **Consult Experts**: If in doubt, consult with a hardware store expert or a professional for advice on the appropriate pilot hole size for your specific application.