Call +(254) 703 030 000 / 751 483 999 / 721 704 777
.....Read More

Frequently Asked Questions
What is a rocker switch and how does it work?
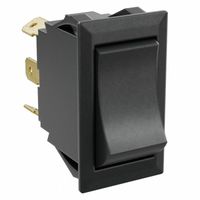
A rocker switch is an electrical on/off switch that rocks back and forth to open or close a circuit. It is commonly used in various electronic devices and appliances due to its simple operation and reliability. The switch typically consists of a plastic or metal housing, a pivoting actuator, and internal contacts.
When the actuator is pressed on one side, it rocks to connect the internal contacts, completing the circuit and allowing current to flow. Pressing the opposite side breaks the connection, interrupting the current and turning the device off. The rocking motion is facilitated by a pivot point, which allows the actuator to move smoothly between the on and off positions.
Rocker switches can be single-pole single-throw (SPST), single-pole double-throw (SPDT), double-pole single-throw (DPST), or double-pole double-throw (DPDT), depending on the number of circuits they control and the number of positions they have. They may also include additional features such as illumination, which indicates the switch's status, or a momentary action, where the switch returns to its original position when released.
These switches are favored for their ease of use, durability, and ability to handle various current ratings. They are commonly found in household appliances, automotive applications, and industrial equipment. The design of rocker switches can vary, with different shapes, sizes, and colors available to suit specific applications and aesthetic preferences.
How do you wire a rocker switch?
1. **Identify the Terminals**: Most rocker switches have three terminals: power (input), accessory (output), and ground. The power terminal connects to the power source, the accessory terminal connects to the device you want to control, and the ground terminal connects to the ground.
2. **Gather Materials**: You will need the rocker switch, wires, a wire stripper, connectors, and a screwdriver.
3. **Prepare the Wires**: Cut the wires to the necessary length. Strip about 1/4 inch of insulation from the ends of each wire using a wire stripper.
4. **Connect the Power Source**: Attach a wire from the power source (battery or power supply) to the power terminal on the switch. Use a connector to secure the wire to the terminal.
5. **Connect the Accessory**: Attach a wire from the accessory terminal on the switch to the device you want to control. Secure the connection with a connector.
6. **Connect the Ground**: Attach a wire from the ground terminal on the switch to a suitable ground point. This could be the vehicle chassis or a ground bus bar.
7. **Secure Connections**: Ensure all connections are tight and secure to prevent any loose connections that could cause malfunction.
8. **Test the Switch**: Once all connections are made, test the switch by turning it on and off to ensure it controls the device as intended.
9. **Mount the Switch**: Install the switch in its designated location, ensuring it is securely mounted and accessible.
10. **Safety Precautions**: Always disconnect the power source before starting the wiring process to prevent electric shock or short circuits. Use appropriate wire gauges for the current load and ensure all connections are insulated to prevent short circuits.
What is the difference between illuminated and non-illuminated rocker switches?
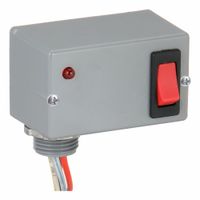
Illuminated rocker switches have built-in lights, typically LEDs or neon bulbs, that glow when the switch is in the "on" position or when power is supplied. This illumination provides a visual indication of the switch's status, making it easier to identify whether the connected device or circuit is active, especially in low-light conditions. The illumination can also serve as a design feature, adding aesthetic appeal to the device or panel where the switch is installed.
Non-illuminated rocker switches, on the other hand, do not have any built-in lighting. They perform the basic function of opening or closing a circuit without providing any visual indication of their status. These switches are often used in applications where the status of the switch is either obvious or not critical, or where illumination is not necessary or desired.
The choice between illuminated and non-illuminated rocker switches depends on the specific application requirements. Illuminated switches are beneficial in environments where visibility is crucial, such as in automotive dashboards, control panels, or consumer electronics. Non-illuminated switches are typically used in simpler applications where cost, simplicity, or aesthetics are prioritized over the need for visual feedback.
How do you troubleshoot a rocker switch that isn't working?
1. **Safety First**: Turn off the power supply to the switch at the circuit breaker to prevent electrical shock.
2. **Visual Inspection**: Check the switch for any visible damage, such as cracks, burns, or melted areas. Ensure the switch is properly mounted and not loose.
3. **Test the Load**: Verify that the device or appliance controlled by the switch is functional by connecting it to a different power source.
4. **Check Connections**: Remove the switch cover and inspect the wiring. Ensure all wires are securely connected to the switch terminals. Look for any signs of corrosion or loose connections.
5. **Use a Multimeter**:
- Set the multimeter to the continuity or resistance setting.
- Disconnect the wires from the switch.
- Test the switch by placing the multimeter probes on the switch terminals.
- Toggle the switch on and off. A working switch should show continuity (low resistance) when on and no continuity (infinite resistance) when off.
6. **Inspect the Circuit**: If the switch is functional, check the circuit for issues. Inspect the wiring for breaks or damage. Ensure the circuit breaker or fuse is not tripped or blown.
7. **Replace the Switch**: If the switch fails the multimeter test, replace it with a new one of the same type and rating.
8. **Reassemble and Test**: Reconnect the wires, ensuring they are tight and secure. Reattach the switch cover, restore power, and test the switch operation.
9. **Consult a Professional**: If the problem persists, consider consulting a licensed electrician to diagnose and fix the issue.
What are the common applications for rocker switches?
Rocker switches are widely used in various applications due to their simple operation and reliability. Common applications include:
1. **Home Appliances**: Rocker switches are frequently found in household appliances such as coffee makers, toasters, and vacuum cleaners, where they control the power supply.
2. **Automotive Industry**: In vehicles, rocker switches are used for controlling lights, windshield wipers, and other electronic systems. They are favored for their durability and ease of use.
3. **Industrial Equipment**: These switches are used in industrial machinery for controlling power to motors, pumps, and other equipment. Their robust design makes them suitable for harsh environments.
4. **Consumer Electronics**: Devices like computer power supplies, audio equipment, and televisions often use rocker switches for power control due to their compact size and reliability.
5. **Marine Applications**: Rocker switches are used in boats for controlling lighting, bilge pumps, and other electrical systems. They are often designed to be water-resistant for marine environments.
6. **Medical Equipment**: In medical devices, rocker switches are used for their reliability and ease of operation, ensuring quick and efficient control of equipment.
7. **Lighting Systems**: Rocker switches are commonly used in residential and commercial lighting systems for turning lights on and off, offering a simple and effective control mechanism.
8. **Power Tools**: Many power tools incorporate rocker switches to control the operation of the tool, providing a straightforward on/off mechanism.
9. **Telecommunications**: In telecommunications equipment, rocker switches are used for power control and signal routing, valued for their reliability and ease of use.
10. **Aerospace**: Rocker switches are used in aircraft for controlling various systems, chosen for their reliability and ability to withstand extreme conditions.
These applications highlight the versatility and widespread use of rocker switches across different industries and environments.
How do you install a prewired rocker switch?
1. **Safety First**: Disconnect the power source to prevent electrical shock. This may involve unplugging the device or turning off the circuit breaker.
2. **Gather Tools and Materials**: You will need a screwdriver, wire strippers, electrical tape, and possibly a drill if a new mounting hole is required.
3. **Identify Wires**: Prewired rocker switches typically have three wires: power (input), load (output), and ground. The power wire connects to the power source, the load wire connects to the device being controlled, and the ground wire connects to the grounding system.
4. **Prepare the Mounting Location**: If the switch is replacing an existing one, remove the old switch. If installing a new switch, drill a hole in the desired location that matches the size of the switch.
5. **Connect Wires**:
- Strip the ends of the wires if necessary.
- Connect the power wire from the switch to the power source wire using wire connectors.
- Connect the load wire from the switch to the device's power wire.
- Connect the ground wire to the grounding system or a grounded metal part.
6. **Secure Connections**: Use electrical tape to cover wire connectors for added safety and to prevent short circuits.
7. **Mount the Switch**: Insert the switch into the mounting hole and secure it using screws or clips provided with the switch.
8. **Test the Switch**: Restore power and test the switch to ensure it operates correctly. The device should turn on and off as the switch is toggled.
9. **Final Check**: Ensure all connections are secure and the switch is firmly mounted. Make any necessary adjustments.
10. **Close Up**: If applicable, replace any covers or panels that were removed during installation.
What are the advantages of using a rocker switch over other types of switches?
Rocker switches offer several advantages over other types of switches:
1. **Ease of Use**: Rocker switches are simple to operate, requiring just a light press to toggle between on and off positions. This makes them user-friendly, especially for individuals with limited dexterity.
2. **Visual and Tactile Feedback**: The distinct rocking motion provides clear tactile feedback, and the switch's position is easily visible, reducing the likelihood of accidental activation or deactivation.
3. **Durability**: Rocker switches are robust and can withstand frequent use. Their design minimizes the exposure of internal components to dust and debris, enhancing longevity.
4. **Design Versatility**: Available in various sizes, shapes, and colors, rocker switches can be customized to fit different design aesthetics and functional requirements, making them suitable for a wide range of applications.
5. **Space Efficiency**: Their compact design allows for efficient use of space on control panels and devices, which is beneficial in applications with limited room.
6. **Safety**: Many rocker switches are designed with safety features such as illuminated indicators to show the switch status, reducing the risk of electrical hazards.
7. **Cost-Effectiveness**: Generally, rocker switches are cost-effective, offering a balance between performance and price, which is advantageous for both manufacturers and consumers.
8. **Versatile Applications**: They are used in various applications, from household appliances to industrial machinery, due to their reliability and ease of integration.
9. **Low Maintenance**: The simple mechanism of rocker switches requires minimal maintenance, reducing downtime and associated costs.
10. **Water and Dust Resistance**: Many rocker switches are available with IP ratings, providing protection against water and dust, making them suitable for harsh environments.
These advantages make rocker switches a popular choice in many industries and applications.