Call +(254) 703 030 000 / 751 483 999 / 721 704 777
.....Read More

Frequently Asked Questions
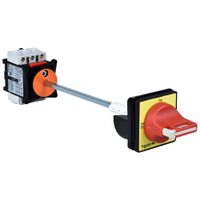
What is a disconnect switch and how does it work?
A disconnect switch, also known as an isolator switch, is an electrical device used to ensure that an electrical circuit is completely de-energized for service or maintenance. It provides a visible break in the circuit, ensuring safety by preventing accidental energization. Disconnect switches are commonly used in industrial and commercial settings, as well as in residential applications.
The primary function of a disconnect switch is to isolate a section of a circuit, allowing for safe inspection, maintenance, or repair. It is typically used in conjunction with circuit breakers or fuses, which provide overcurrent protection. Disconnect switches are designed to handle high voltages and currents, and they are often rated for specific applications, such as indoor or outdoor use.
Disconnect switches can be operated manually or automatically. Manual disconnect switches require a physical action, such as turning a handle or lever, to open or close the circuit. Automatic disconnect switches, on the other hand, can be controlled remotely or programmed to operate under specific conditions, such as during a power outage or fault.
The operation of a disconnect switch involves opening or closing contacts within the switch. When the switch is in the "open" position, the contacts are separated, breaking the circuit and stopping the flow of electricity. In the "closed" position, the contacts are connected, allowing electricity to flow through the circuit.
Disconnect switches are crucial for ensuring the safety of personnel working on electrical systems and for protecting equipment from damage due to electrical faults. They are an essential component of electrical safety protocols, providing a reliable means of isolating electrical circuits.
How do I choose the right safety switch kit for my application?
1. **Identify Application Requirements**: Determine the specific needs of your application, including the type of equipment, voltage, current, and environmental conditions.
2. **Understand Safety Standards**: Familiarize yourself with relevant safety standards and regulations, such as OSHA, NEC, or IEC, to ensure compliance.
3. **Select the Type of Safety Switch**: Choose between fusible or non-fusible switches based on whether overcurrent protection is needed. Consider disconnect switches for simple on/off control.
4. **Determine Voltage and Current Ratings**: Ensure the switch can handle the maximum voltage and current of your application. Check for AC or DC compatibility.
5. **Consider Environmental Conditions**: Choose a switch with the appropriate NEMA or IP rating for protection against dust, water, and other environmental factors.
6. **Evaluate Enclosure Material**: Select an enclosure material suitable for the environment, such as stainless steel for corrosive areas or plastic for non-corrosive, indoor use.
7. **Check for Additional Features**: Look for features like lockout/tagout capabilities, auxiliary contacts, or visible blade design for enhanced safety and functionality.
8. **Size and Space Constraints**: Ensure the switch fits within the available space and meets any size restrictions.
9. **Manufacturer Reputation and Support**: Choose a reputable manufacturer known for quality and reliability. Consider the availability of technical support and warranty.
10. **Cost and Budget**: Balance the cost with the required features and quality to ensure value for money.
11. **Consult with Experts**: If unsure, consult with electrical engineers or safety professionals to ensure the right choice for your specific application.
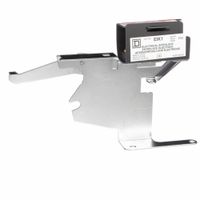
What are the benefits of using flange-mounted safety switch assemblies?
Flange-mounted safety switch assemblies offer several benefits:
1. **Space Efficiency**: These assemblies are designed to be mounted on the flange of an enclosure, saving valuable space inside the cabinet. This is particularly beneficial in compact or crowded environments.
2. **Enhanced Safety**: By positioning the switch externally, operators can quickly and easily access the switch to disconnect power, reducing the risk of electrical accidents during maintenance or emergencies.
3. **Ease of Installation**: Flange-mounted designs simplify installation by reducing the need for additional internal components and wiring, leading to quicker setup and reduced labor costs.
4. **Improved Accessibility**: The external mounting allows for easy access to the switch without opening the enclosure, facilitating faster operation and maintenance.
5. **Versatility**: These assemblies can be used in a variety of applications and environments, including industrial, commercial, and utility settings, due to their robust design and adaptability.
6. **Durability**: Typically constructed from high-quality materials, flange-mounted safety switches are designed to withstand harsh environmental conditions, ensuring long-term reliability and performance.
7. **Compliance and Standards**: Many flange-mounted safety switch assemblies meet industry standards and regulations, ensuring compliance with safety and operational guidelines.
8. **Reduced Downtime**: Quick access and easy operation help minimize downtime during maintenance or emergency shutdowns, enhancing overall productivity.
9. **Customization Options**: Available in various configurations and ratings, these assemblies can be tailored to meet specific application requirements, offering flexibility in design and functionality.
10. **Aesthetic Integration**: The external mounting can be designed to blend seamlessly with the enclosure, maintaining a clean and professional appearance.
Overall, flange-mounted safety switch assemblies provide a practical, efficient, and safe solution for managing electrical disconnection needs in various settings.
How do grounding and neutral assembly kits enhance electrical safety?
Grounding and neutral assembly kits enhance electrical safety by providing a reliable path for fault currents and stabilizing voltage levels. Grounding ensures that any excess electrical charge is safely dissipated into the earth, preventing electrical shock hazards and reducing the risk of fire. It acts as a safeguard by directing fault currents away from users and sensitive equipment, minimizing the potential for electric shock.
Neutral assembly kits help maintain a balanced electrical system by providing a return path for current. This balance is crucial for the proper functioning of electrical systems, as it ensures that voltage levels remain stable and within safe limits. By maintaining this balance, neutral assemblies prevent overloading and overheating of electrical circuits, which can lead to equipment damage or fire.
Together, grounding and neutral assemblies protect against transient voltages and electrical surges, which can occur due to lightning strikes or power line disturbances. By safely channeling these surges away from critical components, they prevent damage to electrical devices and infrastructure.
Moreover, grounding and neutral systems are essential for the operation of circuit protection devices like fuses and circuit breakers. These devices rely on a proper grounding system to detect fault conditions and interrupt the flow of electricity, thereby preventing potential hazards.
In summary, grounding and neutral assembly kits are vital for electrical safety as they provide a controlled path for fault currents, stabilize voltage levels, protect against surges, and ensure the effective operation of protective devices, thereby reducing the risk of electrical shock, equipment damage, and fire.
What is the purpose of a disconnect switch interlock kit?
A disconnect switch interlock kit is designed to enhance safety and operational efficiency in electrical systems. Its primary purpose is to prevent the simultaneous connection of multiple power sources, such as utility power and backup generators, to a single electrical load. This is crucial to avoid backfeeding, which can lead to equipment damage, electrical fires, or even pose a risk to utility workers.
The interlock kit ensures that only one power source can be connected at a time by mechanically or electrically linking the operation of two or more switches. When one switch is in the "on" position, the interlock prevents the other switch from being turned on. This mechanical or electrical barrier ensures that the transfer of power sources is done safely and without human error.
In residential and commercial settings, interlock kits are often used in conjunction with manual transfer switches. They provide a cost-effective and straightforward solution for safely switching between grid power and a generator during outages. By using an interlock kit, users can avoid the need for more complex and expensive automatic transfer switches while still maintaining a high level of safety.
Additionally, interlock kits are designed to comply with electrical codes and standards, ensuring that installations meet regulatory requirements. They are typically easy to install and can be retrofitted to existing systems, making them a versatile option for enhancing electrical safety.
Overall, the purpose of a disconnect switch interlock kit is to provide a reliable, safe, and code-compliant method for managing multiple power sources, thereby protecting both the electrical system and its users.
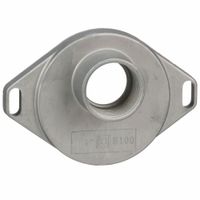
How do I install a disconnect switch enclosure hub?
1. **Safety First**: Turn off the main power supply to ensure safety while working.
2. **Select Location**: Choose an appropriate location for the disconnect switch enclosure, ensuring it is easily accessible and complies with local electrical codes.
3. **Prepare Tools and Materials**: Gather necessary tools such as a drill, screwdriver, wrench, and the disconnect switch enclosure hub.
4. **Mark the Mounting Holes**: Position the enclosure on the wall and mark the locations for the mounting holes.
5. **Drill Holes**: Drill holes at the marked locations for mounting the enclosure.
6. **Install the Enclosure**: Secure the enclosure to the wall using appropriate screws or bolts, ensuring it is level and firmly attached.
7. **Install the Hub**:
- Remove the knockout on the top or side of the enclosure where the hub will be installed.
- Attach the hub to the enclosure by inserting it into the knockout hole.
- Secure the hub with a locknut from inside the enclosure, tightening it with a wrench.
8. **Connect Conduit**:
- Attach the conduit to the hub, ensuring a secure fit.
- Use conduit connectors if necessary to ensure a tight and safe connection.
9. **Wire the Disconnect Switch**:
- Run the electrical wires through the conduit into the enclosure.
- Connect the wires to the disconnect switch according to the wiring diagram provided by the manufacturer.
- Ensure all connections are tight and secure.
10. **Test the Installation**:
- Double-check all connections and ensure the enclosure is properly sealed.
- Restore power and test the disconnect switch to ensure it operates correctly.
11. **Final Inspection**: Conduct a final inspection to ensure compliance with local electrical codes and safety standards.
What are the differences between various types of disconnect switch fuse kits?
Disconnect switch fuse kits vary based on several factors:
1. **Voltage Rating**: Kits are designed for specific voltage levels, such as low, medium, or high voltage applications. This determines their suitability for different electrical systems.
2. **Current Rating**: The current rating indicates the maximum current the switch can handle. Kits are available for various current levels to match the requirements of the electrical circuit.
3. **Fuse Type**: Different kits use different types of fuses, such as blade, cartridge, or HRC (High Rupturing Capacity) fuses. The choice depends on the application and the level of protection needed.
4. **Mounting Style**: Kits can be designed for different mounting styles, such as panel-mounted, DIN rail-mounted, or wall-mounted, affecting installation and space requirements.
5. **Operation Mechanism**: Some kits have manual operation, while others may include motorized or remote operation for convenience and safety in inaccessible or hazardous areas.
6. **Enclosure Type**: The enclosure can vary in terms of material (metal, plastic) and protection level (IP rating), which determines the kit's suitability for indoor or outdoor use and its resistance to environmental factors.
7. **Number of Poles**: Kits can be single-pole, double-pole, or multi-pole, depending on the number of circuits they can disconnect simultaneously.
8. **Safety Features**: Some kits include additional safety features like interlocks, padlocking provisions, or visible blade technology to enhance safety during maintenance.
9. **Compliance and Standards**: Kits may comply with different international standards (e.g., IEC, ANSI) and certifications, ensuring they meet specific safety and performance criteria.
10. **Application Specificity**: Certain kits are designed for specific applications, such as photovoltaic systems, motor circuits, or general industrial use, influencing their design and features.