Call +(254) 703 030 000 / 751 483 999 / 721 704 777
.....Read More
Frequently Asked Questions
What are the different types of terminal blocks for DIN rail mounting?
1. **Screw Terminal Blocks**: These use screws to secure the wire, providing a reliable connection. They are versatile and suitable for various wire sizes.
2. **Spring Clamp Terminal Blocks**: These use a spring mechanism to hold the wire in place. They offer quick and easy installation without the need for tools.
3. **Push-in Terminal Blocks**: Similar to spring clamp, these allow direct insertion of wires without tools. They are designed for solid or ferruled wires.
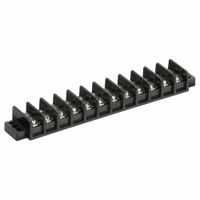
4. **Barrier Terminal Blocks**: These have partitions between terminals to prevent short circuits and are ideal for high-voltage applications.
5. **Pluggable Terminal Blocks**: These consist of a plug and socket design, allowing for easy disconnection and reconnection of circuits.
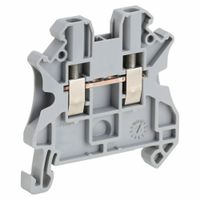
6. **Feed-through Terminal Blocks**: These are used to connect two wires together, allowing current to pass through.
7. **Ground Terminal Blocks**: Specifically designed for grounding applications, they ensure safety by providing a secure ground connection.
8. **Fuse Terminal Blocks**: These include a built-in fuse holder, providing circuit protection by breaking the circuit in case of overload.
9. **Sensor/Actuator Terminal Blocks**: Designed for connecting sensors and actuators, they often include features for signal conditioning.
10. **Multi-level Terminal Blocks**: These have multiple levels of connections in a single block, saving space and organizing complex wiring.
11. **Disconnect Terminal Blocks**: These allow for easy disconnection of circuits without removing the wiring, useful for testing and maintenance.
12. **Diode and LED Terminal Blocks**: These integrate diodes or LEDs for circuit protection or indication purposes.
13. **High-Current Terminal Blocks**: Designed to handle high current loads, they are robust and often have larger connection points.
14. **Thermocouple Terminal Blocks**: Specifically for thermocouple connections, ensuring accurate temperature readings by maintaining the integrity of the thermocouple circuit.
How do you install terminal blocks on a DIN rail?
1. **Select the Terminal Blocks**: Choose the appropriate terminal blocks based on the electrical requirements, such as current rating, voltage, and wire size.
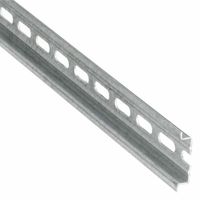
2. **Prepare the DIN Rail**: Ensure the DIN rail is securely mounted in the control panel or enclosure. It should be clean and free of any obstructions.
3. **Align the Terminal Block**: Hold the terminal block at an angle to the DIN rail. The bottom of the terminal block should have a spring-loaded clip or a similar mechanism.
4. **Engage the Clip**: Hook the bottom of the terminal block onto the edge of the DIN rail. The clip should catch the rail's lip.
5. **Snap into Place**: Rotate the terminal block towards the DIN rail until it snaps into place. You should hear a click, indicating it is securely attached.
6. **Check Stability**: Gently tug on the terminal block to ensure it is firmly attached and does not move along the rail.
7. **Repeat for Additional Blocks**: If installing multiple terminal blocks, repeat the process, ensuring each block is securely attached and aligned properly.
8. **Connect Wires**: Insert the wires into the terminal block's connection points. Use a screwdriver to tighten the screws or clamps, ensuring a secure connection.
9. **Label the Blocks**: Use labels or markers to identify each terminal block for easy reference during maintenance or troubleshooting.
10. **Inspect Installation**: Double-check all connections and ensure the terminal blocks are properly aligned and secured on the DIN rail.
11. **Test the System**: Power up the system and test the connections to ensure everything is functioning correctly.
What are the benefits of using terminal blocks in electrical enclosures?
Terminal blocks offer several benefits in electrical enclosures:
1. **Organization**: They provide a neat and organized way to connect wires, reducing clutter and making it easier to manage complex wiring systems.
2. **Safety**: Terminal blocks ensure secure connections, minimizing the risk of short circuits and electrical fires. They often include features like insulation and protective covers.
3. **Ease of Maintenance**: They allow for easy disconnection and reconnection of wires, facilitating maintenance and troubleshooting without disturbing the entire system.
4. **Flexibility**: Terminal blocks can accommodate various wire sizes and types, offering versatility in different applications and environments.
5. **Scalability**: They enable easy expansion of electrical systems by allowing additional connections without significant reconfiguration.
6. **Reliability**: Terminal blocks provide stable and durable connections, reducing the likelihood of connection failures over time.
7. **Time-Saving**: They simplify the wiring process, reducing installation time and labor costs.
8. **Space Efficiency**: Compact designs of terminal blocks help in maximizing space within enclosures, allowing for more components to be housed in a limited area.
9. **Standardization**: Terminal blocks often conform to industry standards, ensuring compatibility and interoperability with other components and systems.
10. **Cost-Effectiveness**: By reducing installation time, maintenance, and potential downtime, terminal blocks can lead to cost savings over the lifecycle of the electrical system.
How do you choose the right terminal block for your application?
1. **Current and Voltage Ratings**: Ensure the terminal block can handle the maximum current and voltage of your application. Check the specifications for safety margins.
2. **Wire Size and Type**: Match the terminal block to the wire gauge and type (solid or stranded) you are using. Ensure compatibility for secure connections.
3. **Number of Connections**: Determine the number of connections needed. Choose a terminal block with the appropriate number of poles or positions.
4. **Mounting Style**: Decide on the mounting style—DIN rail, panel mount, or PCB mount—based on your application’s requirements and space constraints.
5. **Connection Method**: Select the connection method (screw, spring clamp, push-in) that suits your application’s ease of use, reliability, and maintenance needs.
6. **Environmental Conditions**: Consider the operating environment. Choose materials and designs that withstand temperature extremes, humidity, vibration, and corrosive conditions.
7. **Safety and Compliance**: Ensure the terminal block meets relevant industry standards and certifications (e.g., UL, IEC) for safety and performance.
8. **Material and Durability**: Opt for high-quality materials like copper or brass for conductivity and durable plastics for insulation.
9. **Space and Layout**: Evaluate the physical space available and choose a compact design if necessary. Consider the layout for easy access and maintenance.
10. **Cost and Availability**: Balance cost with quality and availability. Ensure the terminal block is readily available for future maintenance or expansion.
11. **Manufacturer Support**: Choose reputable manufacturers that offer technical support and documentation for installation and troubleshooting.
12. **Special Features**: Consider additional features like color coding, marking options, or integrated test points for easier identification and testing.
What accessories are available for terminal blocks to enhance functionality?
Accessories for terminal blocks enhance their functionality, safety, and ease of use. Key accessories include:
1. **End Covers**: These are used to cover the open sides of terminal blocks, providing insulation and protection against accidental contact.
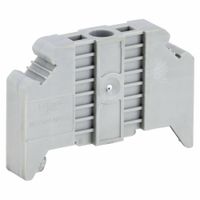
2. **End Brackets/Stops**: These secure terminal blocks on the DIN rail, preventing movement and maintaining alignment.
3. **Jumpers/Bridges**: These allow for the electrical connection of multiple terminal blocks, facilitating parallel connections without additional wiring.
4. **Marking Systems**: Labels, tags, or markers are used for identifying terminal blocks, wires, and connections, aiding in organization and maintenance.
5. **Test Plugs**: These enable easy testing and measurement of electrical parameters without disconnecting the wiring.
6. **Partition Plates**: These provide physical separation between terminal blocks, enhancing safety and preventing short circuits.
7. **Fuse Holders**: Integrated into terminal blocks, these allow for the inclusion of fuses, providing circuit protection.
8. **Diode and LED Modules**: These can be added for functions like reverse polarity protection or status indication.
9. **Sensor and Actuator Interfaces**: These facilitate the connection of sensors and actuators directly to the terminal blocks.
10. **Grounding Terminals**: These provide a secure connection to the ground, ensuring safety and compliance with electrical standards.
11. **Wire Ferrules**: These are used to terminate stranded wires, providing a secure and reliable connection to the terminal block.
12. **Retaining Clips**: These hold wires in place, preventing accidental disconnection.
13. **Insulating Barriers**: These enhance safety by providing additional insulation between adjacent terminal blocks.
14. **Mounting Adapters**: These allow terminal blocks to be mounted on different types of rails or surfaces.
These accessories collectively improve the functionality, safety, and efficiency of terminal block systems in various applications.
How do you ensure proper grounding with terminal blocks?
To ensure proper grounding with terminal blocks, follow these steps:
1. **Select the Right Terminal Block**: Choose terminal blocks specifically designed for grounding applications. These blocks often have a green or yellow color to indicate their purpose.
2. **Use Appropriate Conductors**: Use conductors with the correct gauge and material (usually copper) to ensure efficient grounding. The conductor should be capable of handling the expected fault current.
3. **Secure Connections**: Ensure that all connections are tight and secure. Loose connections can lead to increased resistance and potential failure. Use a torque wrench to apply the manufacturer's recommended torque settings.
4. **Clean Contact Surfaces**: Ensure that all contact surfaces are clean and free from corrosion or oxidation. This can be achieved by lightly sanding or using a contact cleaner.
5. **Proper Installation**: Install the terminal block on a conductive surface that is properly grounded. The mounting surface should be clean and free of paint or other insulating materials.
6. **Use Grounding Accessories**: Utilize grounding accessories such as grounding bars or plates to enhance the grounding system's reliability.
7. **Regular Inspection and Maintenance**: Periodically inspect the grounding connections for signs of wear, corrosion, or loosening. Perform maintenance as needed to ensure continued effectiveness.
8. **Compliance with Standards**: Follow relevant electrical codes and standards, such as the National Electrical Code (NEC) or International Electrotechnical Commission (IEC) standards, to ensure compliance and safety.
9. **Testing**: Conduct regular testing using a ground resistance tester to verify the effectiveness of the grounding system. Ensure that the resistance is within acceptable limits.
10. **Documentation**: Keep detailed records of the grounding system, including installation details, testing results, and maintenance activities, to ensure traceability and accountability.
What are the common troubleshooting steps for issues with terminal blocks?
1. **Visual Inspection**: Check for physical damage, corrosion, or signs of overheating. Ensure all connections are secure and that there are no loose wires.
2. **Tighten Connections**: Use a screwdriver to tighten any loose screws or clamps. Ensure that wires are properly inserted and secured.
3. **Check for Corrosion**: Look for any signs of rust or corrosion on the terminal block and clean it using a contact cleaner or a wire brush.
4. **Test for Continuity**: Use a multimeter to check for continuity across the terminal block. This will help identify any breaks or faults in the connection.
5. **Inspect Wiring**: Ensure that the wires are not frayed or damaged. Replace any damaged wires and ensure they are of the correct gauge for the terminal block.
6. **Verify Correct Installation**: Ensure that the terminal block is installed according to the manufacturer's specifications and that it is suitable for the application.
7. **Check for Overloading**: Ensure that the terminal block is not overloaded beyond its rated capacity, which can cause overheating and failure.
8. **Examine Environmental Conditions**: Ensure that the terminal block is not exposed to extreme temperatures, moisture, or chemicals that could affect its performance.
9. **Replace Faulty Components**: If any part of the terminal block is damaged beyond repair, replace it with a new one that meets the required specifications.
10. **Consult Documentation**: Refer to the terminal block's manual or datasheet for specific troubleshooting tips and ensure compliance with all safety standards.
11. **Professional Assistance**: If the issue persists, consult a professional electrician or technician for further diagnosis and repair.