Call +(254) 703 030 000 / 751 483 999 / 721 704 777
.....Read More
Frequently Asked Questions
What are electrical floor boxes used for?
Electrical floor boxes are used to provide convenient access to power, data, and communication connections in areas where wall outlets are impractical or aesthetically undesirable. They are typically installed in floors of commercial, residential, and industrial buildings to support a variety of applications.
In office environments, floor boxes are essential for powering workstations, computers, and other office equipment without the need for unsightly extension cords. They help maintain a clean and organized workspace by allowing cables to be routed neatly under desks or conference tables.
In residential settings, floor boxes are often used in living rooms, home offices, or entertainment areas to provide power for lamps, televisions, and other electronic devices. This setup minimizes tripping hazards and keeps the space tidy.
In commercial spaces like retail stores, showrooms, and airports, floor boxes are crucial for powering displays, kiosks, and point-of-sale systems. They enable flexible space configurations and can be easily relocated to accommodate changing layouts.
Floor boxes are also used in educational institutions, such as classrooms and lecture halls, to provide power and data connections for projectors, computers, and other teaching aids. This ensures that technology is seamlessly integrated into the learning environment.
In industrial settings, floor boxes are used to supply power to machinery and equipment on the factory floor, facilitating efficient operations and reducing downtime.
Overall, electrical floor boxes enhance functionality, safety, and aesthetics by providing accessible and organized power and data connections in various environments. They are available in different sizes, shapes, and configurations to suit specific needs and can be customized with various cover finishes to blend with the surrounding decor.
How do you install an electrical floor box?
1. **Plan and Layout**: Determine the location for the floor box, ensuring it aligns with furniture placement and electrical needs. Check for obstructions below the floor.
2. **Select the Box**: Choose a floor box suitable for the floor type (wood, concrete, etc.) and the number of outlets needed.
3. **Turn Off Power**: Switch off the power at the circuit breaker to ensure safety.
4. **Mark the Location**: Use the floor box template to mark the cutout area on the floor.
5. **Cut the Opening**: Use a jigsaw or hole saw to cut the marked area. Ensure the cut is precise to fit the box snugly.
6. **Prepare Wiring**: Run electrical cable from the power source to the floor box location. Ensure the cable is long enough to reach the box comfortably.
7. **Install the Box**: Insert the floor box into the cutout. Secure it according to the manufacturer's instructions, typically using screws or clamps.
8. **Connect Wiring**: Strip the insulation from the wires and connect them to the terminals in the box. Typically, black wires connect to brass screws, white wires to silver screws, and green or bare wires to the ground screw.
9. **Secure the Cover**: Attach the cover plate to the floor box, ensuring it is flush with the floor surface.
10. **Test the Installation**: Restore power at the circuit breaker and test the outlets with a voltage tester to ensure proper installation.
11. **Finish**: If necessary, adjust the cover to ensure it is level with the floor and secure any loose components.
12. **Clean Up**: Remove any debris and ensure the area is tidy.
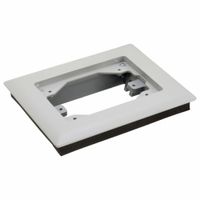
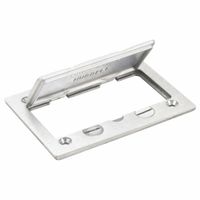
What types of floor box covers are available?
Floor box covers come in various types to accommodate different needs and preferences. Here are some common types:
1. **Flush Covers**: These are designed to sit flush with the floor surface, providing a seamless look. They are ideal for areas where aesthetics are important.
2. **Carpet Covers**: Specifically designed for carpeted floors, these covers have a flange that allows the carpet to be tucked under, ensuring a neat appearance.
3. **Tile Covers**: These are used in tiled areas and are designed to blend in with the tile pattern, often allowing for tile inserts to match the surrounding floor.
4. **Wood Covers**: Made to match wooden floors, these covers can be stained or finished to blend with the wood flooring.
5. **Metal Covers**: Typically made from brass, stainless steel, or aluminum, these are durable and often used in commercial settings. They can be polished or brushed for different finishes.
6. **Plastic Covers**: Lightweight and cost-effective, plastic covers are often used in residential settings. They come in various colors to match different decors.
7. **Pop-Up Covers**: These covers have a mechanism that allows outlets to pop up when needed and retract when not in use, providing a clean look.
8. **Hinged Covers**: These have a hinged lid that can be opened to access the outlets, offering convenience and protection.
9. **Waterproof Covers**: Designed for areas prone to moisture, these covers provide a seal to protect the outlets from water damage.
10. **Adjustable Covers**: These can be adjusted to different heights, making them versatile for various floor thicknesses.
Each type of floor box cover is designed to meet specific functional and aesthetic requirements, ensuring safety and convenience in both residential and commercial environments.
How do you choose the right floor box for your needs?
To choose the right floor box for your needs, consider the following factors:
1. **Location and Environment**: Determine where the floor box will be installed. For indoor use, standard floor boxes suffice, but for outdoor or wet environments, choose weatherproof or waterproof models.
2. **Type of Flooring**: The floor box should be compatible with the flooring type, whether it's concrete, wood, carpet, or tile. Some boxes are designed specifically for certain floor types.
3. **Capacity and Size**: Assess the number and type of connections needed, such as power, data, or AV. Choose a box with adequate capacity to accommodate current and future needs.
4. **Load Rating**: Ensure the floor box can withstand the expected foot traffic and weight. Heavy-duty boxes are necessary for high-traffic areas.
5. **Aesthetic and Design**: Consider the appearance and finish of the floor box to ensure it blends with the surrounding decor. Options include brass, stainless steel, or plastic covers.
6. **Ease of Installation**: Some floor boxes are easier to install than others. Consider whether you need a model that can be installed by a DIY enthusiast or if professional installation is required.
7. **Accessibility and Safety**: Ensure the box is easily accessible and safe to use, with features like flush-mounted covers and tamper-resistant outlets.
8. **Compliance and Standards**: Verify that the floor box meets local electrical codes and standards for safety and performance.
9. **Budget**: Balance your needs with your budget, considering both the initial cost and long-term value.
10. **Brand and Warranty**: Choose reputable brands that offer warranties and customer support for peace of mind.
By evaluating these factors, you can select a floor box that meets your functional, aesthetic, and budgetary requirements.
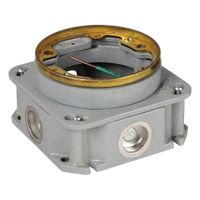
Can electrical floor boxes be installed in concrete floors?
Yes, electrical floor boxes can be installed in concrete floors. These boxes are designed to provide convenient access to power and data connections in areas where wall outlets are not practical. The installation process involves several key steps:
1. **Planning and Design**: Before installation, a detailed plan is necessary to determine the location and number of floor boxes required. Consider the layout of the room, furniture placement, and the specific needs for power and data access.
2. **Selection of Floor Boxes**: Choose floor boxes that are specifically designed for concrete floors. These boxes are typically made of durable materials like metal or heavy-duty plastic to withstand the rigors of a concrete environment.
3. **Concrete Cutting**: Once the locations are marked, the concrete floor is cut to create openings for the boxes. This requires precision to ensure the boxes fit correctly and are level with the floor surface.
4. **Installation of Boxes**: The floor boxes are then placed into the cut openings. They are secured in place using concrete anchors or other appropriate fasteners. It is crucial to ensure that the boxes are flush with the floor to prevent tripping hazards.
5. **Wiring**: Electrical and data cables are run through conduits to the floor boxes. This step must comply with local electrical codes and standards to ensure safety and functionality.
6. **Sealing and Finishing**: After the boxes are installed and wired, the surrounding concrete is patched and sealed. This step ensures a smooth, finished appearance and prevents moisture or debris from entering the boxes.
7. **Testing**: Finally, the connections are tested to ensure that power and data are functioning correctly.
Proper installation of electrical floor boxes in concrete floors enhances accessibility and convenience while maintaining safety and aesthetics.
How do you maintain and clean floor box covers?
To maintain and clean floor box covers, follow these steps:
1. **Regular Inspection**: Periodically check floor box covers for any signs of wear, damage, or dirt accumulation. This helps in identifying issues early.
2. **Dusting**: Use a soft, dry cloth or a vacuum with a brush attachment to remove dust and debris from the surface and edges of the cover. This prevents dirt from entering the box.
3. **Cleaning**: For deeper cleaning, use a damp cloth with mild soap and water. Avoid using harsh chemicals or abrasive materials that can damage the cover's finish. Ensure the cloth is not too wet to prevent moisture from seeping into the box.
4. **Drying**: After cleaning, thoroughly dry the cover with a clean, dry cloth to prevent moisture-related issues like rust or corrosion.
5. **Lubrication**: If the cover has hinges or moving parts, apply a small amount of lubricant to ensure smooth operation. Use a lubricant suitable for metal or plastic, depending on the material of the cover.
6. **Tightening**: Check and tighten any screws or fasteners to ensure the cover is securely attached. Loose covers can lead to accidents or damage.
7. **Replacement**: If the cover is damaged beyond repair, replace it promptly to maintain safety and functionality.
8. **Preventive Measures**: Place mats or rugs over high-traffic areas to reduce wear and tear. Ensure that heavy furniture or equipment is not placed directly on the covers to avoid damage.
9. **Professional Maintenance**: For complex or large installations, consider hiring professionals for periodic maintenance to ensure all components are in optimal condition.
By following these steps, you can ensure that floor box covers remain clean, functional, and safe for use.
What accessories are available for electrical floor boxes?
Accessories for electrical floor boxes include:
1. **Cover Plates**: Available in various materials like brass, stainless steel, and plastic, these cover plates protect the outlets and blend with the floor decor.
2. **Carpet Flanges**: Designed to secure the floor box in carpeted areas, ensuring a flush and stable installation.
3. **Gasket Seals**: Provide a watertight seal to prevent moisture and debris from entering the box, essential for maintaining safety and functionality.
4. **Adjustable Height Rings**: Allow for height adjustments to accommodate different floor thicknesses, ensuring the box sits flush with the floor surface.
5. **Divider Plates**: Used to separate different types of wiring within the same box, such as power and data, to prevent interference and maintain organization.
6. **Receptacle Plates**: These plates hold the electrical outlets or data ports in place and are available in various configurations to suit different needs.
7. **Data and AV Modules**: Include connectors for Ethernet, HDMI, USB, and other audio-visual needs, allowing for integrated connectivity solutions.
8. **Power Outlets**: Standard or specialized outlets that can be installed within the floor box to provide electrical access.
9. **Extension Rings**: Used to increase the depth of the floor box, accommodating additional wiring or components.
10. **Mounting Brackets**: Secure the floor box to the subfloor, ensuring stability and proper alignment.
11. **Cord Management Solutions**: Include grommets and cable clamps to organize and protect cords exiting the floor box.
12. **Locking Mechanisms**: Provide security by preventing unauthorized access to the outlets and connections within the box.
These accessories enhance the functionality, safety, and aesthetic integration of electrical floor boxes in various environments.