Call +(254) 703 030 000 / 751 483 999 / 721 704 777
.....Read More
Frequently Asked Questions
What is a strut channel used for?
A strut channel is a structural component used primarily in the construction and electrical industries for mounting, supporting, and connecting lightweight structural loads. These loads can include electrical and plumbing systems, mechanical components, and other equipment. Strut channels are typically made from steel, stainless steel, or aluminum and are characterized by their U-shaped or C-shaped cross-section, which provides strength and flexibility.
The primary use of strut channels is to create a versatile framework that can support various systems and components. They are often used to mount electrical cables, conduit, and piping, providing a neat and organized way to manage these systems. The channels can be easily cut to size and assembled using a variety of fittings and connectors, allowing for quick and efficient installation.
Strut channels are also used in the construction of shelving systems, racks, and other support structures. Their modular nature allows for easy customization and reconfiguration, making them ideal for environments where changes and adjustments are frequently needed. Additionally, strut channels can be used to create support structures for HVAC systems, lighting fixtures, and solar panel installations.
The design of strut channels allows for the use of various accessories, such as brackets, clamps, and nuts, which can be easily attached to the channel's slots. This feature enhances the flexibility and adaptability of the strut channel system, enabling it to accommodate a wide range of applications and load requirements.
Overall, strut channels provide a cost-effective, durable, and versatile solution for supporting and organizing structural and mechanical systems in a variety of settings, from industrial and commercial buildings to residential projects.
How do you install a strut channel?
1. **Plan and Measure**: Determine the location and length of the strut channel needed. Measure the area where the channel will be installed to ensure proper fit and alignment.
2. **Select Materials**: Choose the appropriate strut channel size and material based on the load requirements and environmental conditions. Common materials include galvanized steel, stainless steel, and aluminum.
3. **Cut the Strut Channel**: Use a saw or cutting tool to cut the strut channel to the desired length. Ensure the cuts are straight and smooth to facilitate easy installation.
4. **Mark the Installation Points**: Use a level and measuring tape to mark the points on the wall, ceiling, or floor where the strut channel will be mounted. Ensure the marks are level and evenly spaced.
5. **Drill Holes**: Drill holes at the marked points using a drill bit appropriate for the surface material (e.g., masonry bit for concrete walls). Ensure the holes are deep enough to accommodate the anchors or fasteners.
6. **Install Anchors**: Insert wall anchors or expansion anchors into the drilled holes if mounting on drywall or concrete. This provides a secure base for the strut channel.
7. **Mount the Strut Channel**: Align the strut channel with the drilled holes and secure it using screws or bolts. Use a wrench or screwdriver to tighten the fasteners, ensuring the channel is firmly attached.
8. **Check Alignment**: Use a level to verify that the strut channel is properly aligned and adjust if necessary.
9. **Install Accessories**: Attach any necessary fittings, brackets, or accessories to the strut channel to support pipes, cables, or other components.
10. **Inspect and Test**: Ensure all components are securely fastened and test the installation by applying a load to verify stability and strength.
What are the different types of strut channels?
Strut channels, also known as Unistrut, are versatile structural components used in construction and electrical industries for mounting, bracing, and supporting various systems. They come in several types, each designed for specific applications:
1. **Standard Strut Channel**: The most common type, typically U-shaped with inward-facing lips. It is used for general support and framing applications.
2. **Slotted Strut Channel**: Features pre-punched holes or slots along its length, allowing for easy attachment and adjustment of components without drilling.
3. **Back-to-Back Strut Channel**: Consists of two standard channels welded together back-to-back, providing increased strength and load-bearing capacity.
4. **Half Slot Strut Channel**: Similar to the slotted channel but with slots only on one side, offering a balance between strength and flexibility.
5. **Solid Strut Channel**: Lacks slots or holes, providing maximum strength and rigidity for heavy-duty applications.
6. **Deep Strut Channel**: Has a deeper profile for enhanced load-bearing capacity, suitable for supporting heavier equipment.
7. **Shallow Strut Channel**: Features a shallower profile, ideal for lighter loads and applications with space constraints.
8. **Stainless Steel Strut Channel**: Made from stainless steel for corrosion resistance, used in environments exposed to moisture or chemicals.
9. **Aluminum Strut Channel**: Lightweight and corrosion-resistant, suitable for applications where weight is a concern.
10. **Fiberglass Strut Channel**: Non-conductive and corrosion-resistant, ideal for electrical applications and harsh environments.
11. **PVC-Coated Strut Channel**: Coated with PVC for additional corrosion resistance and electrical insulation.
These channels can be combined with various fittings, brackets, and accessories to create custom support systems tailored to specific needs.
How do you cut a strut channel?
To cut a strut channel, follow these steps:
1. **Safety First**: Wear safety goggles, gloves, and ear protection to protect against metal shards and noise.
2. **Measure and Mark**: Use a tape measure to determine the desired length of the strut channel. Mark the cutting line clearly with a permanent marker or scribe.
3. **Secure the Channel**: Place the strut channel in a vise or on a stable workbench. Ensure it is clamped securely to prevent movement during cutting.
4. **Choose the Right Tool**:
- **Hacksaw**: Suitable for small jobs or when precision is not critical. Use a blade designed for cutting metal.
- **Reciprocating Saw**: Ideal for quick cuts. Use a metal-cutting blade.
- **Angle Grinder**: Fast and efficient for straight cuts. Equip with a metal cut-off wheel.
- **Band Saw**: Provides precise cuts and is suitable for larger projects.
5. **Cut the Channel**: Align the tool with the marked line. Start cutting slowly to ensure accuracy, then increase speed as needed. Maintain a steady hand to follow the line precisely.
6. **Deburr the Edges**: After cutting, use a metal file or deburring tool to smooth any sharp edges or burrs left on the cut end.
7. **Clean Up**: Wipe down the strut channel to remove any metal filings or dust. Dispose of metal shavings properly.
8. **Inspect the Cut**: Ensure the cut is straight and meets the required specifications. Adjust if necessary.
By following these steps, you can effectively and safely cut a strut channel to the desired length.
What materials are strut channels made from?
Strut channels are typically made from a variety of materials, each chosen for specific properties that suit different applications. The most common materials include:
1. **Steel**: This is the most prevalent material used for strut channels due to its strength and durability. Steel strut channels are often galvanized to enhance their resistance to corrosion. Galvanization involves coating the steel with a layer of zinc, which protects it from rust and extends its lifespan.
2. **Stainless Steel**: For environments where corrosion resistance is paramount, such as in chemical plants or coastal areas, stainless steel is preferred. It offers excellent resistance to rust and corrosion without the need for additional coatings. Stainless steel strut channels are ideal for both indoor and outdoor applications where exposure to moisture or corrosive substances is a concern.
3. **Aluminum**: Lightweight and resistant to corrosion, aluminum strut channels are used in applications where weight is a critical factor. Although not as strong as steel, aluminum provides sufficient strength for many applications while being easier to handle and install due to its lighter weight.
4. **Fiberglass**: In environments where electrical insulation is necessary, fiberglass strut channels are used. They are non-conductive, making them suitable for electrical applications. Fiberglass channels are also resistant to corrosion and chemical exposure, making them ideal for harsh environments.
5. **PVC (Polyvinyl Chloride)**: For applications requiring non-metallic materials, PVC strut channels are used. They offer good resistance to chemicals and moisture and are non-conductive, making them suitable for electrical installations.
Each material offers distinct advantages, and the choice depends on factors such as environmental conditions, load requirements, and specific application needs.
How do you connect strut channels together?
To connect strut channels together, follow these steps:
1. **Select the Appropriate Fittings and Connectors**: Choose the right fittings such as brackets, plates, or angle connectors based on the configuration and load requirements. Common connectors include flat plates, L-brackets, and T-connectors.
2. **Align the Strut Channels**: Position the strut channels in the desired configuration. Ensure they are properly aligned to maintain structural integrity and load distribution.
3. **Use Spring Nuts or Channel Nuts**: Insert spring nuts or channel nuts into the open side of the strut channel. These nuts are designed to fit snugly within the channel and provide a secure point for fastening.
4. **Position the Connector**: Place the chosen connector over the aligned strut channels. Ensure the holes in the connector align with the nuts inside the channels.
5. **Insert Bolts**: Insert bolts through the holes in the connector and into the channel nuts. Use the appropriate size and grade of bolts to ensure a secure connection.
6. **Tighten the Bolts**: Use a wrench or socket to tighten the bolts. Ensure they are tightened to the recommended torque specifications to prevent loosening under load.
7. **Check Alignment and Stability**: After tightening, check the alignment and stability of the connected strut channels. Make any necessary adjustments to ensure the assembly is secure and level.
8. **Add Additional Supports if Needed**: For longer spans or heavier loads, additional supports or braces may be required to maintain structural integrity.
By following these steps, you can effectively connect strut channels to create a robust and versatile support system for various applications.
What accessories are available for strut channels?
Strut channels, commonly used in construction and electrical industries for supporting structures, have a variety of accessories to enhance their functionality and adaptability. These accessories include:
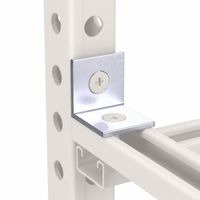
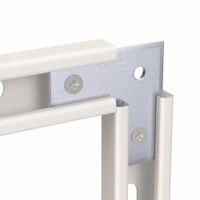
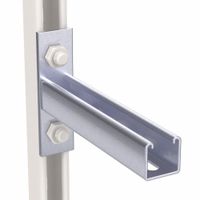
1. **Brackets and Fittings**: These are used to connect strut channels at various angles and configurations. Common types include L-brackets, T-brackets, and corner brackets.
2. **Nuts and Bolts**: Specially designed channel nuts and bolts are used to secure components within the strut channel. They often have a spring mechanism for easy installation.
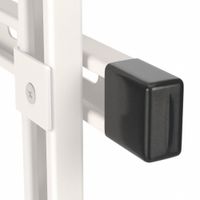
3. **End Caps and Covers**: These are used to protect the ends of the strut channels and provide a finished look. They also help in preventing debris from entering the channel.
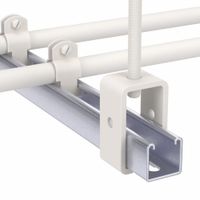
4. **Clamps and Hangers**: Pipe clamps, conduit hangers, and cable clamps are used to secure pipes, conduits, and cables to the strut channel.
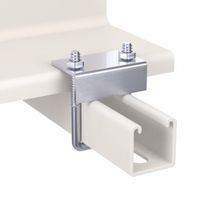
5. **Beam Clamps**: These are used to attach strut channels to beams or other structural elements without drilling or welding.
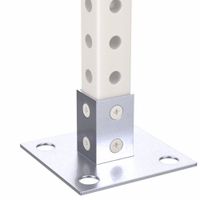
6. **Post Bases and Feet**: These provide a stable base for vertical installations of strut channels, often used in free-standing structures.
7. **Splice Plates**: Used to join two sections of strut channel end-to-end, ensuring alignment and structural integrity.
8. **Spring Nuts**: These are inserted into the channel and provide a threaded hole for attaching other components.
9. **Threaded Rods and Couplers**: Used for suspending strut channels from ceilings or other structures, often in conjunction with beam clamps.
10. **Channel Joiners**: These are used to connect two channels side-by-side or at various angles.
11. **Insulators and Cushions**: These provide electrical insulation and vibration damping for components mounted on the strut channel.
These accessories allow for versatile and customizable installations, making strut channels a popular choice for various structural and support applications.