Call +(254) 703 030 000 / 751 483 999 / 721 704 777
- Home
- Adhesives Sealants And Tape
- Tape
- Masking Tape Painter S Tape Dispensers
- Painter S Tape Tape Shapes Dispensers
.....Read More
Frequently Asked Questions
What is painter's tape used for?
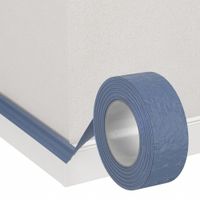
Painter's tape is a type of pressure-sensitive tape made of a thin and easy-to-tear paper, and an easily released pressure-sensitive adhesive. It is used mainly in painting to mask off areas that should not be painted. The tape is applied to surfaces to create clean, sharp lines and prevent paint from bleeding onto areas that are not intended to be painted. It is particularly useful for creating borders, stripes, or patterns on walls, ceilings, and other surfaces.
Painter's tape is designed to adhere well to surfaces without causing damage or leaving residue when removed. It is suitable for use on a variety of surfaces, including walls, trim, glass, and metal. The tape can be used for both interior and exterior painting projects.
In addition to its primary use in painting, painter's tape can also be used for other purposes. It can serve as a temporary adhesive for holding items in place, labeling, or even crafting. Its versatility makes it a handy tool in both professional and DIY settings.
Painter's tape comes in different widths and adhesive strengths, allowing users to choose the right type for their specific project needs. Some tapes are designed for delicate surfaces, while others are more robust for outdoor use or rough surfaces.
Overall, painter's tape is an essential tool for achieving professional-looking paint jobs, ensuring precision, and protecting surfaces during painting projects.
How do you apply painter's tape for best results?
1. **Surface Preparation**: Clean the surface thoroughly to remove dust, dirt, and grease. Ensure it is dry before applying the tape.
2. **Choose the Right Tape**: Select a painter's tape suitable for the surface and the type of paint you are using. Consider the tape's adhesion level and the duration it will stay on the surface.
3. **Measure and Cut**: Measure the length needed and cut the tape with a sharp blade or scissors to avoid frayed edges.
4. **Application**: Start at one end and press the tape down gently, unrolling it as you go. Use a straight edge or a level to ensure it is applied in a straight line.
5. **Seal the Edges**: Use a putty knife or a credit card to press down the edges of the tape firmly. This prevents paint from seeping underneath.
6. **Overlap Corners**: When taping corners, overlap the tape slightly to ensure complete coverage and prevent paint bleed.
7. **Remove Bubbles**: Smooth out any bubbles or wrinkles by pressing the tape down firmly with your fingers or a tool.
8. **Paint Application**: Apply paint carefully, using a brush or roller. Avoid overloading the brush to minimize drips.
9. **Timing for Removal**: Remove the tape while the paint is still slightly wet for clean lines. If the paint has dried, score the edge with a utility knife before removing to prevent peeling.
10. **Peel at an Angle**: Pull the tape back on itself at a 45-degree angle to avoid lifting the paint.
11. **Clean Up**: Dispose of the used tape properly and clean any adhesive residue with a damp cloth if necessary.
Can painter's tape be used on all surfaces?
Painter's tape is designed to adhere to a variety of surfaces, but it is not suitable for all. It works well on smooth surfaces like painted walls, glass, metal, and wood, providing clean lines without leaving residue. However, its effectiveness can vary based on the surface texture, material, and condition.
On rough or porous surfaces like brick, concrete, or stucco, painter's tape may not adhere properly, leading to paint bleed or peeling. For delicate surfaces such as wallpaper or freshly painted walls, using a low-tack version is advisable to prevent damage. Surfaces that are dirty, greasy, or dusty can also hinder adhesion, so cleaning is recommended before application.
In high-moisture areas or on surfaces exposed to direct sunlight, the tape's adhesive may degrade, affecting performance. Additionally, some tapes are designed for specific temperature ranges, so extreme heat or cold can impact their effectiveness.
It's important to choose the right type of painter's tape for the specific surface and conditions. Testing a small area first can help ensure compatibility and prevent potential damage.
How long can painter's tape be left on before painting?
Painter's tape can typically be left on a surface for up to 14 days before painting. However, this duration can vary depending on the brand and type of tape used. Some tapes are designed for longer durations and can be left on for up to 60 days. It's important to check the manufacturer's instructions for specific guidance. Leaving the tape on for too long can result in adhesive residue or difficulty in removal, potentially damaging the surface. For best results, apply the tape to a clean, dry surface and press it down firmly to ensure a good seal. Remove the tape shortly after painting, while the paint is still slightly wet, to achieve clean lines and prevent peeling.
What is the difference between painter's tape and masking tape?
Painter's tape and masking tape are both pressure-sensitive tapes used for masking off areas, but they have distinct differences in composition and application.
Painter's tape is specifically designed for painting projects. It is made with a special adhesive that allows it to be removed cleanly without leaving residue, even after being applied for several days. This tape is often made with a crepe paper backing that is resistant to paint bleed-through, ensuring sharp, clean lines. Painter's tape is available in various widths and is often blue or green, making it easily distinguishable. It is ideal for use on delicate surfaces like freshly painted walls, wallpaper, or wood trim.
Masking tape, on the other hand, is a more general-purpose tape. It is typically made with a rubber-based adhesive that can leave residue if left on surfaces for too long. Masking tape is usually beige or off-white and is less expensive than painter's tape. It is suitable for short-term projects where precision is not as critical, such as bundling items or labeling. However, it is not as effective in preventing paint bleed and can tear easily, making it less ideal for detailed painting work.
In summary, the main differences lie in their adhesive properties, residue potential, and suitability for specific tasks. Painter's tape is designed for clean removal and precision in painting, while masking tape is more versatile but less specialized, often leaving residue and not providing as clean a line.
How do you prevent paint from bleeding under painter's tape?
To prevent paint from bleeding under painter's tape, follow these steps:
1. **Surface Preparation**: Ensure the surface is clean, dry, and free of dust or debris. This helps the tape adhere properly.
2. **Choose the Right Tape**: Use high-quality painter's tape designed for the specific surface you're working on. Different tapes are available for walls, trim, and delicate surfaces.
3. **Apply Tape Correctly**: Press the tape down firmly along the edges using a putty knife or a similar tool to ensure a tight seal. Avoid stretching the tape as it can lead to gaps.
4. **Seal the Edges**: Before painting, apply a thin layer of the base wall color along the edge of the tape. This seals the tape and prevents the new paint color from seeping underneath.
5. **Use Minimal Paint**: Avoid overloading the brush or roller with paint. Excess paint can seep under the tape. Apply paint in thin layers.
6. **Paint Away from the Tape**: When using a brush, paint away from the tape edge rather than towards it to minimize the risk of pushing paint under the tape.
7. **Remove Tape at the Right Time**: Remove the tape while the paint is still slightly wet for a cleaner edge. Pull the tape back on itself at a 45-degree angle to avoid lifting the paint.
8. **Consider a Clear Glaze**: For extra protection, apply a clear glaze or a thin layer of clear acrylic medium over the tape edge before painting.
By following these steps, you can achieve clean, sharp paint lines and prevent bleeding under the tape.
Are there dispensers available for painter's tape?
Yes, dispensers are available for painter's tape. These dispensers are designed to make the application of painter's tape more efficient and precise. They typically feature a handle for easy grip and a cutting edge to neatly slice the tape. Some dispensers are handheld, allowing for quick application along edges and surfaces, while others are designed to be mounted or placed on a flat surface for stability. These tools help in maintaining consistent tension and alignment, reducing the risk of tape tearing or misalignment. Dispensers can accommodate various widths of painter's tape, making them versatile for different projects.

