Sanding Block Guide: How to Choose and Use the Right One
By Tracey Gold · 29 July 2026
A sanding block is the cheapest thing in the abrasives aisle. It is also the item that decides whether your finish looks flat or wavy.
Wrap paper around your fingers and you leave dips and finger marks. Wrap the same paper around a block and the abrasive stays flat.
This guide covers the main sanding block types, how to match one to a material, and the dust controls that keep hand sanding safe.
Why a Sanding Block Beats Folded Paper
Flatness is the whole point
Bare fingers are soft, so they follow every hollow instead of cutting it away. A rigid sanding block does the opposite.
It bridges the low spots and cuts the high ones, which is how a surface becomes truly flat.
Pressure spreads instead of piling up
Finger pressure lands in four narrow strips. That burns through the grit in those strips first, while the rest of the sheet stays sharp and unused.
- Even wear means the abrasive dulls across the whole face rather than in stripes. - Sheets last longer, so the consumable cost of a job drops.
- Consistent scratch depth matters before stain, primer or clear coat.
- Crisp edges survive, because a flat face cannot round a corner over.
The Main Sanding Block Types
Cork and rubber blocks
These are the classic flat blocks. Cork gives a slightly forgiving face, while rubber grips the paper harder.
Foam blocks and sanding sponges
Foam blocks carry the abrasive on the block itself. There is no paper to change. They flex around mouldings, spindles and tight radii.
Hook-and-loop and adhesive-backed blocks
These take pre-cut strips that attach and release in seconds, which suits production work where grit changes happen constantly.
Pole-mounted drywall blocks
Drywall blocks are large, light and often mount to a pole. Many now accept a vacuum hose, which matters a great deal for dust.
| Sanding block type | Face | Best for | Abrasive it takes |
|---|---|---|---|
| Cork or rubber | Rigid and flat | Flat wood, filler, primer | Folded sheet |
| Foam block or sponge | Flexible | Mouldings, curves, edges | Bonded to the block |
| Hook-and-loop | Rigid or semi-rigid | Fast grit changes | Pre-cut hook-and-loop strip |
| Adhesive-backed | Rigid | Long flat runs, bodywork | Peel-and-stick roll |
| Drywall or pole block | Large and semi-rigid | Walls and ceilings | Sheet or mesh screen |
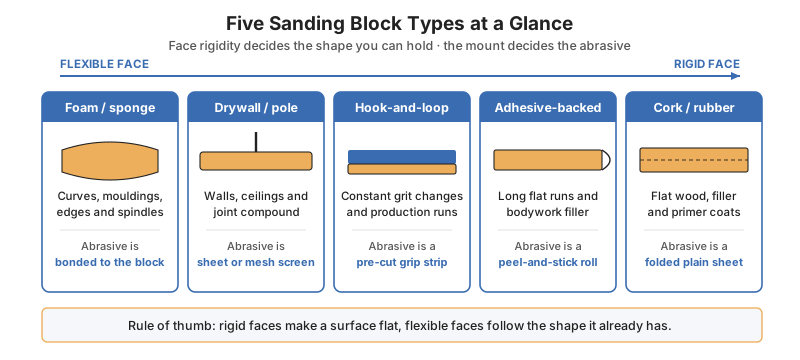
How to read that table
- Block length decides how well a long panel levels out. - A short block follows the dip instead of removing it.
- Block flex decides whether you flatten a shape or follow it.
- Block face decides how fast you can change grits mid-job.
Matching a Sanding Block to the Job
Bare wood and furniture
Use a rigid sanding block on flat panels and a foam block on shaped parts. Work along the grain on the final passes.
Stopping at too fine a grit can close the timber and make it reject stain.
Drywall and joint compound
Joint compound is soft and the area is huge. A large pole-mounted sanding block covers ground quickly without gouging. Light pressure is the rule here, because heavy pressure cuts straight through to the paper facing underneath.
Paint, filler and metal
Bodywork wants a long rigid block, so that filler is levelled rather than dished. Adhesive-backed rolls suit those long blocks well.
Move on to polishing only once the scratch pattern is even across the panel.
- One block per grit stage keeps coarse particles out of your fine work. - A single stray coarse grain will scratch a whole panel.
- A quick brush of the face before every sheet change does the same job.
- A hollow or rounded block should be retired, because it can no longer cut flat.
Grit Pairing and When to Change the Paper
A sanding block does not change what grit does. It only makes the grit behave predictably.
| Stage | Typical grit range | What the sanding block does |
|---|---|---|
| Heavy levelling | Coarse | Removes high spots without digging in |
| Shaping and blending | Medium | Keeps the transition flat and even |
| Pre-finish smoothing | Fine | Leaves a uniform scratch pattern |
| Between finish coats | Very fine | Knocks down nibs without cutting through |
Signs the abrasive is spent
- Cutting slows down even though your pressure has not changed at all. - Most people push harder at this point, which only makes the finish worse.
- The surface starts to shine instead of dulling, which means burnishing.
- Loaded patches appear across the sheet, or it tears at the clamp.
Fresh abrasive is always cheaper than the time lost pushing a worn sheet around a panel. Keep the sanding block in service for years and treat the paper as the running cost.
Dust Control Is Not Optional
What NIOSH measured
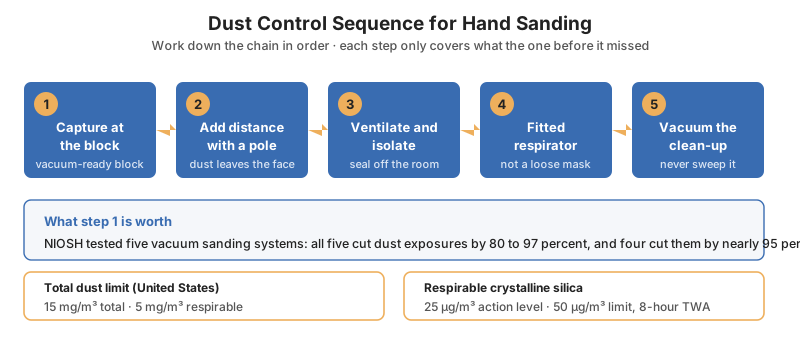
Hand sanding drywall throws a great deal of dust into the air. The National Institute for Occupational Safety and Health has reported drywall sanders exposed to as much as ten times the United States limit of 15 mg/m³ for total dust. The separate limit for respirable dust, 5 mg/m³, was exceeded as well.
That dust is not inert filler, and joint compounds are commonly mixed from several different minerals.
- Talc and calcite.
- Mica and gypsum.
- Crystalline silica, in some compounds.
What actually fixed it
NIOSH tested five vacuum sanding systems: three pole units and two hand units. All five cut dust exposures by between 80 and 97 percent.
Four of the five systems cut exposures by nearly 95 percent, which is the difference between a controlled job and an overexposure.
The silica limits in plain terms
The United States Occupational Safety and Health Administration sets an action level of 25 µg/m³ for respirable crystalline silica in construction, and a permissible limit of 50 µg/m³. Both are measured as eight-hour time-weighted averages.
Other countries publish their own numbers, but the direction of travel is the same everywhere.
Controls that work
- Extraction first, using a vacuum-ready sanding block joined to a dust extractor. - This is the control that produced the large reductions NIOSH recorded.
- Reach instead of lean, because a pole puts distance between the dust and your breathing zone.
- Ventilate and isolate the room, then vacuum the debris rather than sweeping it.
How to Use a Sanding Block Correctly
The working routine
- Mark defects with a pencil so that you can see your progress.
- Fit fresh abrasive squarely, with no slack under the face.
- Start with the coarsest grit the job genuinely needs.
- Use long overlapping strokes and let the block carry the weight.
- Vacuum between grits so that stray coarse particles cannot scratch.
- Step up one grit at a time and check the light across the surface.
Common mistakes
- Heavy pressure loads the abrasive and dishes the surface you are trying to flatten.
- Skipped grits leave deep scratches that only appear once the finish goes on.
- Cross-grain final passes leave marks that stain will magnify.
Backing pads, arbors and mandrels belong to the same family of accessories. They let one abrasive stock feed both hand blocks and powered tools.
Frequently Asked Questions
Is a sanding block better than an electric sander?
They do different jobs. A powered sander removes material faster, while a block gives control on edges and final passes. Most finishers own both and use them on the same project.
Can I use a sanding block on drywall?
Yes, and a large block is the standard tool for it. Use light pressure and connect an extractor wherever you can.
How long does a sanding block last?
The block can last for years, because only the abrasive is consumable. Replace it when the face is no longer flat.
What is the difference between a sanding block and a sanding sponge?
A sanding block holds separate abrasive that you replace. A sponge carries bonded abrasive on flexible foam and is thrown away once it is worn.
Do I need a special sanding block for wet sanding?
Use a block rated for wet work, usually rubber or closed-cell foam, since cork swells and breaks down once it has been soaked repeatedly.
Conclusion
The block is the tool and the paper is the consumable. Choose the sanding block by the shape of the surface first, then pair the grit to the stage. Control the dust from the very first stroke.
A rigid block for flats, a flexible one for curves and a vacuum-ready one for walls will cover most work.
Change the abrasive whenever the cut slows, and one sanding block will outlast hundreds of sheets.
- Browse sanding abrasives for sheets, discs and rolls.
- Browse abrasive accessories for blocks, backing pads and mandrels.
- Browse buffing and polishing for the stage that follows sanding.
Related Posts

Dent Puller Guide: How to Choose the Right Dent Puller