Torque Wrench Guide: How to Choose the Right One for Every Job
By Kasia Olejarczyk · 28 July 2026
Almost every torque wrench on the market is built to one international standard, and almost nobody buying one has read it. That is a shame, because the standard already answers the questions buyers ask.
Which type, and which class. How far the tool is allowed to be wrong, and when it has to go back for checking. ISO 6789 sets all four.
This guide walks that standard back into plain language, in the order the decision actually gets made. Read it once and a spec sheet stops being marketing copy.
Everything below comes from the standard itself.
What a Torque Wrench Is Actually For
Torque is a stand-in for clamp load
The number that matters in a bolted joint is clamp load, and no torque wrench measures it directly. Torque is the cheap, practical stand-in for it.
Because it is only a stand-in, the whole chain has to be controlled.
- Friction runs the show. Thread condition and lubrication move the clamp load you get from any given torque figure.
- The tool is one link. A torque wrench controls what you apply, not what the joint ends up holding. - This is why procedures name a torque figure and a thread condition together.
- Repeatability is the real product. Two fitters on two shifts should reach the same result.
Why guessing goes wrong in both directions
Without a torque wrench, guessing fails in both directions. Under-tighten and the joint works loose under load, and over-tighten and you stretch the fastener past its useful range.
- Feel is not a method, and no amount of experience makes an arm calibrated.
- A torque wrench sets a repeatable ceiling rather than a perfect clamp load.
- Controlled tightening gets written into procedures precisely because judgement varies. - That is also why the tool itself has to be certified against a standard.
Type I and Type II: How the Standard Splits Torque Wrenches
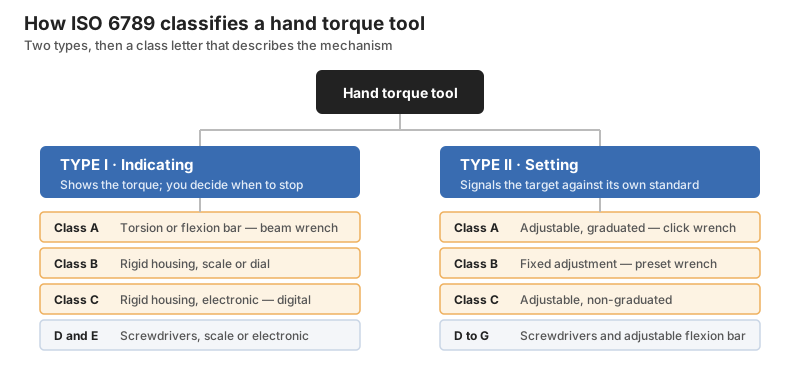
ISO 6789-1 divides every hand torque tool into two types. The split is about what the tool does when you reach the target value.
Indicating tools show the torque
A Type I tool indicates the torque being applied, through a mechanical scale, a dial or an electronic display. You read the value as it climbs, and you decide when to stop. Nothing in the tool intervenes.
- Beam wrenches are the simplest members of this family.
- Dial and digital wrenches sit here too, with far better resolution.
- The operator is the control, which suits checking and auditing work.
Setting tools stop you at the torque
A Type II tool senses the applied torque by comparing it with a self-contained standard inside the tool. The familiar click wrench sits here, and so does every preset tool.
- The tool signals the target by breaking, clicking or slipping.
- Adjustable versions carry a graduated scale or a display.
- Preset versions are fixed at one value and are not user-adjustable.
The class letters matter more than the badge
Under each type the standard runs a set of class letters, and they describe the mechanism rather than the brand name.
- Type I Class A is the torsion or flexion bar wrench, the plain beam design.
- Type I Classes B and C are rigid-housing wrenches with a scale or dial, or with electronic measurement.
- Type II Class A is the adjustable graduated wrench most people picture.
- Type II Class B is fixed adjustment, set once at the factory. - Classes D through G cover screwdrivers and adjustable flexion bar wrenches.
| Standard label | What it means | Common name |
|---|---|---|
| Type I, Class A | Torsion or flexion bar, reads on a pointer | Beam torque wrench |
| Type I, Class B | Rigid housing with scale or dial | Dial torque wrench |
| Type I, Class C | Rigid housing, electronic measurement | Digital torque wrench |
| Type II, Class A | Adjustable, graduated or with display | Click torque wrench |
| Type II, Class B | Fixed adjustment, not user set | Preset torque wrench |
Torque Wrench Accuracy: What the Standard Permits
It is deviation, not accuracy
The standard is blunt about the word everyone uses. It notes that "accuracy" is still used in place of maximum permissible deviation, and that this is not technically correct. Accuracy is not a quantity, so it carries no numerical value.
What a torque wrench datasheet really quotes is the maximum permissible relative deviation.
The dividing line sits at 10 N·m
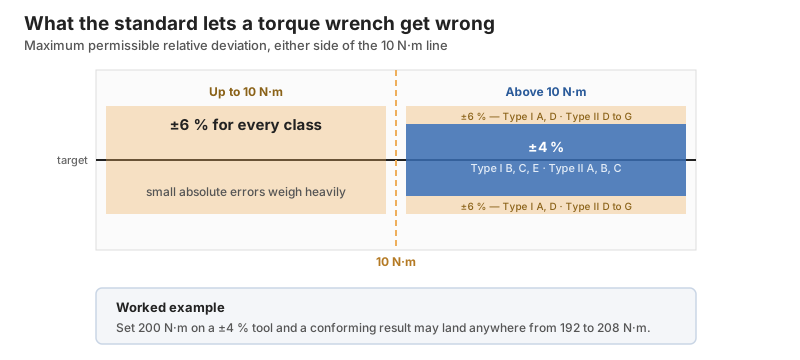
Below that figure the standard is more forgiving, because small absolute errors weigh heavily in percentage terms.
Above it, the better classes have to hold a tighter band. That single line explains most of the price difference between two torque wrenches that look identical.
| Type and class | Up to 10 N·m | Above 10 N·m |
|---|---|---|
| Type I, Classes A and D | ±6 % | ±6 % |
| Type I, Classes B, C and E | ±6 % | ±4 % |
| Type II, Classes A, B and C | ±6 % | ±4 % |
| Type II, Classes D, E, F and G | ±6 % | ±6 % |
A maker may claim a tighter figure than the table, and every test result then has to fall inside that claim. A tool that works in both directions has to meet its limit in each direction.
Drive Size Sets a Torque Wrench Ceiling
The square drive caps a torque wrench
The standard ties the maximum torque of a torque wrench to its output drive size. A bigger job therefore needs a bigger drive, not a longer pull on the same one.
| Square drive | Common name | Maximum torque |
|---|---|---|
| 6,3 mm | 1/4 inch | 30 N·m |
| 10 mm | 3/8 inch | 135 N·m |
| 12,5 mm | 1/2 inch | 340 N·m |
| 20 mm | 3/4 inch | 1 000 N·m |
| 25 mm | 1 inch | 2 100 N·m |
Marked range matters as much as capacity
A graduated tool is specified from its lowest marked value up to its full maximum, so buy for the band you work in rather than the top number. Scale increments are capped at 5 % of that maximum, which tells you how finely you can really set it.
- Pick a torque wrench whose band brackets your target, rather than one that merely reaches it.
- Watch the bottom of the range, because a big wrench used at its floor is the classic mistake.
- On electronic tools the usable range is whatever the maker specifies, not the whole display.
Looking After a Torque Wrench
Cycles are designed in, and so is drift
Conformance testing runs every torque wrench through 5 000 cycles in each working direction, at a rate between 5 and 20 cycles a minute. It must still hold its deviation limit afterwards. Tools also face an overload test at 125 % of maximum torque, three times in each direction.
That tells you two useful things at once. The tool is built to be worked hard, and the mechanism is expected to drift as it goes.
Calibration is a separate document
Part 1 of the standard covers design and manufacture, and it deliberately dropped the old requirement for a calibration certificate. Traceable calibration now lives in Part 2, which also sets out how uncertainty is calculated.
- Ask for the declaration of conformance when you buy the tool.
- Ask for a traceable certificate separately, when the work needs one.
- Set a written recalibration interval tied to use rather than to the calendar alone.
Extensions and flexible heads change the answer
Makers have to test how changing geometry affects torque output, including flexible head ratchets and extension bars meant to reduce operator effort.
- The effect must be published, so read the instruction sheet before adding anything.
- A flexible head moves the effective length and therefore the delivered torque.
- Extension bars are not free, whatever the workshop tells you. - When in doubt, check the figure with the head straight and the socket square.
Frequently Asked Questions About Torque Wrenches
Which torque wrench type should I buy?
For general controlled tightening, a Type II adjustable graduated wrench, which is the everyday click type. Choose an indicating Type I tool when you need to watch the value climb rather than be stopped at it.
Is a click torque wrench better than a beam?
On deviation, usually yes, by the standard's own tables. A click wrench sits in Type II Class A at ±4 % above 10 N·m, while a beam wrench sits in Type I Class A at ±6 % throughout.
What does ±4 % actually mean on a joint?
It is the furthest the tool may sit from the value you set, measured against that target. On a 200 N·m setting a conforming tool may land anywhere between 192 and 208 N·m. Whether that matters is a question about the joint, not about the tool.
Do I have to wind a click wrench down after use?
Follow the maker's instruction sheet, because designs differ on this. What the standard does establish is that the mechanism is a wearing item, tested over thousands of cycles and expected to drift.
How often does a torque wrench need calibration?
There is no single interval written into the standard. Set one from how hard the tool works and how critical the joints are, and use a traceable calibration where the joint really matters.
Can I use an extension bar on a torque wrench?
Only if you know what it does to the reading. The maker has to test and publish the effect of flexible heads and extension bars, so the answer is in the paperwork rather than in the workshop.
Conclusion: Buy the Class, Not the Badge
Start with the type, because indicating and setting tools solve different problems. Then read the class letter, which tells you both the mechanism and the deviation band you are entitled to. After that the choice narrows quickly.
Drive size caps your torque, and the marked range decides where the tool is honest.
The calibration paperwork decides whether anyone else will accept your number. A torque wrench chosen that way costs no more than one chosen off a picture, and it will still be right in three years.
Related categories on EYBY:
- Browse hand tools for wrenches, spanners and drivers.
- Compare sockets and bits for drives, adapters and impact sockets.
- Review measuring and layout tools for the wider measurement kit.
Related Posts
Welding Helmet Guide: How to Choose the Right One for Every Job
Test Instruments - Sound Meter